Tronic TLG 400 B2 handleiding
Handleiding
Je bekijkt pagina 11 van 42
■ 8
│
GB
│
CY
Note
► If, despite this, the pouch is pulled in at an
angle, use the
Anti-blocking switch
ABS
0
as described in the Anti-blocking switch
(ABS) section.
2) When you have slid the pouch several
centimetres into the slot for manual pouch
insertion
9 it will automatically be pulled in
the rest of the way. Release the laminating
pouch as soon as you notice that it is being
pulled in automatically.
3) The finished laminating pouch is ejected
from the pouch output r of the laminator.
Note
► Only after hot lamination: When the
finished laminating pouch is ejected from
the pouch output
r of the laminator, it is
hot and can easily change its shape. For this
reason, let the laminating pouch cool down
for a minute before touching it.
► To improve the lamination result, you can
weigh down a still hot laminating pouch with
a book, a file folder or any other heavy,
flat object. This will help ensure a smooth,
perfect surface.
4) If you do not want to start another laminat-
ing process, press the On/Off switch I/O
w to switch off the appliance. The corre-
sponding LED 6/7/8 turns off.
5) Fold in the pouch support
e.
6) Pull the plug out of the mains socket.
Anti-blocking switch (ABS)
Note
► At the start of the lamination process, the
laminating pouch may be pulled in at an
angle or jam itself inside the appliance.
1) Press and hold the Anti-blocking switch ABS
0
. The pouch will no longer be drawn in.
2) Remove the laminating pouch from the
manual pouch insertion
9 and release the
Anti-blocking switch
ABS
0.
3) Re-start the lamination process.
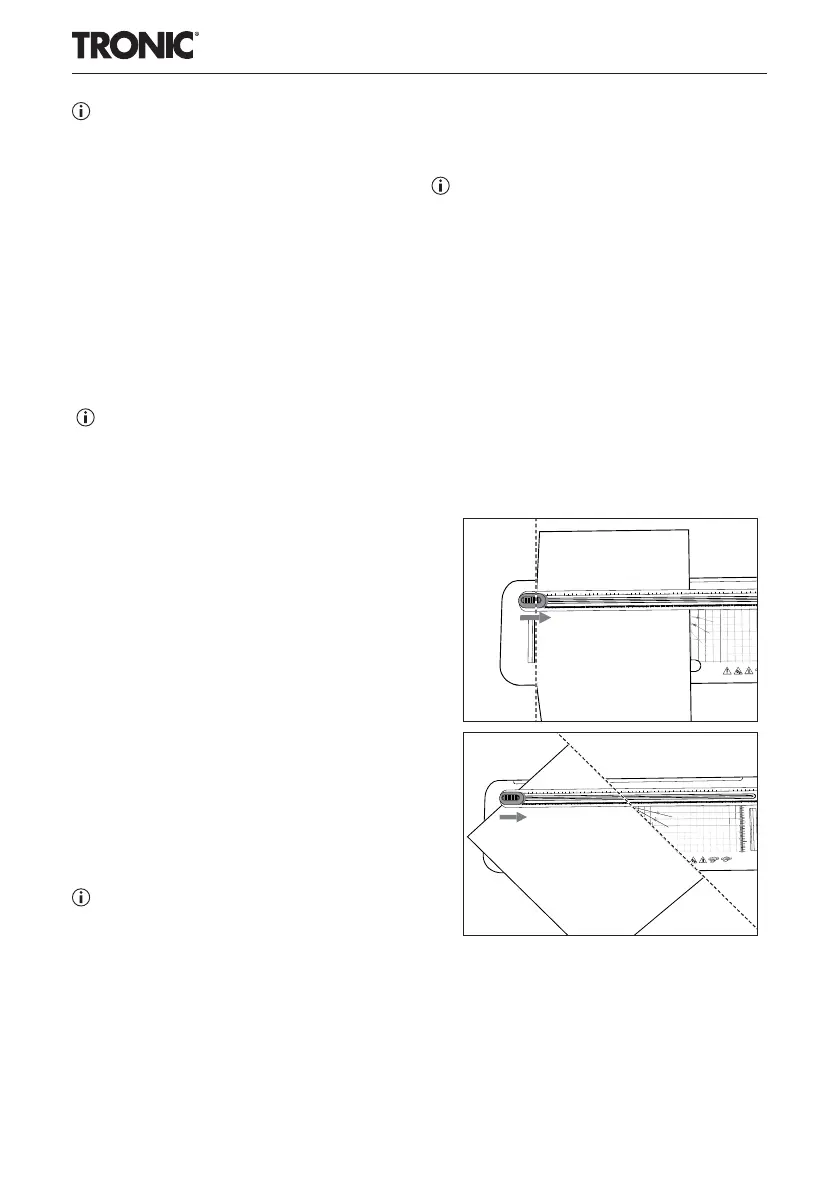
Cutting function
Note
► Do not cut pouches until after lamination.
► When cutting documents, strips of paper
may sometimes remain in the cutting rail
4
that are difficult to remove.
1) Slide the cutting head
1 as far as it will go.
The cutting head 1 can be pushed to both
ends of the cutting rail 4.
2) Feed the paper/pouch under the cutting
rail 4.
3) Use the markings on the cutting ruler
3 to
precisely align the paper/pouch if you want
to shorten or cut at an angle, for example
(see Fig. 3 and 4).
1
2
3
4
6
5
7
8
9
10
11
12
13
14
15
16
17
18
19
20
21
0
1
2
34
6
5
7
8
9
10
11
12
22
23
24
25
26
27
28
29
30
3
0
Fig. 3
1
2
3
4
6
5
7
8
9
10
11
12
13
14
15
16
17
18
19
20
21
0
1
2
34
6
5
7
8
9
10
11
12
15
14
13
22
23
24
25
26
27
28
29
30
31
32
33
34
35
36
37
38
0
1
2
7
8
Fig. 4
4) Hold the paper/pouch firmly in place with
one hand.
5) To cut, press the cutting head
1 down with
the other hand and slide it along the cutting
rail 4 over the paper/pouch in one go.
IB_480151_2410_TLG400B2_LB6_CY.indb 8 31.01.2025 10:11:19
Bekijk gratis de handleiding van Tronic TLG 400 B2, stel vragen en lees de antwoorden op veelvoorkomende problemen, of gebruik onze assistent om sneller informatie in de handleiding te vinden of uitleg te krijgen over specifieke functies.
Productinformatie
| Merk | Tronic |
| Model | TLG 400 B2 |
| Categorie | Niet gecategoriseerd |
| Taal | Nederlands |
| Grootte | 3990 MB |


