Carrier 39L handleiding
Handleiding
Je bekijkt pagina 24 van 76
24
VFD
When the variable frequency drive (VFD) is factory-installed, it is
wired to the motor and fully tested before shipment. Drive pro
-
gramming is also done at the factory, including electronic over-
load, which is programmed for the motor FLA. Refer to Table 7.
Open the VFD front cover and the fan section access door to
check for any damage before proceeding.
FIELD-WIRING
1. Select a suitable location in the bottom of the VFD to connect
field-supplied power source.
2. Remove the appropriate size knockout using a suitable
knockout punch tool. Do NOT use a drill; metal shavings will
damage the drive.
3. Connect the field-supplied conduit to the VFD enclosure.
4. Refer to the wiring diagram supplied with the VFD connect
the line voltage power source to the line voltage terminals
(L1, L2, L3) as shown.
5. Refer to the factory-supplied voltage warning label and verify
that the power source is correct.
6. Connect the ground wire to the grounding lug provided on the
bottom of the VFD.
7. Select another suitable location on the bottom of the VFD to
connect the field-supplied control wiring.
8. Locate and use one of the unused knockouts on the VFD
housing and connect the control wiring conduit. Refer to
Fig.
22 and 23 for field control wiring connections.
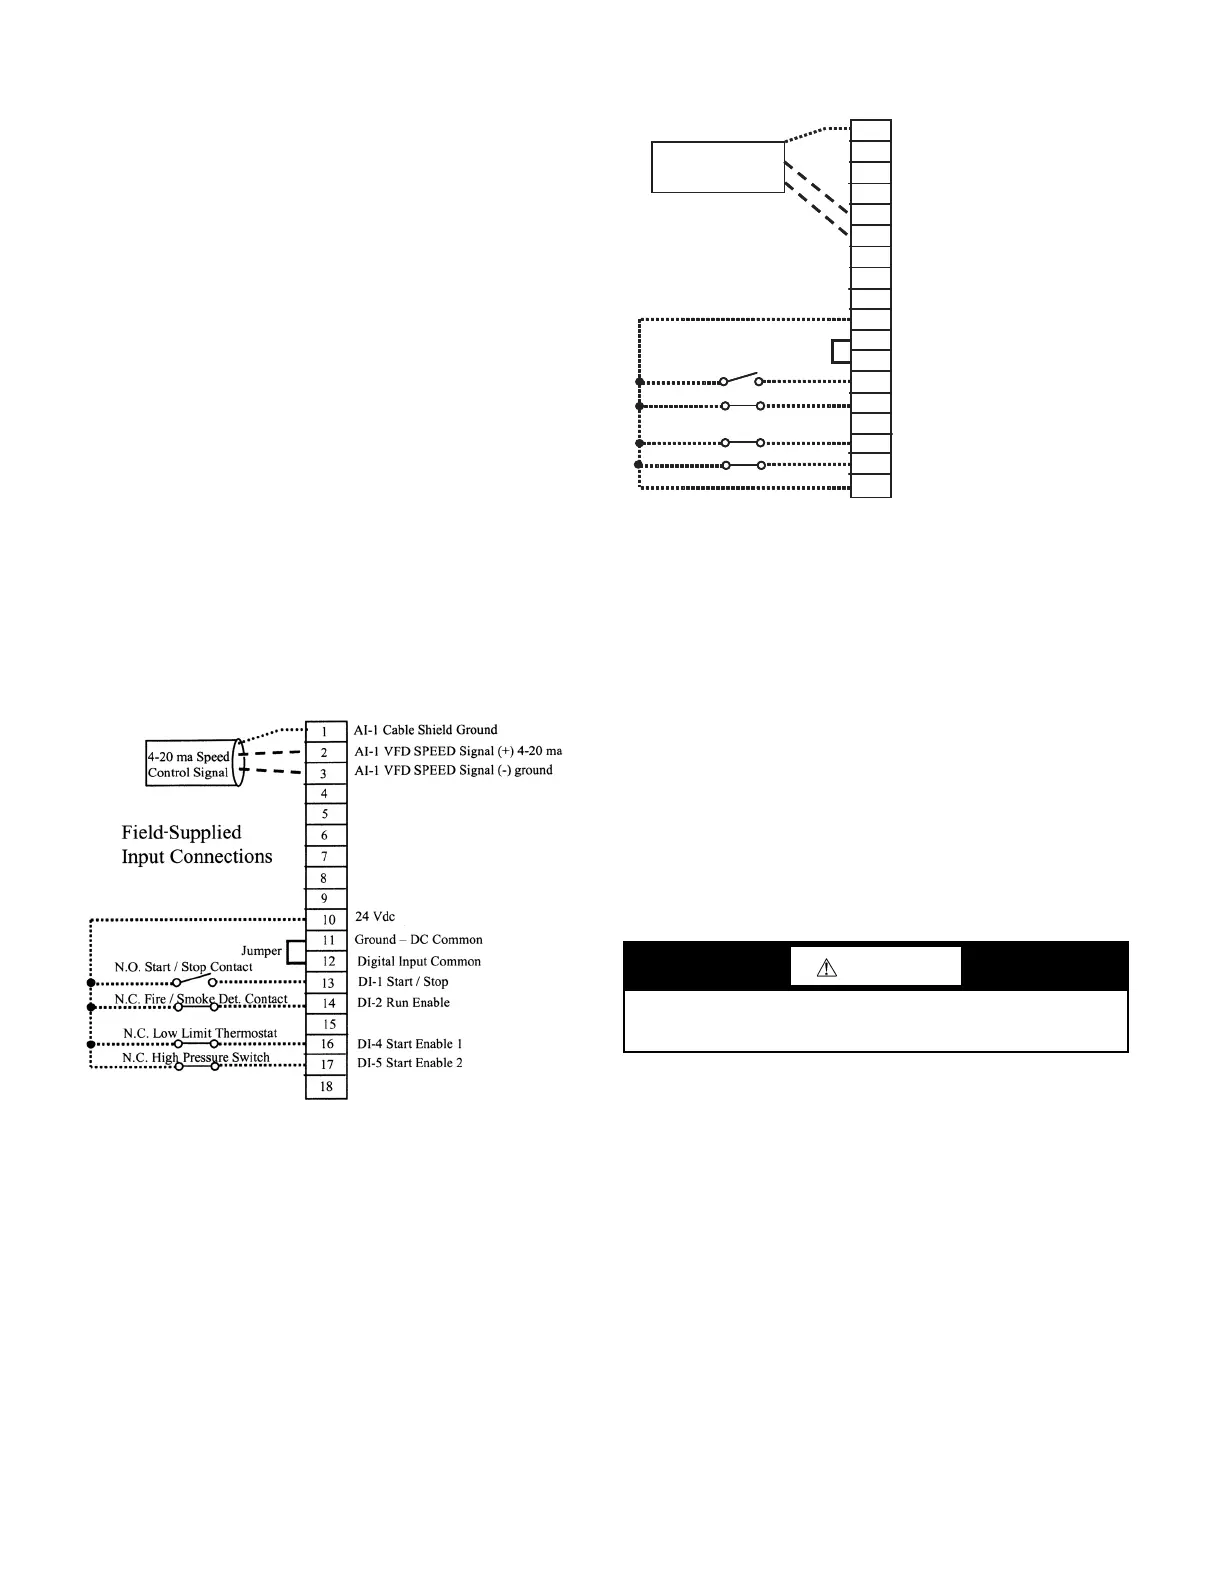
Fig. 22 — Field-Supplied Control Wiring for
VFD Speed Control
Fig. 23 — Field Wiring for Stand-Alone Static
Pressure Control with 4-Wire Static Pressure
Transducer (Voltage Output)
START-UP AND TEST
1. Close and secure the fan access door and the VFD cover.
2. Apply power and allow drive to initialize.
3. If fan is a direct drive type, then ensure VFD has been pro-
grammed with the correct values for parameters 30.12 and
30.14 to maximum fan speed and maximum VFD output fre
-
quency to limit motor speed to the fan maximum.
4. Verify max fan rpm from label on fan sled.
5. Verify motor Hz and nominal operating speed on motor
nameplate.
6. Calculate the maximum frequency output from the VFD.
Maximum frequency = motor frequency (Hz) * fan maxi
-
mum speed (rpm) ÷ motor nominal operating speed (rpm).
7. Verify that parameter 30.12 (maximum fan speed) has been
set to match value on the fan label.
8. Select MENU to enter the main menu.
9. Select PARAMETERS with the UP/DOWN buttons. Select
MODIFIED then press SELECT.
10. Select parameter 30.12 and verify it equals the maximum fan
speed.
11. If values are equal, then go to Step 14.
12. If values are not equal, select EDIT, press the UP/DOWN
buttons to match the required value.
13. Select SAVE to store the modified value.
NOTES:
1. All conductors are no. 22 AWG (American Wire Gage) minimum.
2. Install jumpers if fire/smoke detector, low limit thermostat, or high
pressure switch are not required.
CAUTION
Failure to ensure parameters 30.12 and 30.14 are correct can
result in damage to the fan wheel.
1
2
3
4
5
11
22
33
44
55
6
7
8
9
10
66
77
88
99
1010
11
12
13
14
15
1111
1212
1313
1414
1515
1616
1717
18
Ground – DC Common
Digital Input Common
N.C. Fire / Smoke Det. Contact
N.O. Start / Stop Contact
N.C. Low Limit Thermostat
N.C. High Pressure Switch
24 Vdc
DI-1 Start / Stop
DI-2 Run Enable
DI-4 Start Enable 1
DI-5 Start Enable 2
Field Supplied
Input Connections
* 0-10 v dc
Output Signal
AI-2 Static Pressure Signal (+) 0 - 10 v dc
AI-2 Static Pressure Signal (-) 0 - 10 v dc
AI-2 Cable Shield Ground
+
-
From a Field Supplied 4 Wire
Static Pressure Transducer
DI-6 Internal PID Enable
Jumper
*Acceptable transducer output voltage ranges are 0-10 vdc, 0-5 vdc,
and 2-10 vdc. Default sensor range is 0-10 vdc from factory. Use
parameters 12.29 to configure sensor low voltage and parameter
12.30 to configure sensor high voltage.
NOTES:
1. All conductors are no. 22 AWG (American Wire Gage) minimum.
2. Install jumpers if fire/smoke detector, low limit thermostat, or high
pressure switch are not required.
3. Program static pressure control set point using parameter 40.21
in volts vdc.
Bekijk gratis de handleiding van Carrier 39L, stel vragen en lees de antwoorden op veelvoorkomende problemen, of gebruik onze assistent om sneller informatie in de handleiding te vinden of uitleg te krijgen over specifieke functies.
Productinformatie
| Merk | Carrier |
| Model | 39L |
| Categorie | Niet gecategoriseerd |
| Taal | Nederlands |
| Grootte | 14640 MB |


