Toolcraft TO-9624603 handleiding
Handleiding
Je bekijkt pagina 7 van 9
7
7 Button sound control button 8 Memory access button
9 Power button 10 Measuring reference/unit selection but-
ton
11 Addition button 12 Function selection button
13 Laser aperture 14 End piece
Display indications
Indication Indication
D1 Activated measuring function D6 Activated measurement reference
point
D2 Angle of inclination D7 Laser is activated
D3 Memory mode is activated D8 Single distance measurement
mode is activated
D4 Measured dimensions D9 Battery level indicator
D5 Measurement result
Measurement function indicators
Indication Indication
F1 Distance via 2 reference points F5 Distances via angle (auto level)
F2 Distance via 3 reference points
(partial height)
F6 Area
F3 Distance via 3 reference points
(total height)
F7 Volume
F4 Distance via angle (auto height)
7 Getting started
7.1 Installing batteries
You can operate the product with rechargeable batteries or regular batteries.
Important:
Never recharge non-rechargeable batteries. Never mix rechargeable and non-re-
chargeable batteries.
1. Install 2x AAA batteries/rechargeable batteries as shown in the below diagrams.
2. Attach and lock the battery compartment cover.
Note:
Replace regular batteries or recharge the rechargeable batteries as soon as all segments
of the battery status indicator have gone out.
7.2 Charging rechargeable batteries
If you have installed rechargeable batteries, you can charge them via the USB charging port.
Important:
Never attempt to recharge disposable batteries. There is a risk of explosion!
1. Remove the charging port cover from the charging port.
2. Connect the included USB charging cable to the USB-C® charging port on the product
and the other end to a USB power source.
3. If all segments of the battery indicator light up, disconnect the USB charging cable from
the product.
4. Seal the port with the charging port cover to prevent water and dust from entering.
7.3 Switching on and off
1. Press and hold the power button for approx. 1 second to turn on the product.
à The target laser is active.
2. Press the measure button MEAS deactivate the laser.
3. Press and hold the power button for approx. 1 second to turn off the product.
Note:
The product switches off automatically after 3 minutes of inactivity.
7.4 Switching button sounds on and off
1. Press the button sound control button to enable/disable button sounds.
8 Before you measure
8.1 Setting measurement units
The following units are available: m = meters, ft = foot, in = inch, ---’--” = feet/inches.
1. Repeatedly press and hold the button UNIT for approx. 1 second to select desired the
unit.
à The display shows the selected unit.
8.2 Setting the measurement reference point
By setting the reference point, you determine the starting location from where measurements
are taken.
The selectable reference points are:
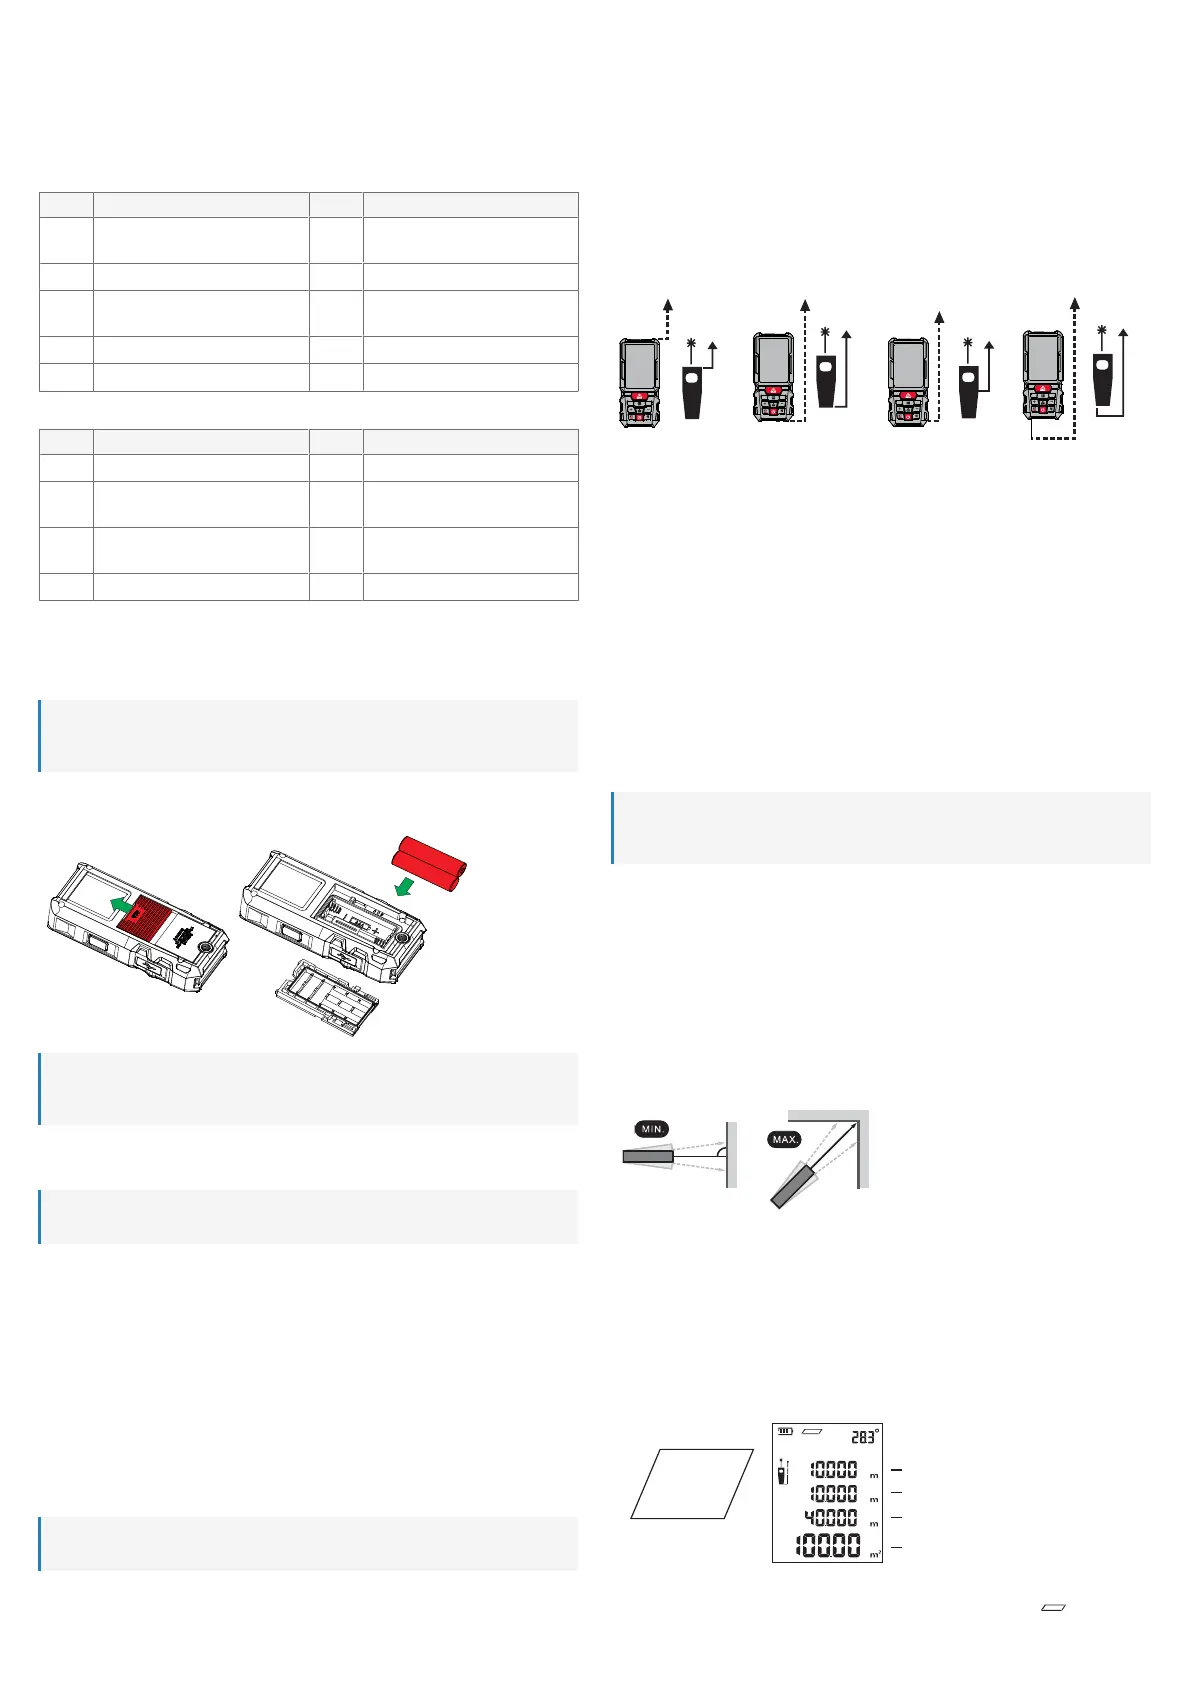
From the front From the rear From the tripod
mount
From the end piece
To select a reference point:
1. Select and set a reference point using the button UNIT.
2. End piece: flip out the end piece to set the end piece as the reference point.
8.3 Understanding measurement accuracy
Measuring errors might occur if you operate the product outdoors. Light refraction and sun
light are sources that cause measurement errors. Perform measurements in suitable condi-
tions.
The following surfaces might falsify measurements:
■
Transparent surfaces (example: glass, water)
■
Reflective surfaces (example: glass, shiny metal)
■
Porous surfaces (example: insulating materials)
■
Structured surfaces (example: rough cast, natural stone)
Tip:
If you are experiencing poor sunlight or inadequate reflection from the object, it is advis-
able to use a target plate or reflector to improve measurement accuracy.
9 Taking basic measurements
9.1 Taking single distance measurements
1. Point the laser at the target at a right angle and hold the product as calm as possible
2. Take a measurement by pressing the measurement button MEAS or the side measure-
ment button MEAS.
à The display shows the measured value.
9.2 Taking continuous distance measurements
With the continous measurement mode, you can repeatedly take measurements simply by
pointing the laser at different locations.
1. Activate the continous measurement mode by pressing and holding the button MEAS for
2 seconds.
à The laser activates and the distances are measured continuously.
à The display shows the maximum, minimum and the latest distance measurement.
2. Freeze measurements by pressing the button MEAS.
3. Return to single distance measuring by pressing the button MEAS.
9.3 Measuring area
Measure the area of a surface based on the properties of a parallelogram.
D1
D1
D1
D2
D2
D2
C
C = 2 x D1 + 2 x D2
A
1. Press the measure button MEAS to activate the laser.
2. Press the function button until the display shows the function indicator .
Bekijk gratis de handleiding van Toolcraft TO-9624603, stel vragen en lees de antwoorden op veelvoorkomende problemen, of gebruik onze assistent om sneller informatie in de handleiding te vinden of uitleg te krijgen over specifieke functies.
Productinformatie
| Merk | Toolcraft |
| Model | TO-9624603 |
| Categorie | Niet gecategoriseerd |
| Taal | Nederlands |
| Grootte | 1542 MB |