Steinberg SBS-THE-600 handleiding
Handleiding
Je bekijkt pagina 22 van 49
42 43
Rev. 22.02.2022
Rev. 22.02.2022
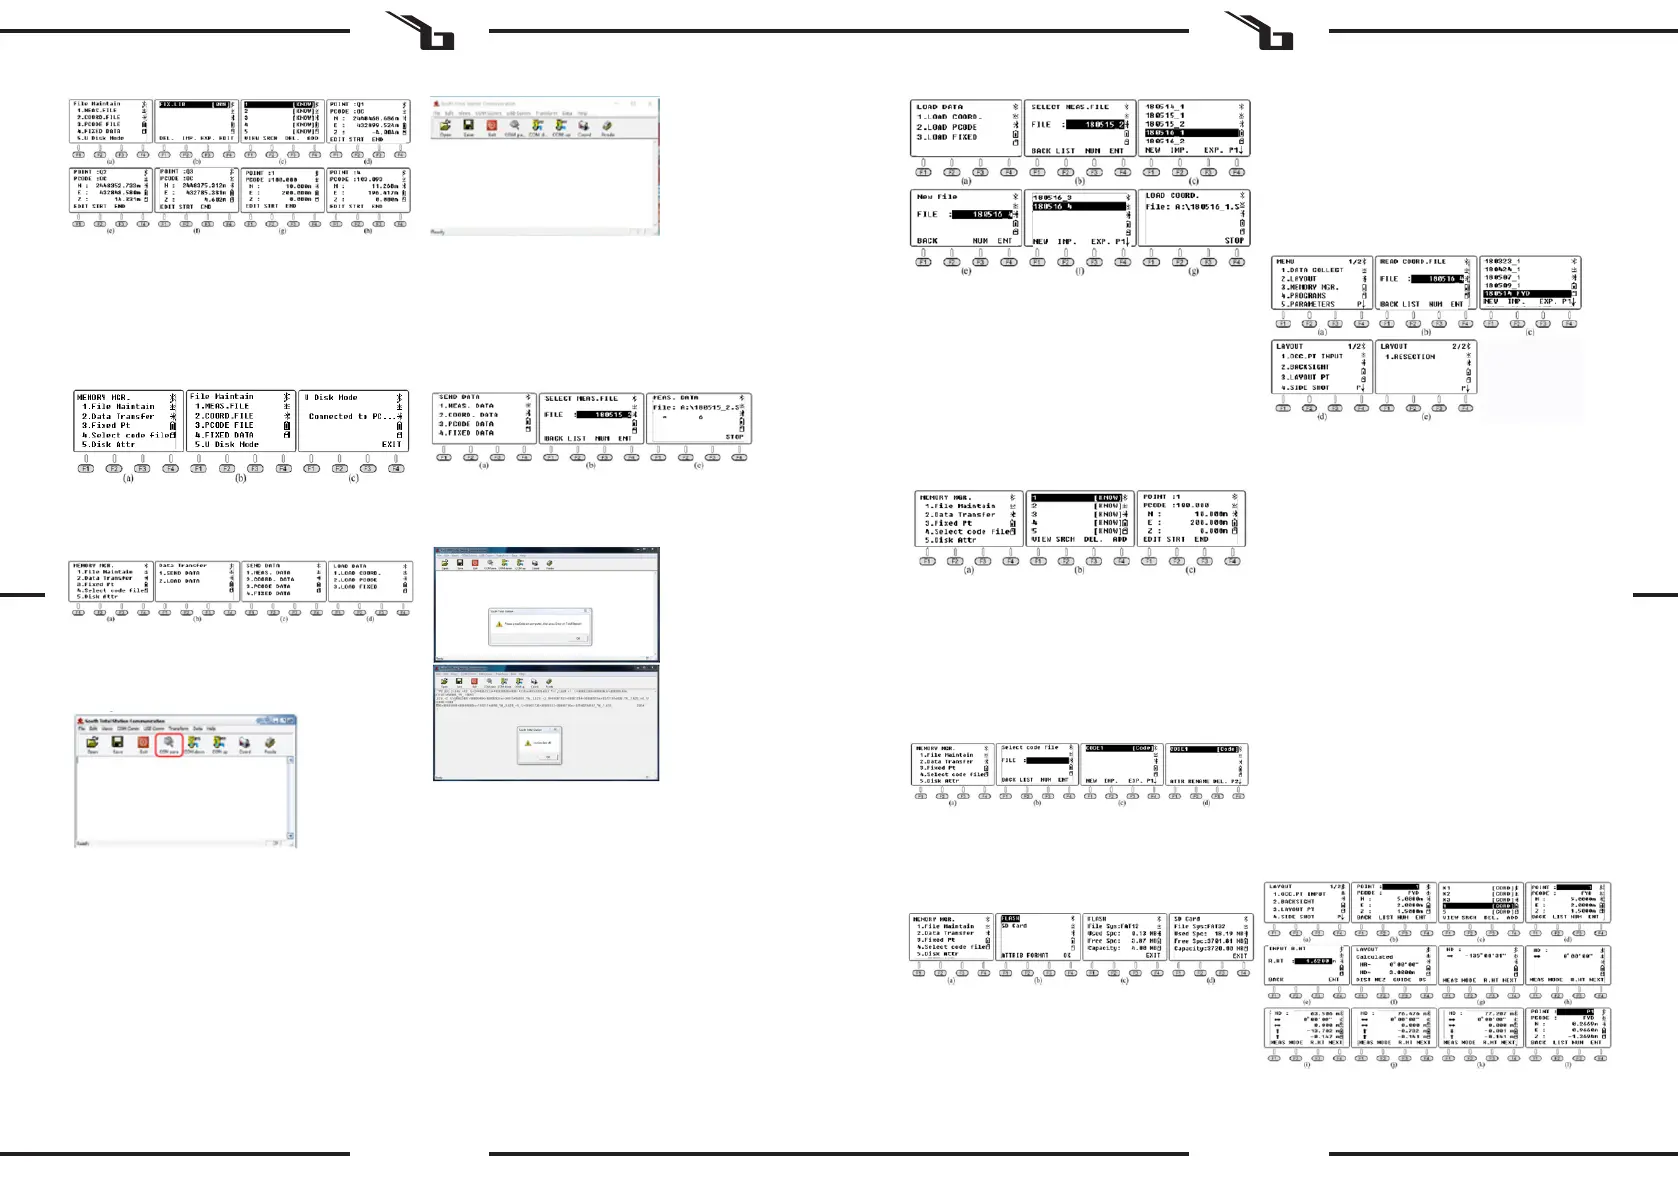
9.6. DATA TRANSFER
Press 2.Data Transfer in the „MEMORY MGR“ menu (g. b),
press 1.SEND DATA or 2.LOAD DAT to send the data (g. c)
or download the data (g. d).
9.6.1. CONNECTION BETWEEN N6 AND PC
A. Via USB
Connect N6 to PC with USB cable, activate the transform
software „NTS-360LNB.exe“. The software looks like in the
picture below:
Click the „COM pair“ button on the toolbar to activate the
connection, the status bar will show the COMM port used
for that connection.
* Windows will ask you to install the driver for the USB
cable after connected. Copy the „Virtual COM Port Driver“
folder to the computer and set the driver as this folder.
Windows will install the driver automatically.
* Also conrm that the baud rate and communication port
match.
B. Via Bluetooth
Click the „Start“ icon on a PC with Windows 10 and
Bluetooth. Select „Setting - Device - Bluetooth“ to open
the Bluetooth connection and search for hardware. Edit the
pairing code as „0000“. Open the data transfer software.
Click the „COMM pair“ button on the toolbar to activate the
connection, the status bar will show the COMM port used
for that connection.
9.6.2. SENDING DATA
The N6 can transfer four types of data to a PC: measurement
data, coordinate data, code data and constant data. The
data is saved in the ash memory in the le format. Before
sending the data, you must activate the transfer software.
Explanatory example:
Press 1.MEAS DATA to select the le (g. b), the screen will
show the latest le name.
Click the „COM down“ button on the PC before pressing
F4 ENT on the N6 to send the selected le. Click the „Save“
button to save the le after receiving data from the total
station.
9.6.3. LOADING DATA
The N6 can transfer three kinds of data from a PC:
coordinates, code and constant data. You must select the
le and turn on the data loader before converting.
Sending data on the example of coordinate data:
1. Activate the software, click the „Folder“ button and
select the „4points.csv“ le. Then click the „COM up“
button.
2. Press the 1.LOAD COORD button. Go to the „LOAD
DATA“ menu (g. a) and enter the le selection page
(g. b). Press F2 LIST, F1 NEW and F4 ENT to create
a new le with the current date. Move the cursor to
the new le (g. e). Press ENT to conrm the data
loading (g. f).
3. Click „OK“ button on the PC to activate the software,
the device will show the data loading process in real
time (g. g). After nishing the process, the device
will return to the „LOAD DATA“ interface (g. H).
* The point name in FIX.LIB should not be repeated.
Otherwise, the system will cover the points exited.
9.7. EDITING THE KNOWN COORDINATES
Press 3.Fixed Pt under „MEMORY MGR“ to enter the point
list (g. b), the steps are completely the same as in section
9.3. Move the cursor to the point to be edited, press F1
VIEW to check the coordinates and press F1 EDIT to edit
the selected point.
A maximum of 200 points can be saved in the FIX.
LIB coordinate le. if the name of the newly imported
points is the same as the existing points, the system will
automatically cover the existing points without notication
for each point.
9.5. U DISK MODE
Press the 5.U Disk Mode button in the „File Maintain“ menu
(g. b).
9.8. SELECTING THE CODE FILE
Press 4.Select code le in the „MEMORY MGR“ menu (g.
a) to enter the le selection interface (g. b). Press F2 LIST
to display the code list (g. c). Click on F4 to go to the next
page. The meaning of the F1-F4 function keys is the same
as in chapter 9.1.
The only dierence is that when the cursor remains in the
code le (g c-d), press ENT to set the selected code le
as the current le before returning to the „MEMORY MGR“
menu (g. a).
9.9. DISK ATTRIBUTE
Press 5.Disk Attr in the „MEMORY MGR“ menu (g. b), the
cursor will default to the rst „FLASH“ line. Press F1 ATTRIB
or ENT to check the ash memory attribute (g. c), the
capacity of N6 is 4.00MB. Press F4 EXIT or ESC to exit. Press
F2 FORMAT to format the USB memory.
10. LAYOUT
The layout function in this chapter is almost the same as the
S.O. (Stake Out) function in the coordinate measurement
tab. Assume that the coordinates of 19 occupied points
have been imported into the“FIX.LIB“ le in the ash
memory, the designed points have been imported into the
„180514_FYD“ le. Press 2.LAYOUT on the rst page of the
menu (g. a) and enter the selection page (g. b). Press
F2 LIST to display the le list (g. c), move the cursor to
„180514_FYD“ and press ENT.
10.1. SETTING AN OCCUPIED POINT AND BACKSIGHT
POINT
The same steps as in chapter 8.3. Setting an occupied point
and backsight point.
10.2. SETTING A LAYOUT POINT
Press 3. Layout PT in the „LAYOUT“ menu (g. b). Press
F2 LIST to enter the list of points (g. d), the cursor will
automatically stay on the rst point (g. c). Press ENT to
display detailed information about the selected point. The
description in this chapter is the same as in chapter 6.2.
Press F4 ENT to input the instrument height (g. e).
Press F4 ENT again, the device will calculate HR and HD
from the occupied point K3 to point 1 (g. f).
Press F3 GUIDE to display the HD between the current
azimuth and the designed azimuth,
• -53 ° 50‘36 „means the equipment should turn right
53° 50‘36“ to the stakeout point (g. h).
Aim and set the prism to the EDM azimuth until the HD
value is 0 ° 00‘00 „. Turn the device vertically to aim at the
center of the target (note that the horizontal angle should
not be moved), press F1 MEAS to measure the distance (g.
i).
Guide the prism and move: -13.702 m. A minus distance
means that the prism should move backward 13.702 m. Aim
at the center of the target and press F1 MEAS again after
the movement has been completed (g. j).
EN EN
Bekijk gratis de handleiding van Steinberg SBS-THE-600, stel vragen en lees de antwoorden op veelvoorkomende problemen, of gebruik onze assistent om sneller informatie in de handleiding te vinden of uitleg te krijgen over specifieke functies.
Productinformatie
| Merk | Steinberg |
| Model | SBS-THE-600 |
| Categorie | Niet gecategoriseerd |
| Taal | Nederlands |
| Grootte | 19988 MB |


