Steinberg SBS-THE-600 handleiding
Handleiding
Je bekijkt pagina 19 van 49
36 37
Rev. 22.02.2022
Rev. 22.02.2022
F1 ALL / P_
To compare the dierence between the actual coordinates
and the designed coordinates between points 1-4, the user
can execute the „ALL“ command to measure and store the
coordinates for the current job.
To do this, export the current les to a USB stick, using
Microsoft-Excel to open the csv le. Compare the dierence
between the actual and the designed coordinates to
double-check the staking out results.
Aim at the prism center on point 1. Press F1 ALL to save the
data (g. a) then press F4 YES to change the name. Measure
the coordinates of the 2/3/4 point as shown in gures c-h.
1. Check the list of points within the current job: Press
F2 S.O in P3. Press F2 1.OCC. PT INPUT and LIST to
display the list (g. C).
2. Export the current job to a USB stick.
Dat and csv les can be used in SOUTH CASS
software; dxf le is a graphics interchange format
that can be recognized by AutoCAD and CASS.
dxf is a graphics interchange format that can be
recognized by AutoCAD and saved in the .dwg
format. The txt les are raw data in the 300 and 600
format.
* The „.dat“ le can be opened by Windows TXT and
the „.csv“ le can be opened by Microsoft EXIT Coord
File Export STN K329 Excel.
6.2. SIDE SHOT
Press F2 S.O in P3. If the view between the occupied point
and the staking point has been obscured, the user can
execute the „Side Shot“ or „Resection“ command to add
the occupied point. Enter the Side Shot menu. Input P1 as
the name of the point, aim at the center of the point. Press
F4 MEAS to measure the coordinates of the P1 point. Then
press F4 YES to save.
Set the total station on P1 and adjust the position. Press
1.OCC. PT INPUT in the stakeout menu, press F2 LIST to
enter the points list. Move the cursor to P1 and press ENT
to view the details. Press F4 YES and follow the next steps
as in the previous instructions.
6.3. RESECTION
Resection is also known as free station. Set up the total
station on an unknown point, it will calculate the coordinates
of the occupied point by measuring the distance for about
2-7 known points or measuring the angle for 3-7 known
points.
Angle resection
On the second page of the stakeout function, press
1.RESECTION to go to the next page. The coordinate can be
calculated after measuring at least 3 points.
1. Measure the rst known point: Input P1 as the new
station name and the device height (g. b). Press
F4 ENT to go to the measurement page. Input the
known point Q1, press F4. The system will recall the
Q1 coordinate from the list, press F4 OK. Aim at prism
center at point Q1 (g. f). Press F3 ANG to end the
measurement. The system then continues to measure
for the second point.
2. Measure the second known point: as in gures g-j.
3. Measure the third known point as shown in the k-m
gures.
After measuring the Q1 / Q2 / Q3 points, press F1 NEXT
to move to point 4 or press F4 CALC to calculate the
coordinate (g. o). Press F4 NEZ to display the result. Press
F4 YES to save the data to the current job.
Distance resection
In the distance resection method, at least 2 known points
should be included in the calculation of the coordinate. The
steps are similar to the angle resection method. The only
thing to pay attention to is pressing the F4 DIST key after
aiming at the point. The method is similar to the angular
resection.
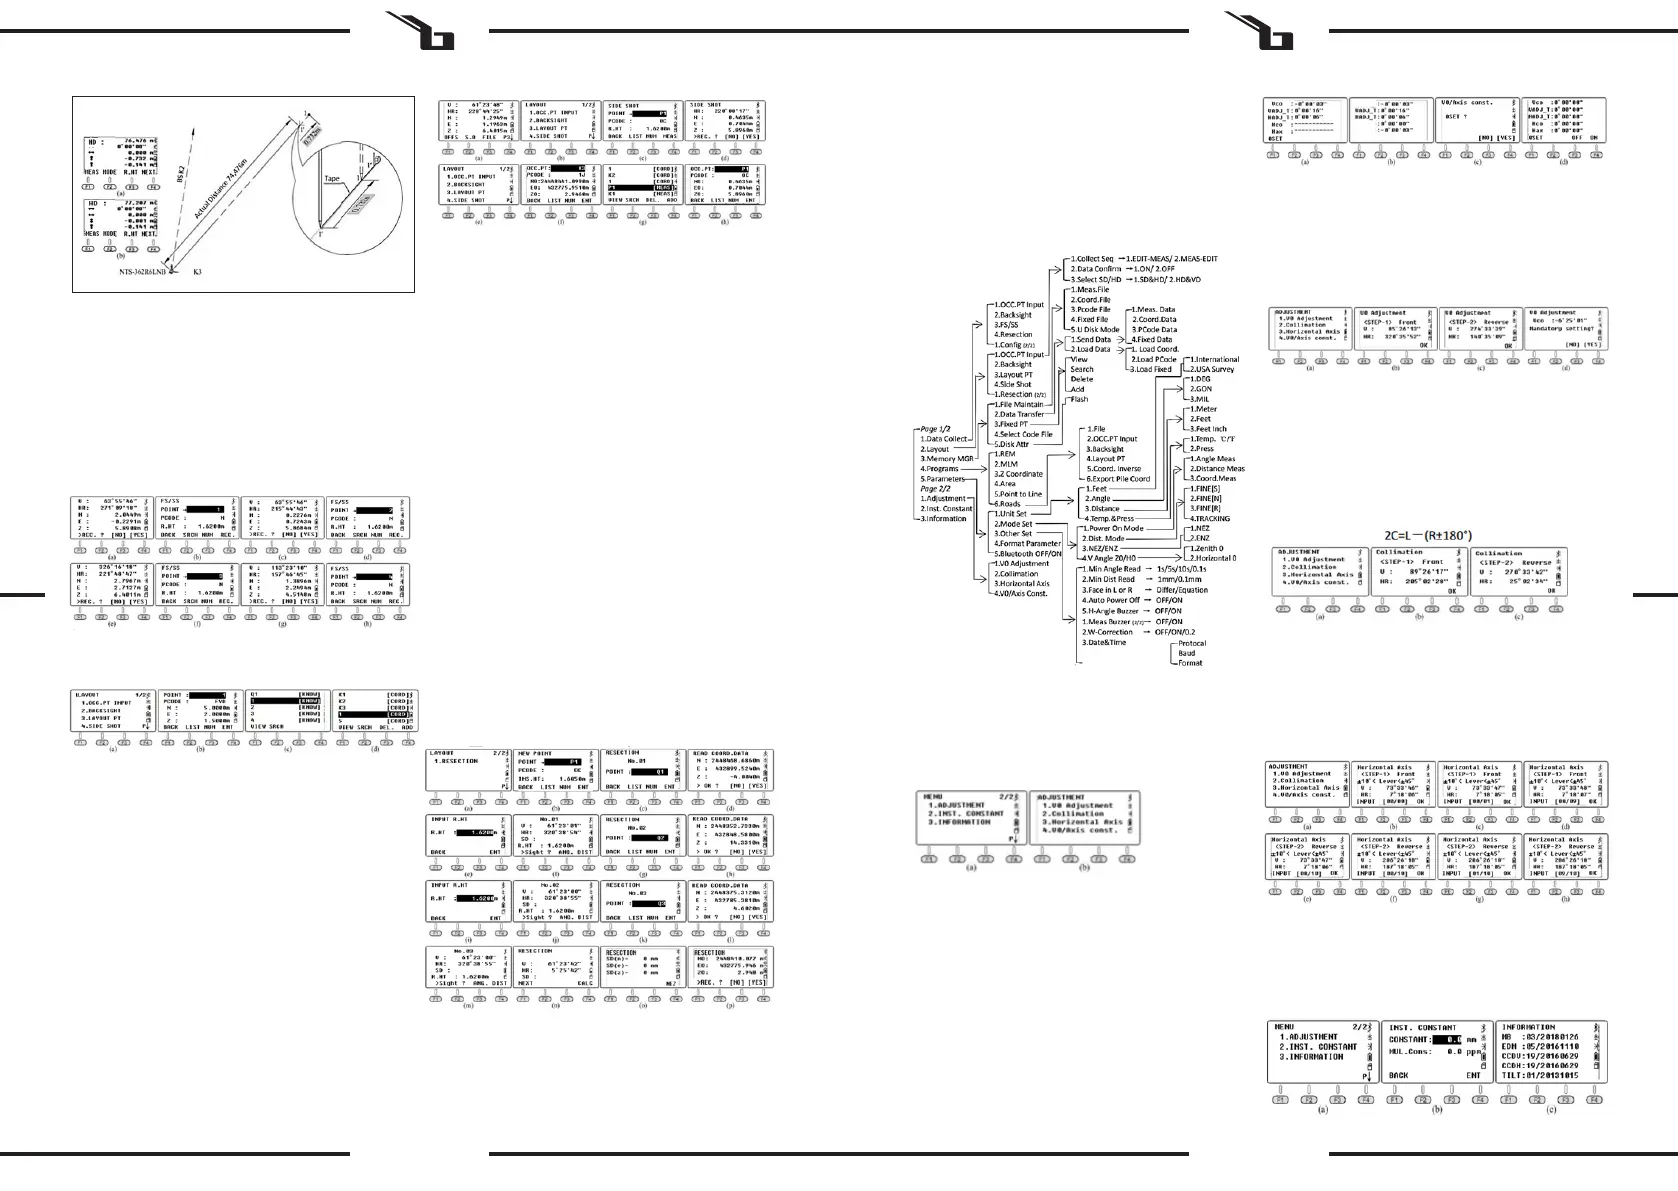
7. ADJUSTMENT AND INFORMATION
The structure of the menu system is as follows:
7.1. ADJUSTMENT
On the 2nd page of the menu, press 1.ADJUSTMENT. It
contains four commands: 1. V0 Control, 2. Collimation, 3.
Horizontal axis and 4. V0 / Axis const. The last V0 / Axis
const. command displays the results of the previous three
commands. Please execute the last command before
executing commands 1-3 to clear the previous results.
Please open the sensor and set the total station well before
executing the commands.
The horizontal angle should be HR (horizontal right) and
the V angle should be set to zenith = 0.
7.1.1. V0 / AXIS CONST.
In the „Adjustment“ menu, press 4. V0 / Axis const. The
VADJ_T and HADJ_T refer to a sensor error if an electrical
sensor has beeen installed.
Press F3 OFF to exit the horizontal axis adjustment and
error 2C adjustment. Press F4 to enable horizontal axis
adjustment.
Press F1 OSET to reset the previous result to zero.
7.1.2. V0 ADJUSTMENT (i ANGLE)
Calculate the error of the vertical disc to correct the vertical
reading by measuring a clear target on both sides.
Aim at the target in the HL program, press F4 1.V0
Adjustment (g. b) and F4 OK. Turn the instrument so as to
aim at the same point in the HR program (g. c), press F4
OK to nish the adjustment. The vertical target error value
is displayed (g. d), press F4 YE to conrm.
7.1.4. HORIZONTAL AXIS
Calculate the horizontal axis error to adjust the horizontal
reading by measuring the target with a vertical angle of ±
10 ° ~ ± 45 ° on both sides. Aim at a target in HL with
a vertical angle of ± 10 ° ~ ± 45 °, then press 3 to enter the
horizontal axis page (g. b). Press F4 OK about 10 times.
Turn the instrument to aim at the same point in HR (g. c),
then press F4 OK about 10 times to nish the adjustment.
* Please adjust the i angle, 2C and horizontal axis after
prolonged transportation or other vibration.
7.2. INFORMATION
7.2.1. Press the 2.INST.CONSTANT button in the 2nd menu
page (g. b). The default is 0. Do not change this value
without authorization.
If the vertical angle is zenith 0, i = (L + R-360 °) / 233
If the vertical angle is horizontal 0, i = (L + R-180 °) / 2 or
(L + R-540 °) / 2
7.1.3. COLIMATION (2C)
Calculate the 2C error to correct the horizontal reading by
measuring a bright target from both sides. Aim at the target
in HL, press 2.Collimation (g. B) and F4 OK. Turn the device
to aim at the same point in HR (g. C), press F4 OK to nish
the adjustment.
EN EN
Bekijk gratis de handleiding van Steinberg SBS-THE-600, stel vragen en lees de antwoorden op veelvoorkomende problemen, of gebruik onze assistent om sneller informatie in de handleiding te vinden of uitleg te krijgen over specifieke functies.
Productinformatie
| Merk | Steinberg |
| Model | SBS-THE-600 |
| Categorie | Niet gecategoriseerd |
| Taal | Nederlands |
| Grootte | 19988 MB |


