Scheppach AWH-500BL handleiding
Handleiding
Je bekijkt pagina 24 van 212
www.scheppach.com
24
|
GB
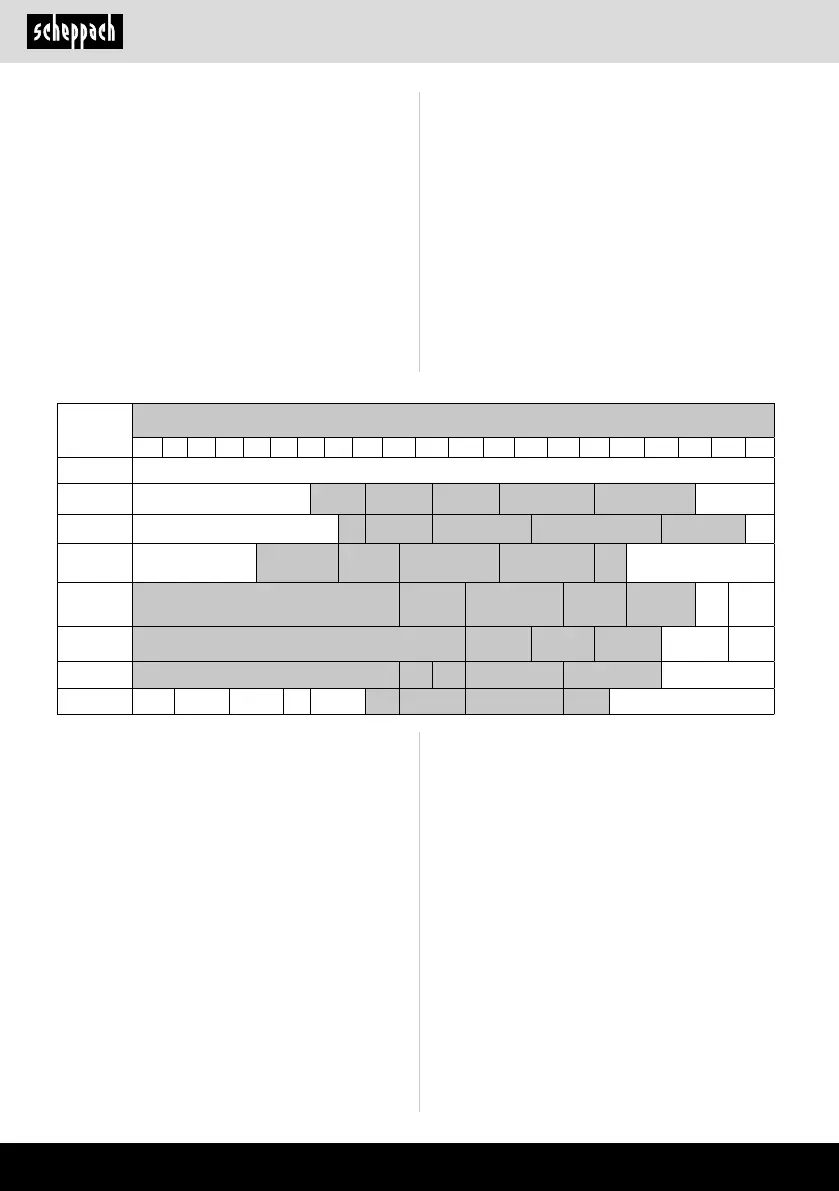
Table for setting the darkening levels
Arc current (amperes)
1.5 6 10 15 30 40 60 70 100 125 150 175 200 225 250 300 350 400 450 500 600
Grind
Grinding function - automatic darkening is not active
SMAW 8 9 10 11 12 13 14
MAG 8 9 10 11 12 13 14
TIG/
GTAW
8 9 10 11 12 13
MIG
(heavy)
9 10 11 12 13 14
MIG
(light)
10 11 12 13 14
PAC 9 10 11 12 13
PAW 4 5 6 7 8 9 10 11 12
6.6 Setting the darkening level
• Set the appropriate darkening level before the weld-
ing process (see table below). The darkening level
can be set manually by turning the darkening control
(5) on the outside of the helmet.
m ATTENTION! The darkening control (5) allows you
to choose between protection levels 9 - 13 and “Grind”.
When grinding, the helmet protects against impacting
particles. The dimming function is switched o.
m ATTENTION! Only use this setting if you do not want
to use the automatic welding helmet for welding. Auto-
matic darkening is then not active.
6.5 Carrying out the test procedure (Fig. 1)
The test button (14) can be used to check in advance
whether the darkening function of the welding helmet
is working.
• Point the welding shield at a light source such as a
ceiling light or lamp.
• Press the “Test” button (14). The lter should now
switch to the dark state.
• Release the test button (14) again. The lter should
return to the light state.
Check the light proong before each use.
• SMAW: Welding with sheathed electrodes
• MAG: Welding with metal active gas
• TIG / GTAW: Welding with inert gas
• MIG (heavy): Welding of heavy metals
• MIG (light): Welding of alloys and light metals
• PAC: Plasma cutting
• PAW: Plasma welding
• Grinding function: Automatic darkening is not active.
Only use this setting if you are not using the auto-
matic welding helmet for welding.
m WARNING! If the UV/IR lter does not darken when
the arc strikes, stop welding immediately and consult
the operating manual.
6.6.1 Carrying out the test procedure
• Approach an external light source with more
than 40 W of the viewing pane and check
whether the pane darkens or brightens.
To do this, turn the darkening control (5) clockwise
from “Grind” to the next stage. This automatically
causes the lter to darken.
• If you turn the darkening control (5) anti-clockwise
back to “Grind”, the automatic darkening of the lter
is deactivated again.
6.6.2 Setting the delay time
With the delay setting (11), depending on the welding
process, it is possible to set whether or not the auto-
matic darkening should be switched o immediately af-
ter completion of the welding process. At the min. level
the automatic darkening switches o straight away.
The more the knob is turned clockwise in the direc-
tion of the max. level, the longer the darkening will last
after the welding process. This function is very useful
for afterglowing. The delay or reaction time can be set
between 0.1 and 1.0 seconds as required using the DE-
LAY control on the inside of the helmet.
Bekijk gratis de handleiding van Scheppach AWH-500BL, stel vragen en lees de antwoorden op veelvoorkomende problemen, of gebruik onze assistent om sneller informatie in de handleiding te vinden of uitleg te krijgen over specifieke functies.
Productinformatie
| Merk | Scheppach |
| Model | AWH-500BL |
| Categorie | Niet gecategoriseerd |
| Taal | Nederlands |
| Grootte | 28998 MB |


