RIDGID WD19560 handleiding
Handleiding
Je bekijkt pagina 7 van 40
7
ASSEMBLY
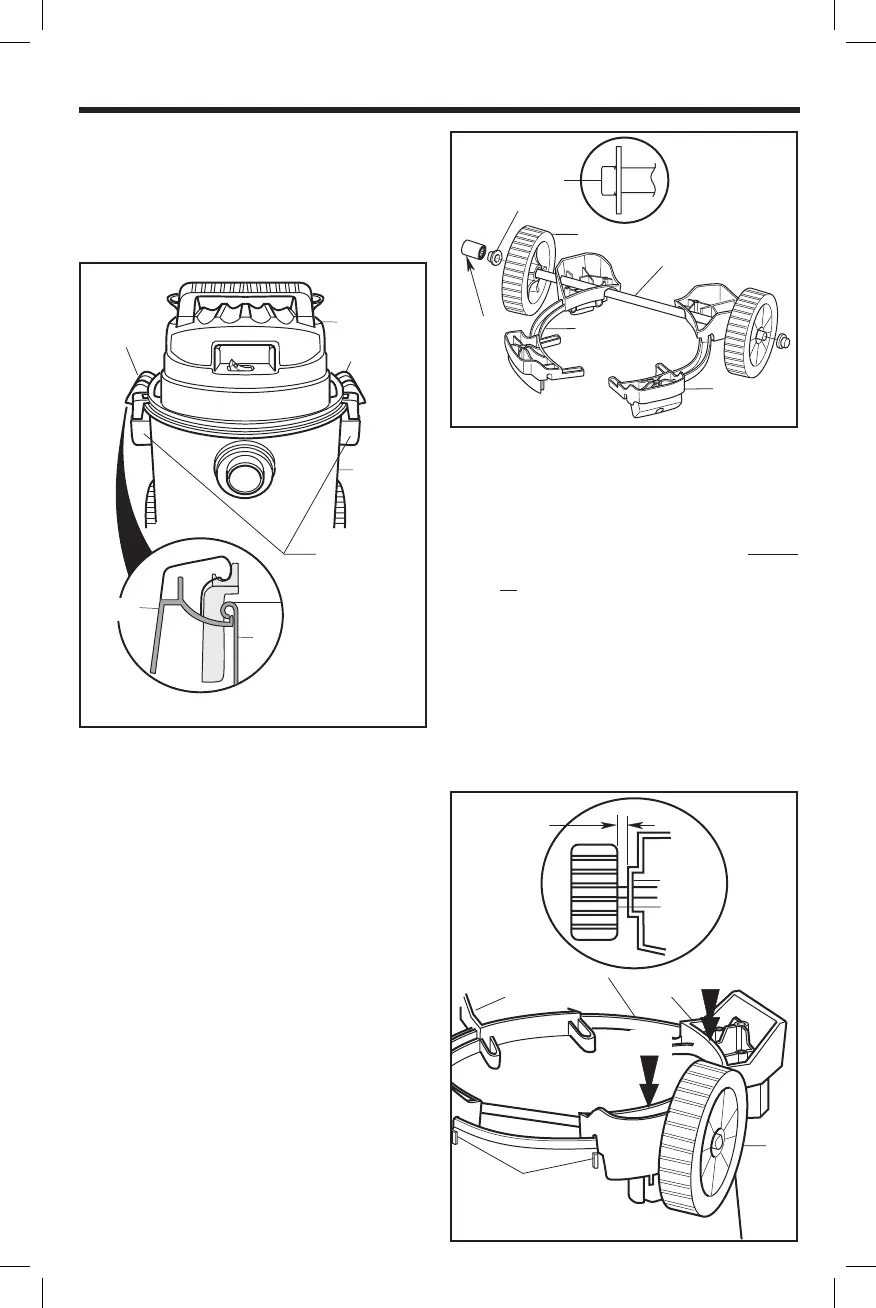
POWERHEAD ASSEMBLY REMOVAL (Fig. 5)
1. Rotate both Powerhead Assembly Latches up and
out away from the Dust Drum Assembly (B) lip.
2. Remove Powerhead Assembly (A) from Dust Drum
Assembly (B).
Fig. 5
(A)
Powerhead
Powerhead
Latch
Latch
(B)
Dust Drum
Handles (2)
Latch
(B)
DUST DRUM CADDIES, REAR WHEELS, &
CASTERS ASSEMBLY
(Fig. 6, Fig. 7, Fig. 8, Fig. 9 & Fig. 10)
If any parts are missing or damaged contact Customer
Service. Do not assemble until you have all the Parts.
1. With Powerhead Assembly removed, invert Dust
Drum Assembly (B) to install Right and Left Caddies
(S & T). Install Cap Nut (V) on one side of Shaft
Rod (R). Tap gently with Rubber Mallet or Hammer
until fully seated. Slide open end of Shaft Rod (R)
through the Rear Wheel (P) (smooth side of wheel
facing outward).
TIP: Use a 5/8
”
Socket to securely hold the Cap Nut
while hammering the Shaft Rod.
2. Place Wheel/Shaft Rod Assembly through Caddy
Left (T) and on through the Caddy Right (S).
3. Then place the remaining Rear Wheel (P) onto
the Caddy Assembly (smooth side of wheel facing
outward), and install second Cap Nut (V).
SP7156 ESF.indb 7SP7156 ESF.indb 7 5/8/24 10:09 AM5/8/24 10:09 AM
Fig. 6
(V)
(V)
(P)
NOTE: Smooth side of the wheel
5
to the outside.
/8"
(R)
HT
Socket
R
I
G
(S)
(T)
CADDY ASSEMBLY
4. Installation of Caddies onto Dust Drum Assembly:
Place the Caddy Assembly onto the Dust Drum
Rim. Align inside edges of both Left and Right
Caddies (S & T) with the raised outer Ribs, located
on back of the Dust Drum Assembly (B). Be sure
that Rear Wheels (P) spin freely, and Do Not
contact the Caddies (S & T). If the Rear Wheels
(P) Do touch the Caddies (S & T), move Caddies
inward slightly.
5. Once the Caddies (S & T) are aligned with the raised
Ribs on Back of the Dust Drum Assembly (B),
gently tap on rear of each Caddy until firmly seated.
It is recommended to tap the center portion of each
rear Caddy (S & T). After rear portions of Caddies
(S & T) are firmly in place, proceed to tap into place
the front portion of each Caddy until fully seated.
It is recommended to tap the center portion of the
front Caddies (S & T).
Fig. 7
1/16" (1.6 mm)
Clearance
(S or T)
(P)
Dust Drum Rim
TAP
(T)
(S)
TAP
(P)
Raised Rib
on Back of Drum
Bekijk gratis de handleiding van RIDGID WD19560, stel vragen en lees de antwoorden op veelvoorkomende problemen, of gebruik onze assistent om sneller informatie in de handleiding te vinden of uitleg te krijgen over specifieke functies.
Productinformatie
| Merk | RIDGID |
| Model | WD19560 |
| Categorie | Stofzuiger |
| Taal | Nederlands |
| Grootte | 6967 MB |
