Power Soak SKS-70 handleiding
Handleiding
Je bekijkt pagina 5 van 10
5 OM-SKEWER SOAK
Check to see that the Liquid Level LEDs #3 and #4 are illuminated when the wash
tank is filled to the waterline. If either one or both of the lights are not illuminated,
see that all connections to and from the liquid level sensors are secure and that
there is no physical damage to the wiring. In the event that damaged connectors
and/or wiring are found, contact Power Soak Systems, Inc. at
888-994-7636
.
If the troubleshooting guidelines do not correct the problem, it will be necessary to
contact Power Soak Systems, Inc. at
888-994-7636.
INSTALLATION
THE INSTALLATION AND INITIAL OPERATIONAL CHECK OF THE POWER
SOAK SKEWER WASH MUST BE PERFORMED BY LICENSED AND CERTIFIED
PLUMBERS AND ELECTRICIANS.
BE SURE TO FOLLOW ALL APPLICABLE NATIONAL AND LOCAL ELECTRICAL
CODES WHEN INSTALLING THE ELECTRICAL SUPPLY AND/OR A NEW
BREAKER. DO NOT CONNECT THE SYSTEM USING A POWER CORD AND
PLUG OR AN EXTENSION CORD OF ANY KIND.
Please refer to the detailed installation instructions that were sent with the Power
Soak Skewer Wash.
Electrical Requirements
The electrical requirements of the machine are on the serial number plate located
on the front of the wash sink, adjacent to the control panel enclosure and inside
the enclosure on the back face of the enclosure door.
The machine is completely pre-wired and tested at the factory.
All Power Soak systems have a single point electrical connection, and a dedicated
circuit is required. A “hard-wired” connection from an appropriate power source
junction box to the control panel is used to power the machine. The junction box
power source should be located at the end of the machine nearest the motor.
Ideally, the junction box should be located on the wall directly behind the pump
motor and control panel.
The installer is to provide an electrical disconnect that should be incorporated in
the “hard wire” electrical connection to the machine. Properly sized watertight
conduit, fittings and parts are required, as well as the appropriate gauge wire.
A wiring diagram is located in the control panel enclosure on the machine. Specific
part numbers and part information can be obtained from the factory by calling
888-994-7636.
Plumbing Requirements
The Skewer Soak will require the following plumbing connections:
• 3/4” (19mm) or 1/2” (12 mm) hot water supply line.
• 3/4” (19mm) or 1/2” (12 mm) cold water supply line.
• One waste water connection 1-1/2” ( 38mm) or larger.
• One wash tank overflow connection 1-1/2” (38mm) or larger.
PRE-UNCRATING CHECKLIST
Verifying System Requirements
Prior to completely removing the Skewer Soak unit from the crate, it is necessary to
verify certain requirements. Remove only the lid of the crate at this time.
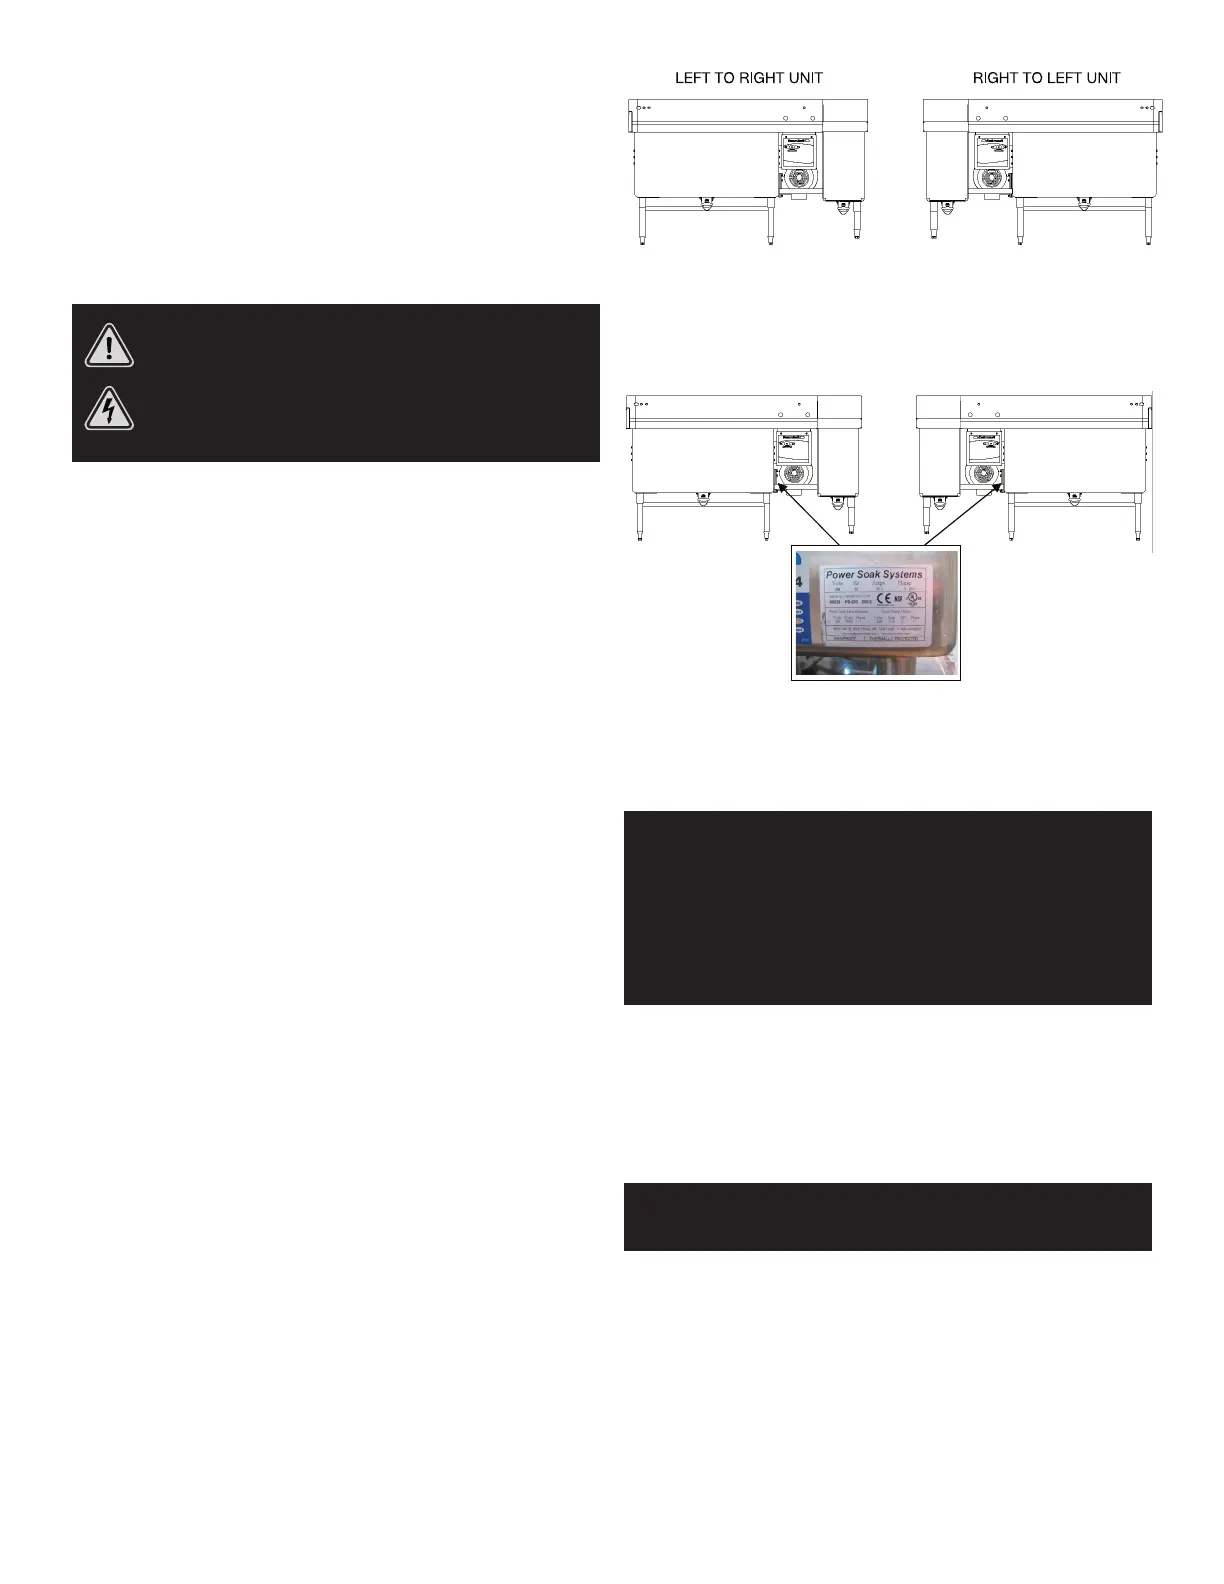
Verifying the Configuration
The Skewer Soak can be built as a “Left to Right” or as a “Right to Left” configuration
with a variety of options. Look inside the crate and verify that the configuration of the
machine matches the specifications of the order description.
Verifying the Electrical Requirements
The electrical requirements for the machine are on the machine identification tag
located on the side of the wash tank, next to the motor. The electrical service in the
facility where the machine is to be installed must be rated for the capacity shown on
the identification tag.
This machine will require a permanently mounted disconnect that is in a “liquid tight”
enclosure. Do not use an in-line plug for disconnecting the machine from the electrical
source. Contact a licensed and certified electrician to make the enclosure installation
if one is not present. Use the tables in the appendix to determine the appropriate
breaker (over-current protection) and wire size for the machine’s electrical service.
WARNING: DO NOT CONNECT THE MACHINE USING A POWER CORD AND PLUG OR AN
EXTENSION CORD OF ANY KIND.
WARNING: KITCHENS ARE A WET ENVIRONMENT WHICH REQUIRE ALL ELECTRICAL
CONNECTIONS TO BE “LIQUID TIGHT”.
ELECTRICAL INSTALLATION MUST CONFORM TO ALL APPLICABLE
LOCAL WIRING CODES. ALL ELECTRICAL CONNECTIONS MUST BE
“LIQUID TIGHT” AND READILY ACCESSIBLE FOR INSPECTION AFTER
INSTALLATION WITHOUT MOVING THE POWER SOAK MACHINE OR ANY OF
ITS ACCESSORIES.
Removal of Existing Unit
If the new Skewer Soak is not replacing an existing sink, skip this section. If the
removal of an existing sink is necessary, continue with this section.
Existing Supply Lines
The water and electrical source must be shut off before disconnecting or cutting the
water or electric lines.
WARNING: FAILURE TO SHUT OFF THE ELECTRICAL AND WATER SUPPLY WILL RESULT
IN PERSONAL INJURY, INCLUDING SERIOUS INJURY OR DEATH, AND
EXTENSIVE EQUIPMENT DAMAGE.
Disconnect any electrical cord that is connected to the existing sink. Cut the cold and
hot water lines as closely as possible to the fittings on the existing sink.
IMPORTANT: Be sure to leave enough of the existing piping for the installation of new
shutoff valves. See “Pre-Plumbing” section for reference.
Existing Sink Removal
Detach any fasteners holding the existing sink in place and remove the existing sink
along with any shelves that may interfere with the installation of the Skewer Soak.
Discard all unwanted materials in an appropriate container or disposal area.
Bekijk gratis de handleiding van Power Soak SKS-70, stel vragen en lees de antwoorden op veelvoorkomende problemen, of gebruik onze assistent om sneller informatie in de handleiding te vinden of uitleg te krijgen over specifieke functies.
Productinformatie
| Merk | Power Soak |
| Model | SKS-70 |
| Categorie | Niet gecategoriseerd |
| Taal | Nederlands |
| Grootte | 3637 MB |


