Parkside PPFSA 40-Li C2 handleiding
Handleiding
Je bekijkt pagina 20 van 54
PPFSA 40-Li C2
GB
│
IE
│
NI
│
13 ■
3) Pull on both line ends to adjust the length so
that they are approximately the same length
and the spool N is centred.
4) Turn the rotary knob f in the direction indicated
by the arrow on the underside of the spool case
B to wind the line.
Winding is made easier if you press the rotary
knob f at the same time.
With open spool case:
1) If the line cannot be easily inserted into the
inner line channel, open the spool case B by
pressing the two click fasteners M.
2) Place the empty spool N loosely on the spring.
Make sure that the line channel is in line with
the two line outlet holes.
3) Guide the line ends through the openings m of
the spool case B and through the line channel
of the spool N.
4) Pull on both line ends to adjust the length so
that they are approximately the same length
and the spool N is centred.
5) Replace the cover m on the spool case B.
6) Turn the rotary knob f in the direction indicated
by the arrow on the underside of the spool case
B to wind the line. Winding is made easier if
you press the rotary knob f at the same time.
Fitting/changing the 2-tooth blade
(Fig. E)
WARNING!
► The 2-tooth blade g is very sharp. Only re-
move the blade guard cover after installation.
Wear protective gloves.
1) Make sure that the motor is switched off and
remove the batteries.
2) Place the device on the ground so that it has
a secure hold. Turn it so that you can work
comfortably on the underside of the protective
cover 0.
3) Block the mounting spindle c as described in
the "Fitting/changing the line spool" section
and, if necessary, remove the fitted line spool d
as described there.
4) Position the 2-tooth blade g on the mounting
spindle c. The 2-tooth blade g can be used
on both sides.
5) Attach the 2-tooth blade g with the washer n,
spring washer b and nut v. Use the multifunc-
tion key a. Then remove the hex key s.
NOTE
► If the 2-tooth blade g becomes blunt, it can
be resharpened by a specialised workshop.
If it is damaged or unbalanced, it must be re-
placed (see section "Ordering replacement
parts").
Putting on the harness
WARNING!
► Never use the device without the harness G.
Always switch off the device before removing
the harness G.
► Never use several strap holders or several
shoulder straps at the same time.
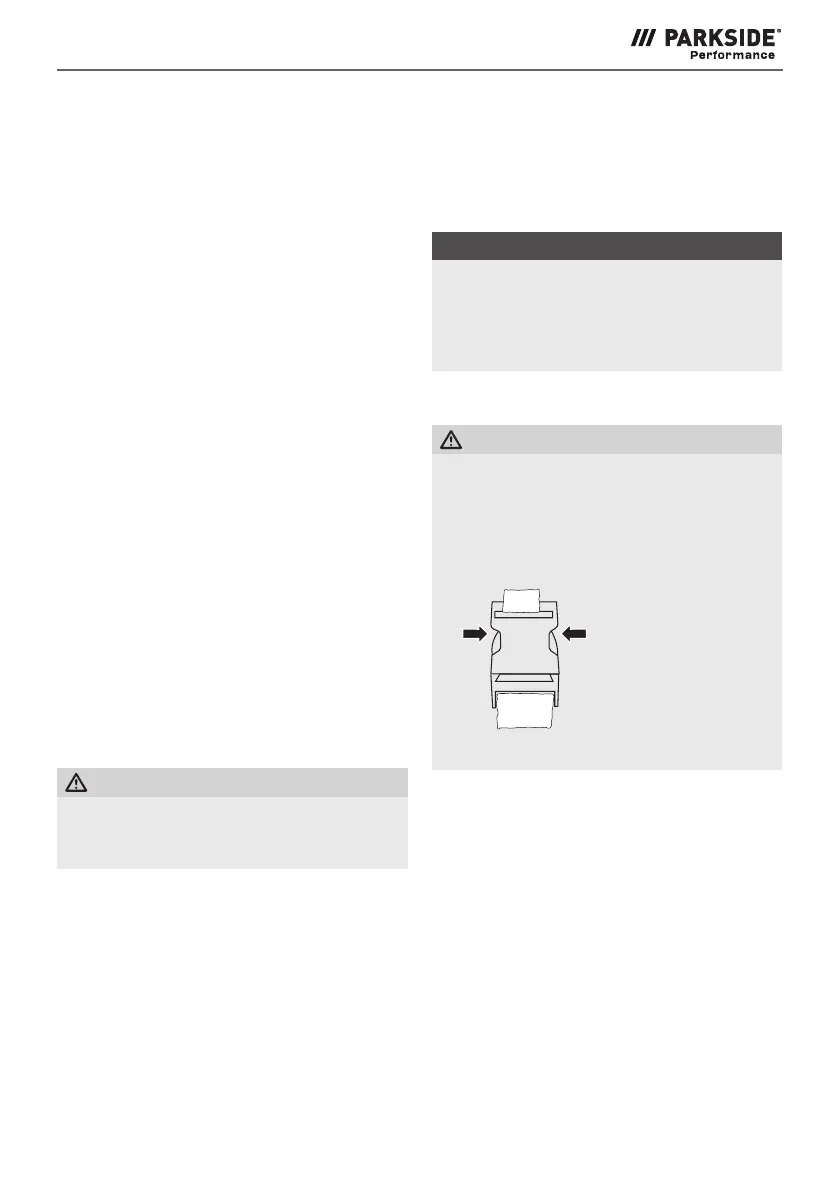
►
The harness G comes with
a quick-release device F
to quickly detach the de-
vice from the harness G
in a dangerous situation.
In a dangerous situation,
press both sides of the
quick-release device F
to release the device from the harness G.
1) Position the harness G so that the shoulder
plate H is on your back.
2) Close the harness G (see Fig. K) and adjust it
to the body circumference as shown in Fig. L.
3) Tighten the shoulder straps by pulling them
downwards (see Fig. M and N). The strap
length is optimally adjusted when the snap
hook is approx. 10 cm below the hips.
4) Attach the snap hook to the eyelet 3 on the
upper shaft tube 6.
5) Place the body protection plate on the hip
between the body and the device.
Bekijk gratis de handleiding van Parkside PPFSA 40-Li C2, stel vragen en lees de antwoorden op veelvoorkomende problemen, of gebruik onze assistent om sneller informatie in de handleiding te vinden of uitleg te krijgen over specifieke functies.
Productinformatie
| Merk | Parkside |
| Model | PPFSA 40-Li C2 |
| Categorie | Niet gecategoriseerd |
| Taal | Nederlands |
| Grootte | 6664 MB |


