Parkside PEH 30 D4 handleiding
Handleiding
Je bekijkt pagina 12 van 151
PEH 30 D4
■ 8
│
GB
│
IE
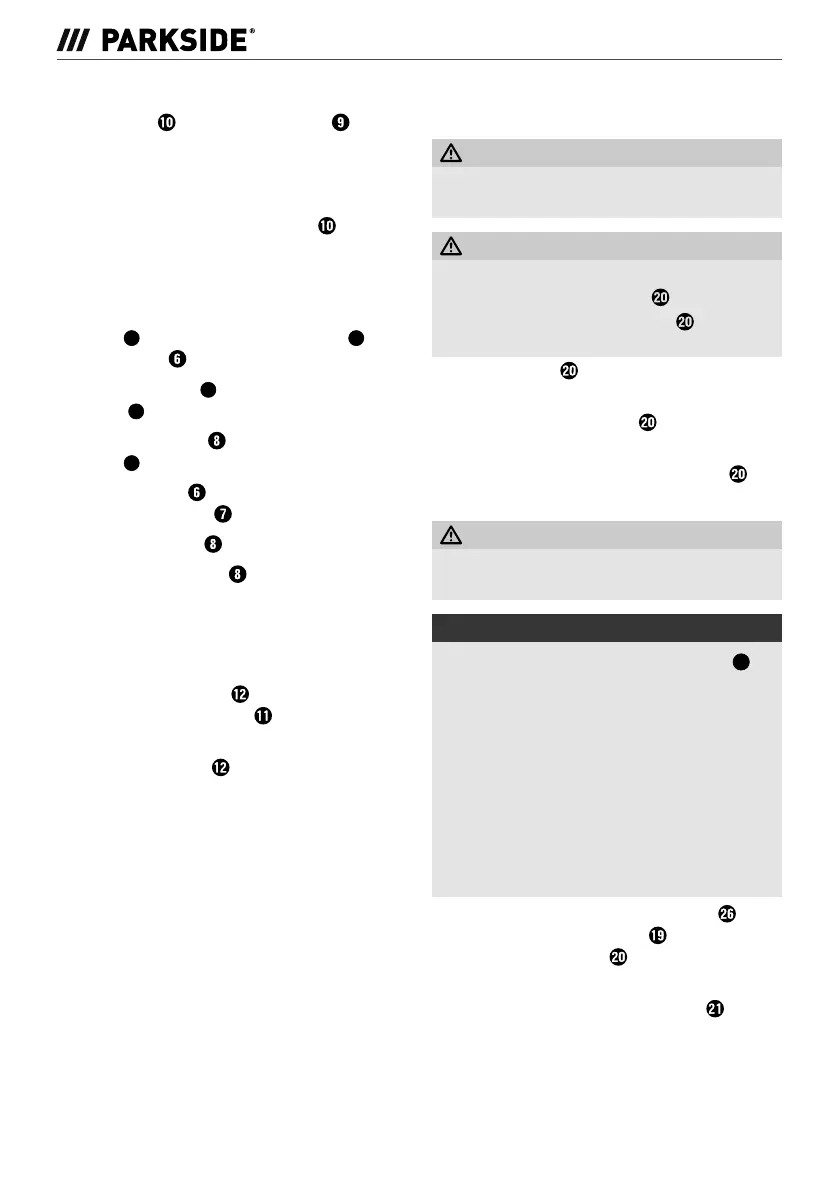
Chamfering edges
The V grooves in the front plane sole allow
easy chamfering of workpiece edges.
♦ Use the V groove that corresponds to the
chamfer width required.
♦ Place the planer with the V groove
onto the
workpiece edge and guide it forwards.
Using the rip fence
♦ To fit the rip fence, guide the connecting
screw
8b
through the connecting piece
8a
and
the rip fence
.
♦ Place the washer
8c
on the connecting
screw
8b
.
♦ Screw the lock nut
onto the connecting
screw
8b
.
♦ Fit the rip fence
onto the appliance using
the fastening screw
.
♦ Undo the lock nut
and set the desired width.
♦ Retighten the lock nut
.
♦ Ensure that the plane is applied with lateral
pressure.
Using the fold depth stop (seefig.G)
♦ Fit the fold depth stop onto the appliance
using the fastening screw .
♦ Set the desired fold depth in millimetres using
the fold depth stop
.
♦ Repeat the planing process several times until
the required fold depth is achieved.
Removing/replacing the planing
blade (see figs. C–E)
WARNING! RISK OF INJURY!
► Always remove the plug from the power
socket before working on the appliance.
CAUTION!
► There is a risk of injury due to the cutting
edges of the planing blade
!
► Never touch the planing blade
on its
cutting edges.
The planing blade
has two cutting edges and
can be turned.
♦ Replace the planing blade
when both cutting
edges are blunt.
♦ Do not try to sharpen the planing blade
.
Turn the planing blade or replace it
WARNING! RISK OF INJURY!
► Wear suitable protective gloves when changing
the planing blades.
NOTE
► Do not undo the two hex socket screws
18a
.
These are used for adjusting the height of the
cutter block. No adjustment is required if you
use the planing blades sold by the manufac-
turer. Use only the planing knives supplied by
the manufacturer.
► When changing the blade, always replace
both blades to prevent an imbalance.
► Unscrew only one blade to start with. This will
allow you to use the factory-mounted second
blade for reference when reassembling later.
♦ Use the supplied open-ended spanner
to
undo the 3 fastening screws
a little way so
that the planing blade
can be moved
(see fig. C).
♦ Push the movable cutter block guard
into the
slot in the housing.
IB_471090_PEH30D4_LB8.indb 8IB_471090_PEH30D4_LB8.indb 8 09.01.2024 14:14:1709.01.2024 14:14:17
Bekijk gratis de handleiding van Parkside PEH 30 D4, stel vragen en lees de antwoorden op veelvoorkomende problemen, of gebruik onze assistent om sneller informatie in de handleiding te vinden of uitleg te krijgen over specifieke functies.
Productinformatie
| Merk | Parkside |
| Model | PEH 30 D4 |
| Categorie | Niet gecategoriseerd |
| Taal | Nederlands |
| Grootte | 15971 MB |


