NEO Tools 10-812 handleiding
Handleiding
Je bekijkt pagina 6 van 41
6
• ALWAYS wear appropriate protective clothing, gloves and safety
glasses, manufactured in accordance with the latest European safety
standards. Everyday goggles are not safety glasses.
• ALWAYS wash off any accidental splashes of degreaser on the skin,
and contact a doctor immediately if necessary.
• ALWAYS read the degreaser instructions carefully and follow the
manufacturer's instructions.
• ALWAYS check the individual parts of the washer for damage. Inspect
any damaged part before using the washer to ensure that it will function
properly and perform its intended function. Any damage should be
repaired or the part replaced as appropriate. If in doubt, DO NOT use
the machine. Consult your local dealer or service centre.
• ALWAYS disconnect the washer from the power source before
servicing or cleaning.
• ALWAYS keep the work area clean. Cluttered areas and benches are
conducive to accidents, so clean up accidental degreaser spills
immediately.
• ALWAYS ensure adequate lighting. The minimum light intensity should
be 300 lux. Ensure that the lighting is positioned in such a way that you
do not work in your own shadow.
• ALWAYS keep children away. All visitors should be at a safe distance
from the work area,
• especially when operating the device.
• ALWAYS keep the unit in the best possible condition. Keep the washer
clean to ensure the best and safest performance. Follow the
maintenance recommendations of this manual.
• ALWAYS ensure that the switch is turned off before connecting the
appliance to the power supply. This avoids accidental start-up.
• ALWAYS concentrate on the job at hand, no matter how trivial it may
seem. Remember that accidents are caused by carelessness resulting
from routine.
• ALWAYS maintain correct posture and balance and do not reach too
far. The best basis is to wear footwear with rubber non-slip soles.
• Keep the surroundings clean especially the floor in the vicinity of the
washer.
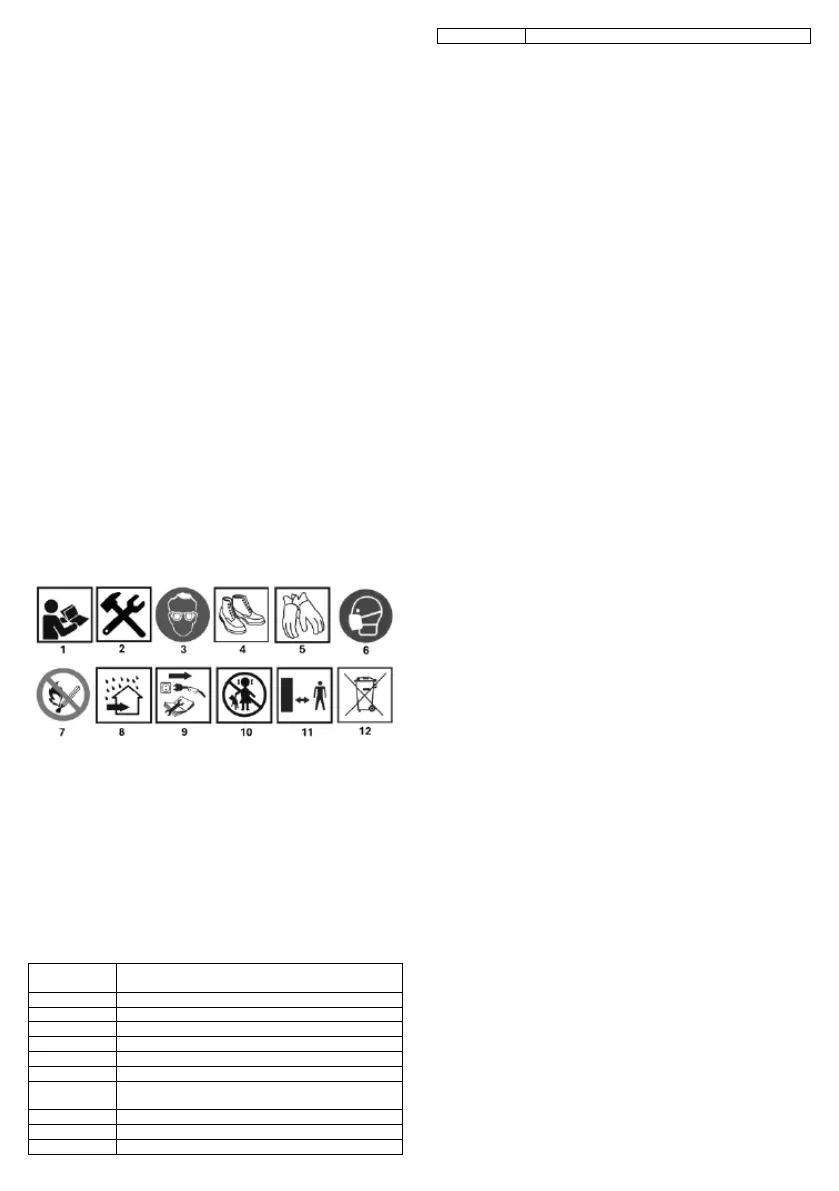
PICTOGRAMS AND WARNINGS
1.Read all instructions
2.Requires assembly
3.Wear personal protective equipment safety goggles
4.Wear personal protective equipment non-slip safety footwear
5.Wear personal protective equipment protective gloves
6. wear personal protective equipment protective mask
7.Do not use an open flame near the washer in operation
8.For indoor use
9.Before maintenance, disconnect from the power supply
10.Keep out of the reach of children
11.Keep your distance from the stand
12.Do not dispose of with domestic waste
DESCRIPTION OF THE GRAPHIC ELEMENTS
The following numbering refers to the components of the device
shown on the graphic pages of this manual.
Designation
Fig. A
Description
1
Washer compartment cover
2
Hinge / lid lock
3
Washer chamber
4
Working fluid outlet pipe
5
Pump switch
6
Parts shelf
Designation
Fig. B
Description
1
Parts shelf
2
Working fluid outlet pipe
3
Pump
4
Pump switch
* There may be differences between the graphic and the actual
product
PURPOSE
The workshop washer is designed for degreasing and washing all kinds of
metal parts, with the dimensions and weight specified in the rating data.
ATTENTION! Exceeding the weight limit for parts can damage the
worktop and destroy the washer.
Areas of application: repair workshops, shops where degreasing and
washing of serviced parts is required. Use of the washer for other
purposes and unauthorised modifications is not permitted under penalty
of loss of guarantee.
OPERATION OF THE DEVICE
Before switching on the product, make sure that the mains voltage is the
same as that indicated on the rating plate. Connecting the appliance to a
different power supply may cause damage to the appliance.
MONTAGE
• Attach the flexible metal fluid outlet tube fig. B2 to the pump outlet
connector fig. B3.
• Place the parts cleaning tray on the shelves on the tub walls. Ensure
that the nozzle of the flexible metal fluid outlet tube is facing inwards
and down towards the centre of the bath Figure B1.
• Fill the unit with a suitable water-based degreasing solution sufficient to
cover the entire pump (approx. 13 litres) Fig. B3.
NOTE!
Carefully follow the instructions for mixing, use and safety of the
degreasing solution before use.
NOTE
Only dedicated workshop washer fluids may be used as degreasers
in this type of machine. Fluids containing petroleum-based,
flammable or volatile substances (e.g. containing ethanol, solvents,
etc.) must not be used in the washer.
NOTE: Familiarise yourself with the manufacturer's safety and use
recommendations for the solutions.
• Make sure that the cleaning solution level completely covers the pump,
otherwise it will not function properly.
• Plug the power cord into an approved, grounded and GFI-equipped
power outlet
• Set the power switch to position I. The parts washer is ready for use.
• Set the power switch Fig. B4 to position 0. The washer pump is
switched off.
WASHINGTON WORK
• Place the parts to be cleaned in the parts tray in fig. B1.
• Apply the cleaning solution to the part to be washed. Wait until the
cleaning solution completely covers the surface of the part, wetting it
completely. Wait for the solution to soften the grease and dirt, then use
a suitable brush to clean the part to remove stubborn deposits.
• Wait a moment for the excess solution to run off the parts, then remove
them from the washer and rinse them in warm clean water.
• When finished, place the pump in the off position Fig. B4 in position 0,
close the cover and disconnect the unit from the power supply.
MAINTENANCE AND STORAGE
• After each hour of cleaning, unplug the unit and check the pump inlet
grille.
• Clean the washer more frequently if you are removing large deposits of
grease and grit. ATTENTION: Failure to clean the pump inlet will
reduce air and liquid flow, reduce cleaning effectiveness and may lead
to pump motor failure.
• If you find that the pump inlet grille requires more frequent cleaning, you
will probably need to replace the cleaning solution and remove
accumulated deposits from the bottom of the sump.
• Drain and pour the cleaning solution into suitable containers and
dispose of in accordance with local regulations.
PROBLEM SOLVING
• If the fluid stops flowing or flows sporadically, the pump may not be fully
submerged. The pump must be completely below the surface of the
fluid for it to function properly.
• If cleaning the pump inlet does not restore pump performance, there
may be accumulated dirt and grit in the flexible metal liquid discharge
line.
• Unplug the unit and remove the flexible metal fluid outlet tube, check
for obstructions in the tube and remove them if present.
Bekijk gratis de handleiding van NEO Tools 10-812, stel vragen en lees de antwoorden op veelvoorkomende problemen, of gebruik onze assistent om sneller informatie in de handleiding te vinden of uitleg te krijgen over specifieke functies.
Productinformatie
| Merk | NEO Tools |
| Model | 10-812 |
| Categorie | Niet gecategoriseerd |
| Taal | Nederlands |
| Grootte | 10920 MB |


