MSW -DEH580B handleiding
Handleiding
Je bekijkt pagina 7 van 31
12
Rev. 10.11.2021
13
Rev. 10.11.2021
EN
EN
A
B
G
D
C
C D
F
H
C
E
C
ATTENTION! Despite the safe design of the device
and its protective features, and despite the use of
additional elements protecting the operator, there
is still a slight risk of accident or injury when using
the device. Stay alert and use common sense when
using the device.
j) Do not touch articulated parts or accessories unless
the device has been disconnected from the power
source.
k) Do not move, adjust or rotate the device in the
course of work.
l) Do not leave this appliance unattended while it is in
use.
m) Clean the device regularly to prevent stubborn grime
from accumulating.
n) Do not cover the air intake and outlet.
o) The device is not a toy. Cleaning and maintenance
may not be carried out by children without
supervision by an adult person.
p) Do not run the device when empty.
q) It is forbidden to interfere with the structure of
the device in order to change its parameters or
construction.
r) Keep the device away from sources of re and heat.
s) If the device has been tipped more than 45°, allow it
to sit upright for at least 24 hours before use.
t) Inspection and maintenance of the refrigerant
system must be carried out by a qualied person
only.
3. USE GUIDELINES
The device is designed to dehumidify the air in a room,
protecting it and objects inside against the negative eects
of moisture.
The user is liable for any damage resulting from
unintended use of the device.
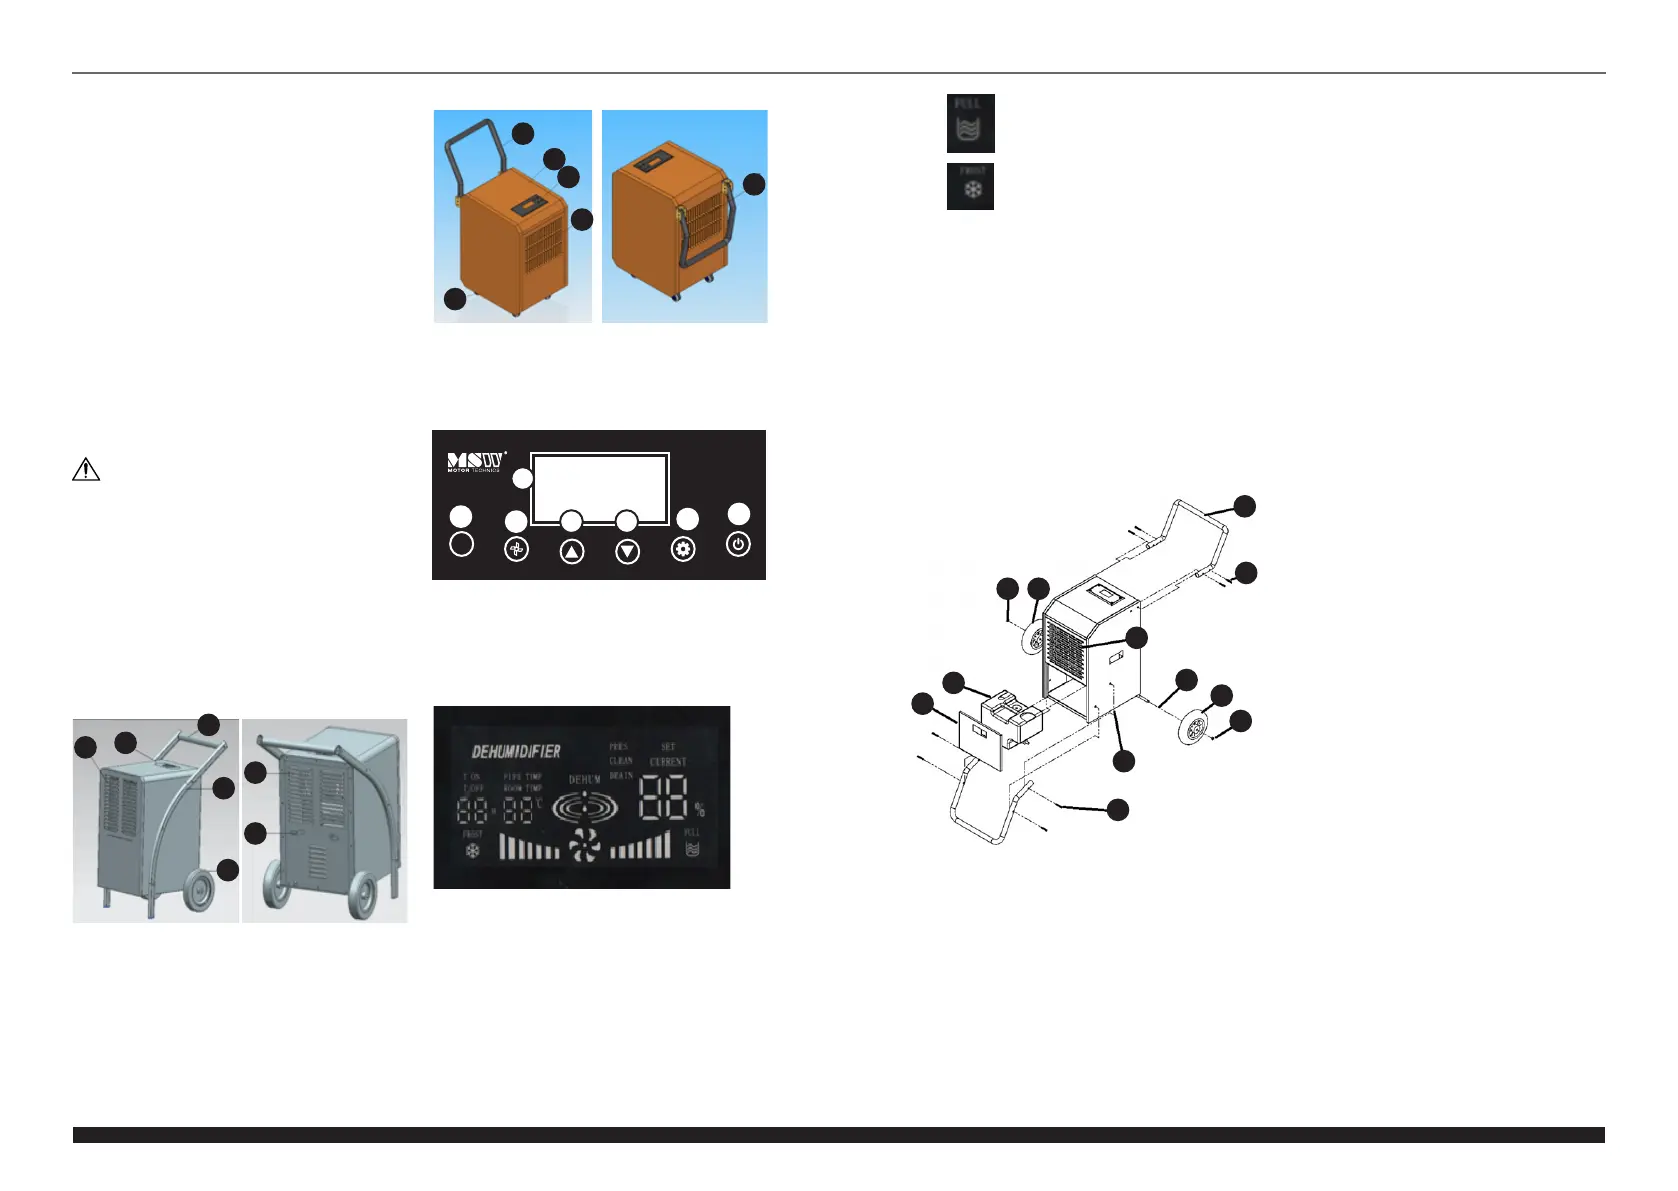
3.1. DEVICE DESCRIPTION
MSW-DEH1080A (MSW-DEH1080C/
MSW-DEH2000C similar
1. Air inlet openings
2. Control panel with a display
3. Carrying handle
4. Legs
5. Wheel (x2)
6. Air outlet openings
7. Mounting for a power cord
MSW
-
DEH580B
1. Carrying handle
2. Housing
3. Control panel with a display
4. Air inlet openings
5. Wheel (x4)
6. Air outlet openings
1
2
3
4
5
7
6
6
1
2
3
4
5
IN- DRY
AUTO
ADD MINUS
SET
POWER
1
2
345
6
7
1. ON/OFF button
2. Timer on/o button
3. Value decreasing button
4. Value increasing button
5. ON/OFF button of continuous dehumidication
6. ON/OFF button of internal drying function
7. Display
The display shows the following parameters:
• The current indoor air humidity ("CURRENT ...%")
• Setting the target indoor air humidity ("SET ...%")
• Cleaning indicator ("CLEAN")
• Indicator for removing accumulated water ("DRAIN")
• Dryer operation ("DEHUM ...") with visual signal
• Indoor temperature ("ROOM TEMP ... oC") or of the
pipes ("PIPE TEMP ... oC")
• Timer setting (time to turn the device on – "T ON" /
time to turn the device o – "T OFF"; operation time
"... H")
3.2. PREPARING FOR USE
APPLIANCE LOCATION
The temperature of environment must not be higher than
38°C and the relative humidity should be less than 95%.
Ensure good ventilation in the room in which the device
is being used. There should be at least 50 cm distance
between each side of the device and the wall or other
objects. The device should always be used when positioned
on an even, stable, clean, reproof and dry surface, and
be out of the reach of children and persons with limited
mental and sensory functions. Position the device such that
you always have access to the power plug. The power cord
connected to the appliance must be properly grounded
and correspond to the technical details on the product
label. Do not use or store the device in rooms smaller than
12 m2. If there are windows or doors in the room, they
must be closed.
ASSEMBLING THE APPLIANCE
(
THE EXAMPLE OF MSW
-
DEH2000C
–
THE OTHERS ARE SIMILAR
)
A. Cap
B. Tank
C. Screw
D. Wheel
E. Handle
F. Filter
G. Spacer
H. Hole for supporter
3.3. DEVICE USE
CAUTION: Each time a button is pressed on the control
panel, an acoustic signal is emitted.
3.3.1 STARTING/STOPPING THE DEVICE AND
CONTINUOUS OPERATION
Press the POWER button (1) on the control panel, the
device will start and automatically start continuous drying.
In this mode, it is not possible to set a target humidity level.
• full reservoir indicator light
• defrost indicator
To turn the device o, press the same button (1) and the
device will nish its operation after a short delay, i.e. until
the fan stops. CAUTION: in the event of a power drop or
loss, the device has a built-in compressor protection that
will restart the compressor with a 3-minute delay.
3.3.2 STANDARD DEVICE OPERATION
After turning the device on (see the point above), press
the AUTO button (5) on the control panel – continuous
operation will be turned o and the device will start
working in the standard mode with the default humidity
level (50 %).
3.3.3 SETTING A TARGET HUMIDITY LEVEL
With the device turned on, press the SET button (2) on the
control panel to set the a target room humidity during
standard operating mode. By pressing the buttons for
decreasing or increasing the parameter (3 or 4), set the
target value in the range 20–90 % – leave the selected value
until it stops ashing on the display, which means that it
has been saved. The device will then cycle automatically to
maintain the set value.
3.3.4 TIMER SETTING
It is possible to set the operating time range of the device
in hourly intervals from 1–24 hours.
• Automatic activation time – with the device turned
o (but connected to the power source), press
the SET button (2) on the control panel to activate
the Timer (the "T ON" indicator lights up on the
display) and then use the buttons for decreasing or
increasing the parameter to set the number of hours
after which devices are to start up automatically.
Leave the amount set on the display until it blinks
4 times, then the time to start will be saved and the
device will start counting down.
• Time operation cycle – with the device turned on,
press the SET button (2) on the control panel to
activate the Timer and then use the parameter
decreasing or increasing buttons (3 or 4) to set
the number of hours to turn o ("T ON" after
conrmation as above) and then using the same
buttons (3 or 4) to switch the device on again ("T
OFF"). After a given time has elapsed the device will
automatically turn o, and then after a certain time
has elapsed from turning it o, it will turn on again
and again according to the set time cycle (OFF-ON-
OFF-ON …).
Similarly to the above procedure, you can set the
time operation cycle with the device turned o
(connected to the power source). Press the SET
button (2) on the control panel to start the Timer
function, then use the parameter decreasing/
increasing buttons (3 or 4) to set the time after which
the device is to start automatically ("T ON"), then
conrm the time after which it is to stop working
and turn o, i.e. switch to standby mode ("T OFF").
The device will then start working according to the
set time cycle (ON-OFF-ON-OFF…).
• Canceling the Timer function – when working with
the active Timer, press the SET button (2) on the
control panel to disable the Timer function, but it
does not turn o the device itself. An alternative
method of deactivating the timer function is to turn
the device o by pressing the POWER button (1) on
the control panel, which also turns the device o
itself.
Bekijk gratis de handleiding van MSW -DEH580B, stel vragen en lees de antwoorden op veelvoorkomende problemen, of gebruik onze assistent om sneller informatie in de handleiding te vinden of uitleg te krijgen over specifieke functies.
Productinformatie
| Merk | MSW |
| Model | -DEH580B |
| Categorie | Niet gecategoriseerd |
| Taal | Nederlands |
| Grootte | 7397 MB |


