Intermatic PE953 handleiding
Handleiding
Je bekijkt pagina 18 van 51
18 Multi-Wave PE953 Installation Guide
Copyright © 2011 Intermatic, Inc.
Testing Z-Wave Reception
At the heart of the Multi-Wave system is Z-Wave wireless technology. Test
reception by walking around the yard with the Hand-Held Controller and
look on the screen to see if there are any areas where STAT OK changes to
STAT (which means the Hand-Held and the Receiving Device are no longer
communicating).
The STAT OK refreshes approximately once every 6 seconds, so you must
stay in each location being tested for at least that long (and even 2 to 3
times longer in fringe areas, where the signal is becoming too weak to be
considered a GOOD signal strength).
Signal reception between Hand-Held Controllers and the Receiving Device
is affected by distance (about 100 feet,) direct line of sight, and by physical
obstacles (like brick, wire lath in walls, or steel structures).
Ifyouidentifyanylocationsintheareaofoperationwherecommunications
problems occur, typically when a structure blocks the line of sight between
the Hand-Held Controller and the Receiving Device, use a length of Cat 5
ethernet cable, suitable for outdoor use and/or for burying in the ground to
relocate the antenna to a new location where the reception is stronger.
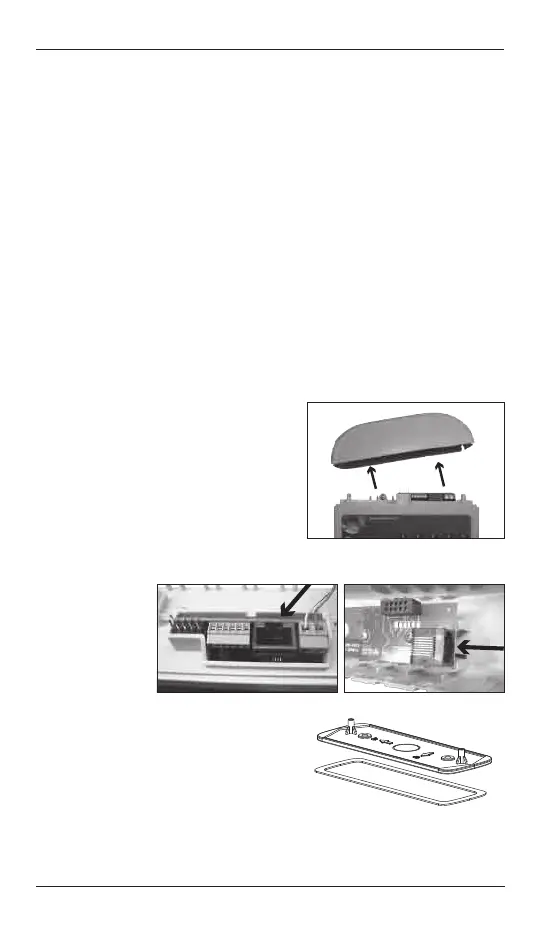
Moving the Antenna to a Better Location
The removable top of the PE653 enclosure
containsthesystem’santenna.
1. Remove the two screws used to attach
the antenna cover to the PE653 and
remove the antenna enclosure by pulling
it straight away from the main body of the
PE653 Receiving Device.
2. Relocate the antenna assembly to a
location where it is in direct line of sight
fromtheareaofoperation—theareawherethehomeownerwillbe
using the Hand-Held Controller.
3. Connect the
antenna to the
PE653 Receiving
Device using a
length of CAT 5
ethernet cable
suitable for
outdoor use and/
or burying in the ground.
4. Attachthemountingplate—ontopofits
waterproonggasket—tothewallorpost
where you plan to relocate the antenna.
1. Cut out a knock-out for the wire to pass through
the cap, then screw the antenna cap to the
bracket, using the screws supplied with the
remote kit.
2. Cut out a knock-out for the wire to pass through
the dummy cap, then screw the dummy cap to
the top of the PE653 Receiving Device, using
the original screws.
Labeling the Hand-Held Controller
Intermaticprovidesasheetofpeel-and-sticklabelstouseinidentifyingthe
vebuttonsontheHand-HeldController.Wheninstallationiscomplete
and the system has been programmed, apply the appropriate stickers
to guide the owner in using the system. For additional stickers, contact
Intermatic Inc., at 815-675-7000.
Depending on which components have been installed in the system,
you have several choices for which screen you want to use as the default
primary screen (displayed when the Hand-Held Controller awakes from
sleep). This decision may determine which labels you might want to apply
to the Hand-Held Controller.
Labeling for the PE653 Screen
IfyousetthePE653screenastheprimaryscreen,thevebuttonsonthe
Hand-HeldControllerareusuallyconguredasfollows:
Button <1> = Filter Pump
Button <2> = Filter Pump low speed for two-speed systems, or available
for generic assignment
Button <3> = Cleaner Pump, or available for generic assignment
Button <4> = Pool/Spa control actuators, or available for generic
assignment
Button <5> = Heater, or available for generic assignment
Labeling for the Z-Wave Screen
Labelthevebuttonsaccordingtothenamesofthevescenes.
Labeling for the Variable-Speed Pump Screen
Labelthevebuttonsaccordingtowhichspeedsyouhaveassignedto
specicfunctions,asidentiedonthescreen.
Labeling for the PE650 Screen
Labelthevebuttonsaccordingtothefunctionsassignedtothecircuits
in use at the installation.
Bekijk gratis de handleiding van Intermatic PE953, stel vragen en lees de antwoorden op veelvoorkomende problemen, of gebruik onze assistent om sneller informatie in de handleiding te vinden of uitleg te krijgen over specifieke functies.
Productinformatie
| Merk | Intermatic |
| Model | PE953 |
| Categorie | Niet gecategoriseerd |
| Taal | Nederlands |
| Grootte | 8177 MB |


