ErgoAV ERMMM6-01B handleiding
Handleiding
Je bekijkt pagina 10 van 16
A1
02
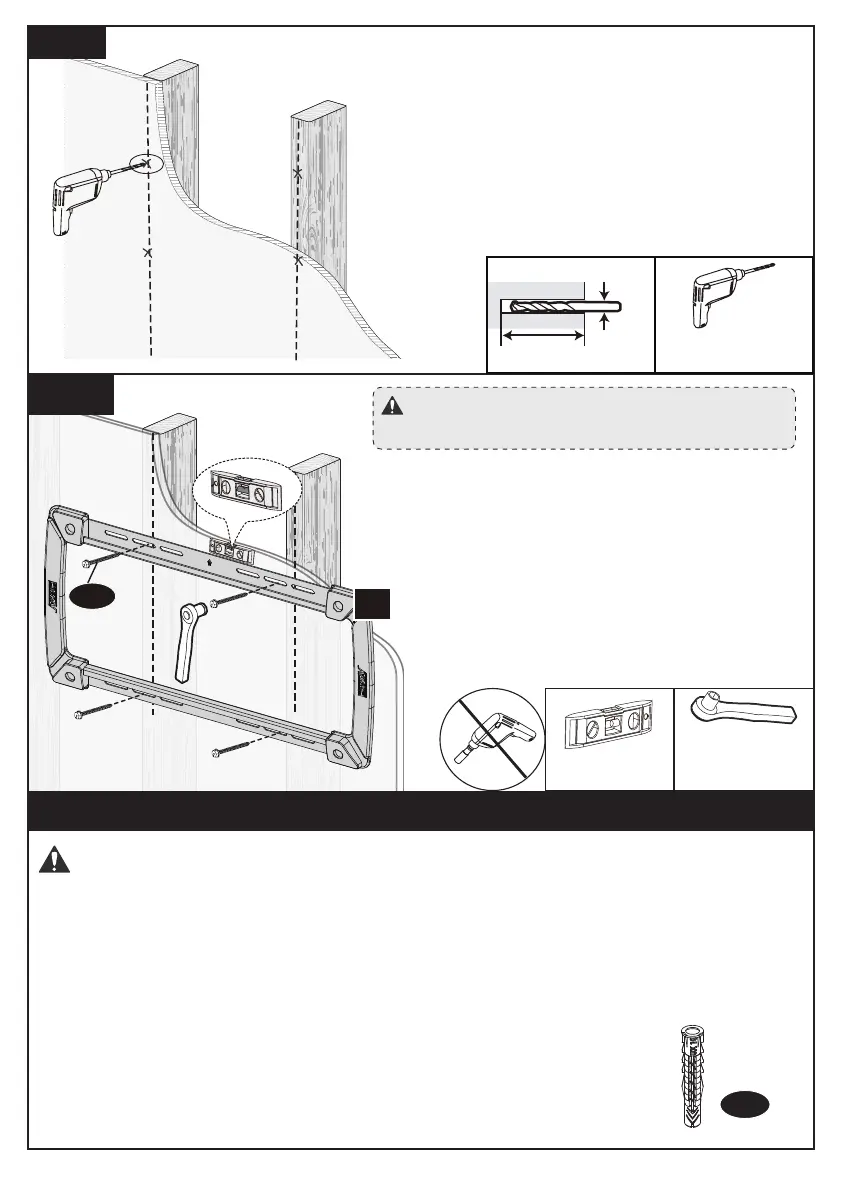
Install the Wall Plate [02] using the Lag
Screws [A1]. Using self-supplied 1/2”
(13mm) socket wrench, tighten the Lag
Screws [A1] until the Lag Screws [A1] are
pulled firmly against the Wall Plate [02].
DO NOT over-tighten the Lag Screws [A1].
2A-4
NOTE: DO NOT use a drill to tighten the
Lag Screws [A1]. Only use a socket wrench.
1/2” (13mm)
Socket Wrench
(Not Included)
Level
(Not Included)
Step 2B Solid Concrete Wall Option
Wall
Anchor
A2
WARNING:
● DO NOT use a drill when tightening the Lag Screws [A1]! Only use a socket wrench.
● To avoid potential personal injury or property damage, DO NOT over-tighten the Lag
Screws [A1]! Tighten the Lag Screws [A1] only until they are pulled firmly against the
Wall Plate [02] and the wall.
● Ensure the Wall Plate [02] is securely fastened to the wall before continuing to the
next step.
● Mount the Wall Plate [02] directly onto the concrete surface without
any covering.
● The thickness of the concrete wall must exceed 5 1/2” (140mm).
2A-3
Electric Drill
(Not Included)
2 3/4” (70mm)
7/32”
(5.5mm)
Drill 4 pilot holes using a 7/32”
(5.5mm) diameter drill bit. Make sure
the depth is not less than 2 3/4”
(70mm) deep.
02 03 04 05 06 07 08 09 10 11 12 13 14
Bekijk gratis de handleiding van ErgoAV ERMMM6-01B, stel vragen en lees de antwoorden op veelvoorkomende problemen, of gebruik onze assistent om sneller informatie in de handleiding te vinden of uitleg te krijgen over specifieke functies.
Productinformatie
| Merk | ErgoAV |
| Model | ERMMM6-01B |
| Categorie | Niet gecategoriseerd |
| Taal | Nederlands |
| Grootte | 2396 MB |


