Daikin REYA16A7Y1B handleiding
Handleiding
Je bekijkt pagina 41 van 60
18 Configuration
Installation and operation manual
41
REMA5+REYA8~20A7Y1B
VRV 5 heat recovery
4P684060-1C – 2024.10
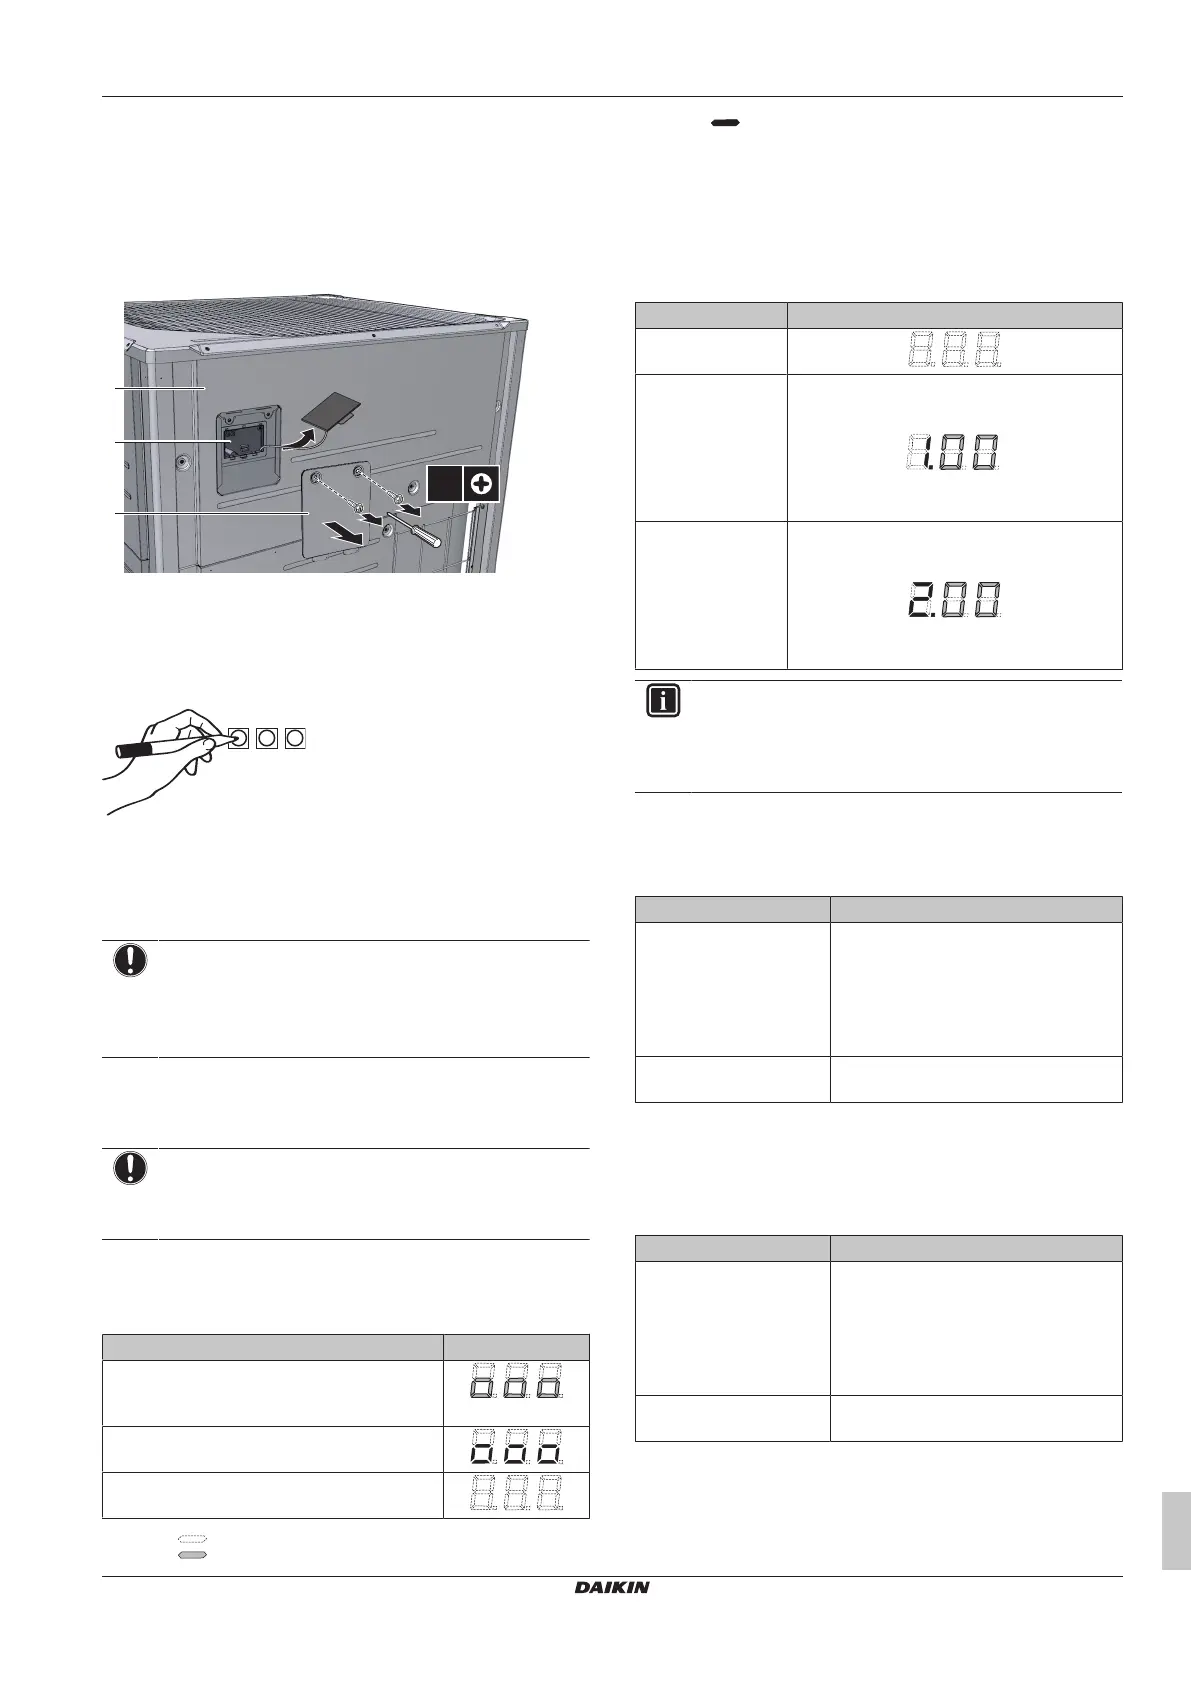
18.1.3 To access the field setting components
It is not required to open the complete switch box to access the push
buttons on the PCB and read out the 7‑segment display(s).
To access you can remove the front inspection cover of the front
plate (see figure). Now you can open the inspection cover of the
switch box front plate (see figure). You can see the three push
buttons and the three 7‑segment displays and DIP switches.
2×
a
b
c
a Front plate
b Main PCB with three 7‑segment displays and three push
buttons
c Switch box service cover
Operate the switches and push buttons with an insulated stick (such
as a closed ball-point pen) to avoid touching of live parts.
Make sure to re-attach the inspection cover into the switch box cover
and to close the front plate's inspection cover after the job is
finished. During operation of the unit the front plate of the unit should
be attached. Settings are still possible to be made through the
inspection opening.
NOTICE
Make sure that all outside panels, except for the service
cover on the switch box, are closed while working.
Close the lid of the switch box firmly before turning on the
power.
18.1.4 To access mode 1 or 2
Initialisation: default situation
NOTICE
Turn ON the power 6 hours before operation in order to
have power running to the crankcase heater and to protect
the compressor.
Turn on the power supply of the outdoor unit and all indoor units.
When the communication between indoor units and outdoor unit(s) is
established and normal, the 7‑segment display indication state will
be as below (default situation when shipped from factory).
Stage Display
When turning on the power supply: blinking as
indicated. First checks on power supply are
executed (8~10min).
When no trouble occurs: lighted as indicated
(1~2min).
Ready for operation: blank display indication as
indicated.
Off
Blinking
On
In case of malfunction, the malfunction code is displayed on the
indoor unit user interface and the outdoor unit 7‑segment display.
Solve the malfunction code accordingly. The communication wiring
should be checked at first.
Access
BS1 is used to switch between the default situation, mode 1 and
mode2.
Access Action
Default situation
Mode1 ▪ Push BS1 one time.
7‑segment display indication changes to:
.
▪ Push BS1 one more time to return to the
default situation.
Mode2 ▪ Push BS1 for at least five seconds.
7‑segment display indication changes to:
▪ Push BS1 one more time (short) to return to
the default situation.
INFORMATION
If you get confused in the middle of the process, push BS1
to return to the default situation (no indication on
7‑segment displays: blank, see "18.1.4To access mode 1
or 2"[441].
18.1.5 To use mode 1
Mode1 is used to set basic settings and to monitor the status of the
unit.
What How
Changing and accessing
the setting in mode1
1 Push BS1 one time to select
mode1.
2 Push BS2 to select the required
setting.
3 Push BS3 one time to access the
selected setting's value.
To quit and return to the
initial status
Push BS1.
18.1.6 To use mode 2
The master unit should be used to input field settings in
mode2.
Mode2 is used to set field settings of the outdoor unit and system.
What How
Changing and accessing
the setting in mode2
▪ Push BS1 for more than fiveseconds
to select mode2.
▪ Push BS2 to select the required
setting.
▪ Push BS3 one time to access the
selected setting's value.
To quit and return to the
initial status
Push BS1.
Bekijk gratis de handleiding van Daikin REYA16A7Y1B, stel vragen en lees de antwoorden op veelvoorkomende problemen, of gebruik onze assistent om sneller informatie in de handleiding te vinden of uitleg te krijgen over specifieke functies.
Productinformatie
| Merk | Daikin |
| Model | REYA16A7Y1B |
| Categorie | Niet gecategoriseerd |
| Taal | Nederlands |
| Grootte | 10147 MB |


