Handleiding
Je bekijkt pagina 40 van 42
78 79
ENEN
INSTALLATION INSTRUCTIONS
• The warranty does not cover damages caused by incorrect installation.
• The responsibility for installing the appliance lies with the buyer, not the manufacturer.
• The manufacturer is not responsible for any injuries or damages that are the result of incorrect installation.
• To ensure the correct function of the appliance, place it in asuitable furniture.
• The appliance should be assembled into correct built-in units and work surfaces that align to the standards and
have dimensions shown in Fig. 5.
• The kitchen furniture must be made of suciently heat-resistant material, at least 120 °C. The materials and
adhesives used must be resistant to heat from the appliance as according to the CSN EN 60335-2-6 standard.
Materials and adhesives that do not meet the stated standard may deform or peel-o.
480
560
min. 50
min. 50
min. 50
Fig. 5
Follow the following instruction during installation:
1. Remove all the covering and marketing materials from
the appliance before the rst use.
2. The required dimensions of the built-in space in the
worktop made of heat-resistant material of aminimum
thickness of 38–40 mm are on Fig. 5.
3. Leave min. 50 mm space for the adjacent cabinets on the
sides. Leave at least 25 mm free space behind the hob.
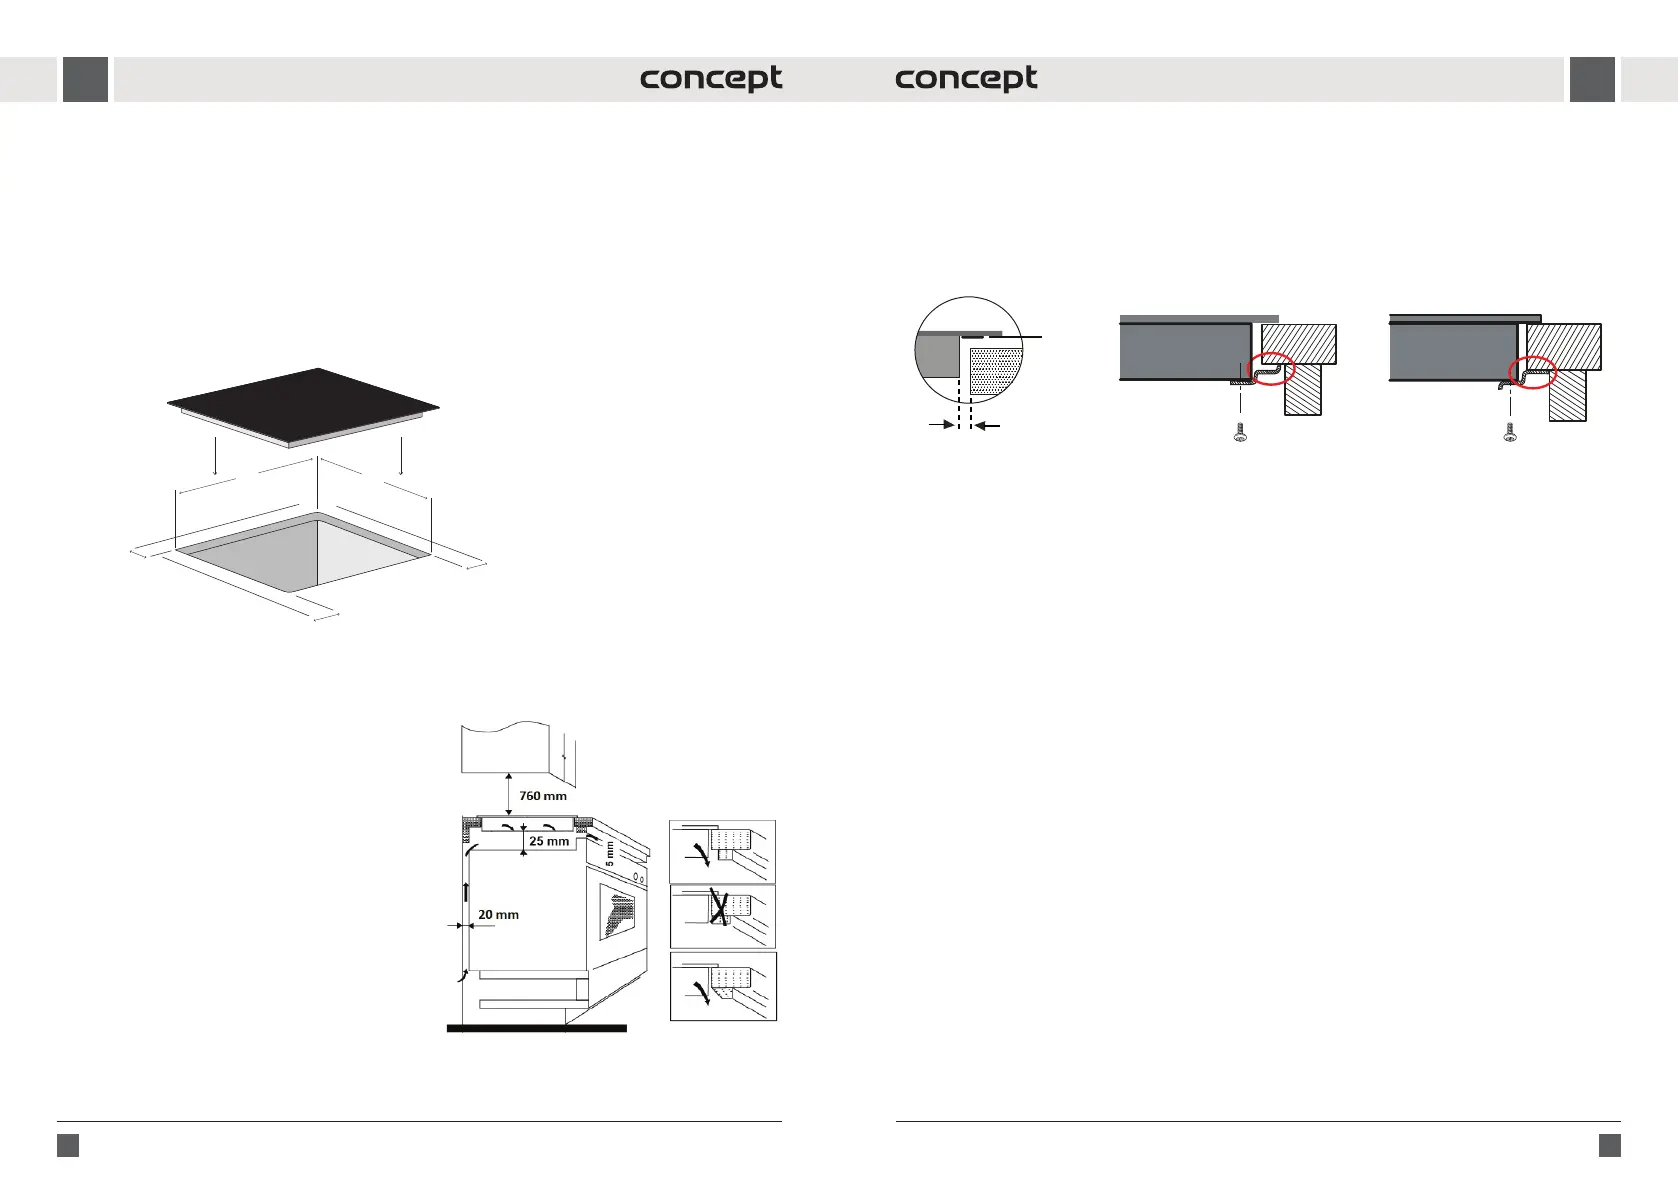
4. We recommend installing a cook hood above the hob.
The cooking hood should be at least 600 mm above the
hob.
5. Aseparate cabinet without acooking hood should be at
least 760 mm above the hob (Fig. 6).
6. For sucient air circulation the appliance needs to be
installed as shown in Fig. 6 and the cabinet must be
designed so that the air can ow at the bottom. Make
sure that the ventilation space of 20 mm, between the
drawer and the rear wall and 50 mm between the drawer
and the hob, is free (Fig. 6).
7. Make sure that the ventilation space of 25 mm, between
the hob and the top of the below unit, is free.
8. If the appliance is installed above drawers make sure that
the space, between the bottom of the appliance and the
upper drawer, is 50 mm.
Fig. 6
9. Position the appliance onto the edge of the worktop and pass the mains cable through the opening so that the
plug or terminals remain accessible after installation.
10. Push the appliance carefully into place. Make sure not to cause damage to the mains plug or to the mains cable.
11. The bottom of the hob base is tted with asealant to prevent it from moisture and leakage of liquids. After
installation the space between the edge of the hob and the worktops should be min. 3 mm (Fig. 7).
12. Secure the hob in the required position from the bottom to the worktop with the supplied retaining clips (Fig. 8).
13. Connect the supply cable to the terminal box and then turn on the appropriate circuit breaker on.
Removal
To uninstall the unit, it is important to proceed correctly:
1. First, switch o the circuit breaker and unplug the mains cable from the socket.
2. Remove the retaining clips.
3. Take out the hob and at the same time pull out the mains cable carefully.
Connecting to the mains power
• Only aqualied person can install this appliance!
• Make sure that the parameters on the rating plate are compatible with the electrical ratings of the main power
supply.
• Make sure that the parameters on the rating plate are compatible with the mains voltage and the current
protection. Otherwise the installed electric circuit could be overloaded, especially in the case of single-phase
connection (230 V).
• If the hob is connected to the mains power in asingle phase (see Connection of the terminal box of the appliance), all
cooking zones cannot be used for maximum performance. The hob automatically reduces the power consumption
of individual cooking zones to avoid overloading of the circuit breaker.
• We recommend using aself-contained electrical circuit to connect to the mains.
• Use solely electric power distribution with PE protective conductor.
• Do not use multi-plug adapters, connectors and extension cables. Risk of re due to overheating!
• Make sure that there is access to the mains plug or the circuit breaker after the installation.
• The electrical safety of the appliance can only be guaranteed if the protective terminal of the unit is connected to
the protective conductor of the mains.
• The manufacturer is not responsible for any injuries or damages that are the result of incorrect or missing protective
installation.
• Make sure the mains cable or plug does not touch the hot appliance or hot cookware, to prevent it from becoming
deformed and excessively bent.
• In the event of disconnecting the hob from the mains power, all set parameters will be reset and the hob control
panel will be locked.
F
A
B
Sealing
min. 3 mm
Hob
Worktop
Retaining clipRetaining clip
Fig. 7 Fig. 8
Worktop
Hob
Bekijk gratis de handleiding van Concept SDV4360, stel vragen en lees de antwoorden op veelvoorkomende problemen, of gebruik onze assistent om sneller informatie in de handleiding te vinden of uitleg te krijgen over specifieke functies.
Productinformatie
| Merk | Concept |
| Model | SDV4360 |
| Categorie | Fornuis |
| Taal | Nederlands |
| Grootte | 4692 MB |


