Handleiding
Je bekijkt pagina 42 van 43
82 83
ENEN
9. Position the appliance onto the edge of the worktop and pass the mains cable through the opening so that the
plug or terminals remain accessible after installation.
10. Push the appliance carefully into place. Make sure not to cause damage to the mains plug or to the mains cable.
11. The bottom of the hob base is tted with a sealant to prevent it from moisture and leakage of liquids. After
installation the space between the edge of the hob and the worktops should be min. 3 mm (Fig. 7).
12. Secure the hob in the required position from the bottom to the worktop with the supplied retaining clips (Fig. 8).
13. Connect the supply cable to the terminal box and then turn on the appropriate circuit breaker on.
Removal
To uninstall the unit, it is important to proceed correctly:
1. First, switch o the circuit breaker and unplug the mains cable from the socket.
2. Remove the retaining clips.
3. Take out the hob and at the same time pull out the mains cable carefully.
Connecting to the mains power
• Only aqualied person can install this appliance!
• Make sure that the parameters on the rating plate are compatible with the electrical ratings of the main power
supply.
• Make sure that the parameters on the rating plate are compatible with the mains voltage and the current
protection. Otherwise the installed electric circuit could be overloaded, especially in the case of single-phase
connection (230 V).
• If the hob is connected to the mains power in asingle phase (see Connection of the terminal box of the appliance), all
cooking zones cannot be used for maximum performance. The hob automatically reduces the power consumption
of individual cooking zones to avoid overloading of the circuit breaker.
• We recommend using aself-contained electrical circuit to connect to the mains.
• Use solely electric power distribution with PE protective conductor.
• Do not use multi-plug adapters, connectors and extension cables. Risk of re due to overheating!
• Make sure that there is access to the mains plug or the circuit breaker after the installation.
• The electrical safety of the appliance can only be guaranteed if the protective terminal of the unit is connected to
the protective conductor of the mains.
• The manufacturer is not responsible for any injuries or damages that are the result of incorrect or missing protective
installation.
• Make sure the mains cable or plug does not touch the hot appliance or hot cookware, to prevent it from becoming
deformed and excessively bent.
• In the event of disconnecting the hob from the mains power, all set parameters will be reset and the hob control
panel will be locked.
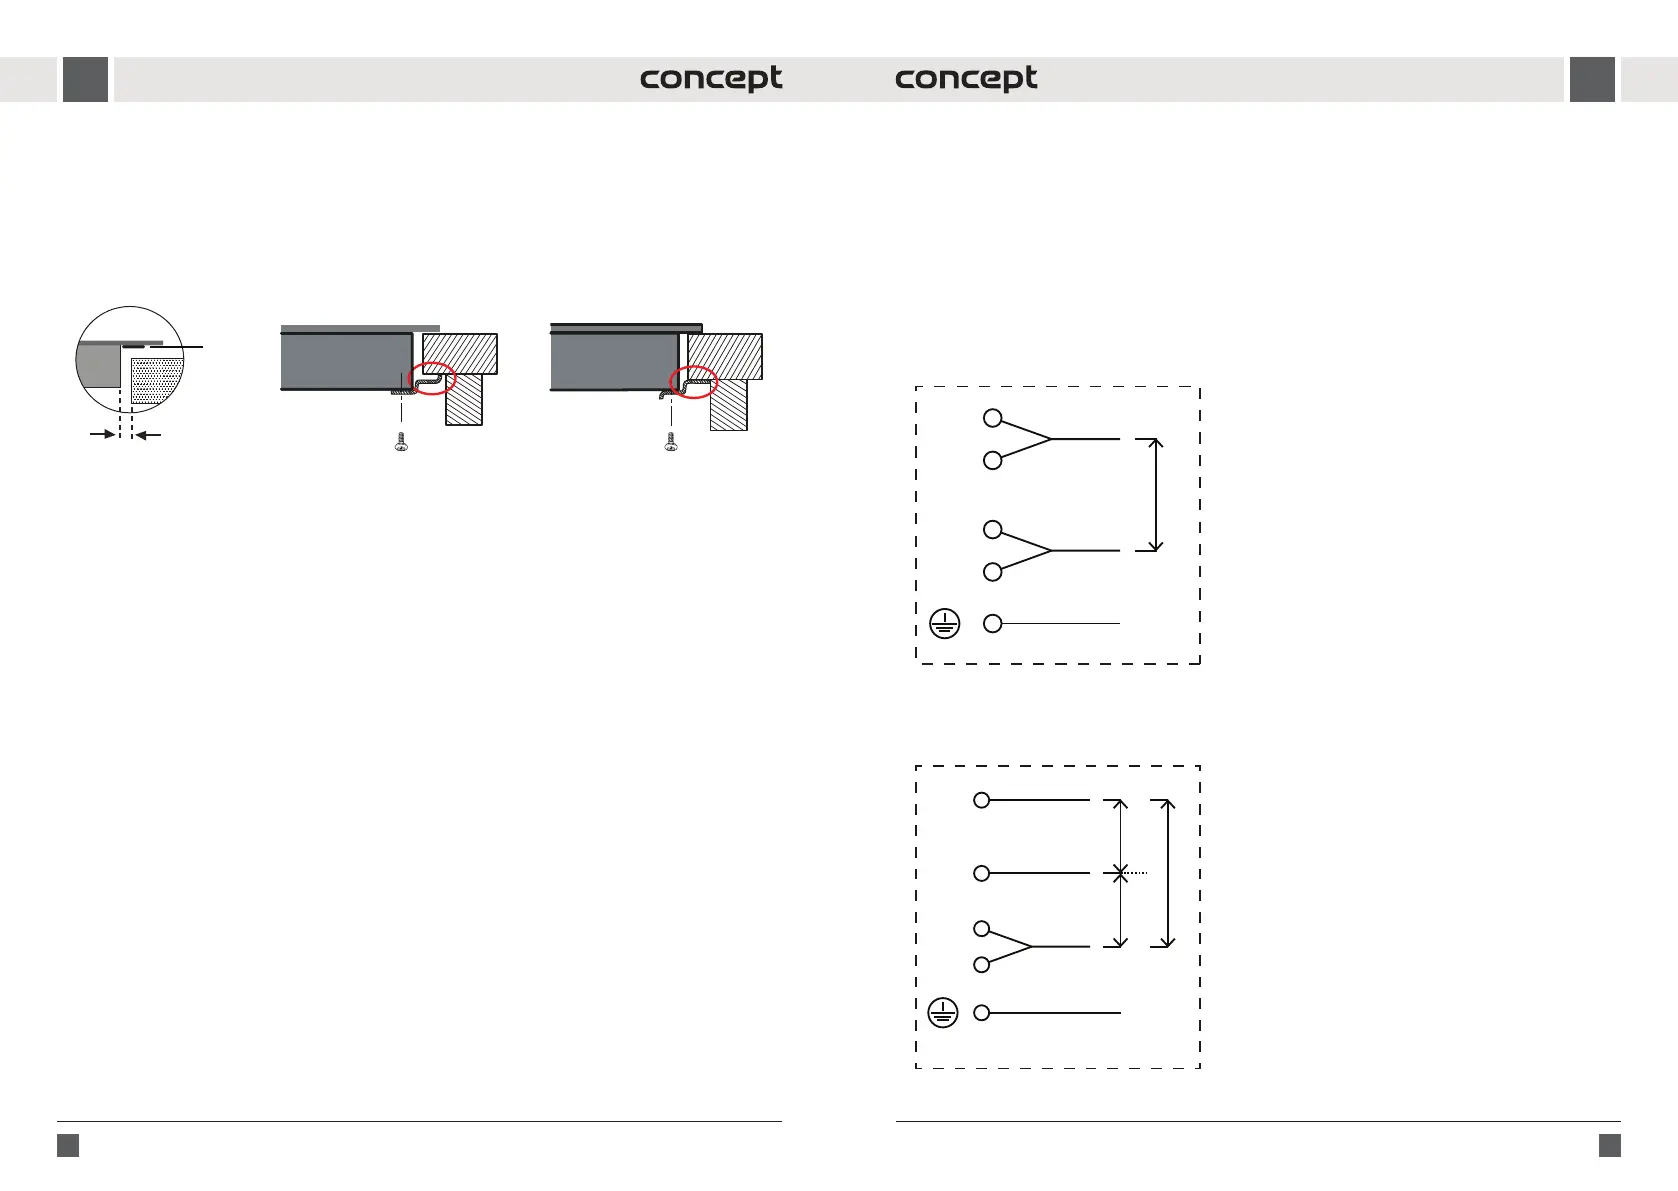
Connection of the terminal box of the appliance
• The hob is already supplied with amains cable. In case it is necessary to replace the mains cable due to damage,
Fig. 9 or Fig. 10, shows the wiring of the terminal box.
• The mains cable must be replaced with the same type of cable with the corresponding wire cross section.
• After connecting the new mains cable to the terminal box, secure the cable from being pulled out from the
terminal box.
• Follow the same procedure as described above when installing the appliance into the worktop cut-out and
connecting it to the mains power.
Connecting the hob by a3-core mains cable (230 V)
Use acable with wires of adiameter of at least 4 mm
2
.
Connecting the hob by a4-core mains cable (400 V)
Use acable with wires of adiameter of at least 2.5 mm
2
.
Fig. 9
L1
L2
N1
N2
Brown
220 - 240V 380 - 415V
220 - 240V
Black
PE
Green -
Yellow
PE
Green -
Yellow
Blue
Gray
L1
L2
N1
N2
220 - 240V
Blue
Gray
Brown
Black
Fig. 10
L1
L2
N1
N2
Brown
220 - 240V 380 - 415V
220 - 240V
Black
PE
Green -
Yellow
PE
Green -
Yellow
Blue
Gray
L1
L2
N1
N2
220 - 240V
Blue
Gray
Brown
Black
F
A
B
Sealing
min. 3 mm
Hob
Worktop
Retaining clipRetaining clip
Fig. 7 Fig. 8
Worktop
Hob
Bekijk gratis de handleiding van Concept SDV3860, stel vragen en lees de antwoorden op veelvoorkomende problemen, of gebruik onze assistent om sneller informatie in de handleiding te vinden of uitleg te krijgen over specifieke functies.
Productinformatie
| Merk | Concept |
| Model | SDV3860 |
| Categorie | Fornuis |
| Taal | Nederlands |
| Grootte | 4759 MB |


