Cecotec BelleCouture 6600 handleiding
Handleiding
Je bekijkt pagina 14 van 49
BELLECOUTURE 6600
BELLECOUTURE 6600
27
26
ENGLISHENGLISH
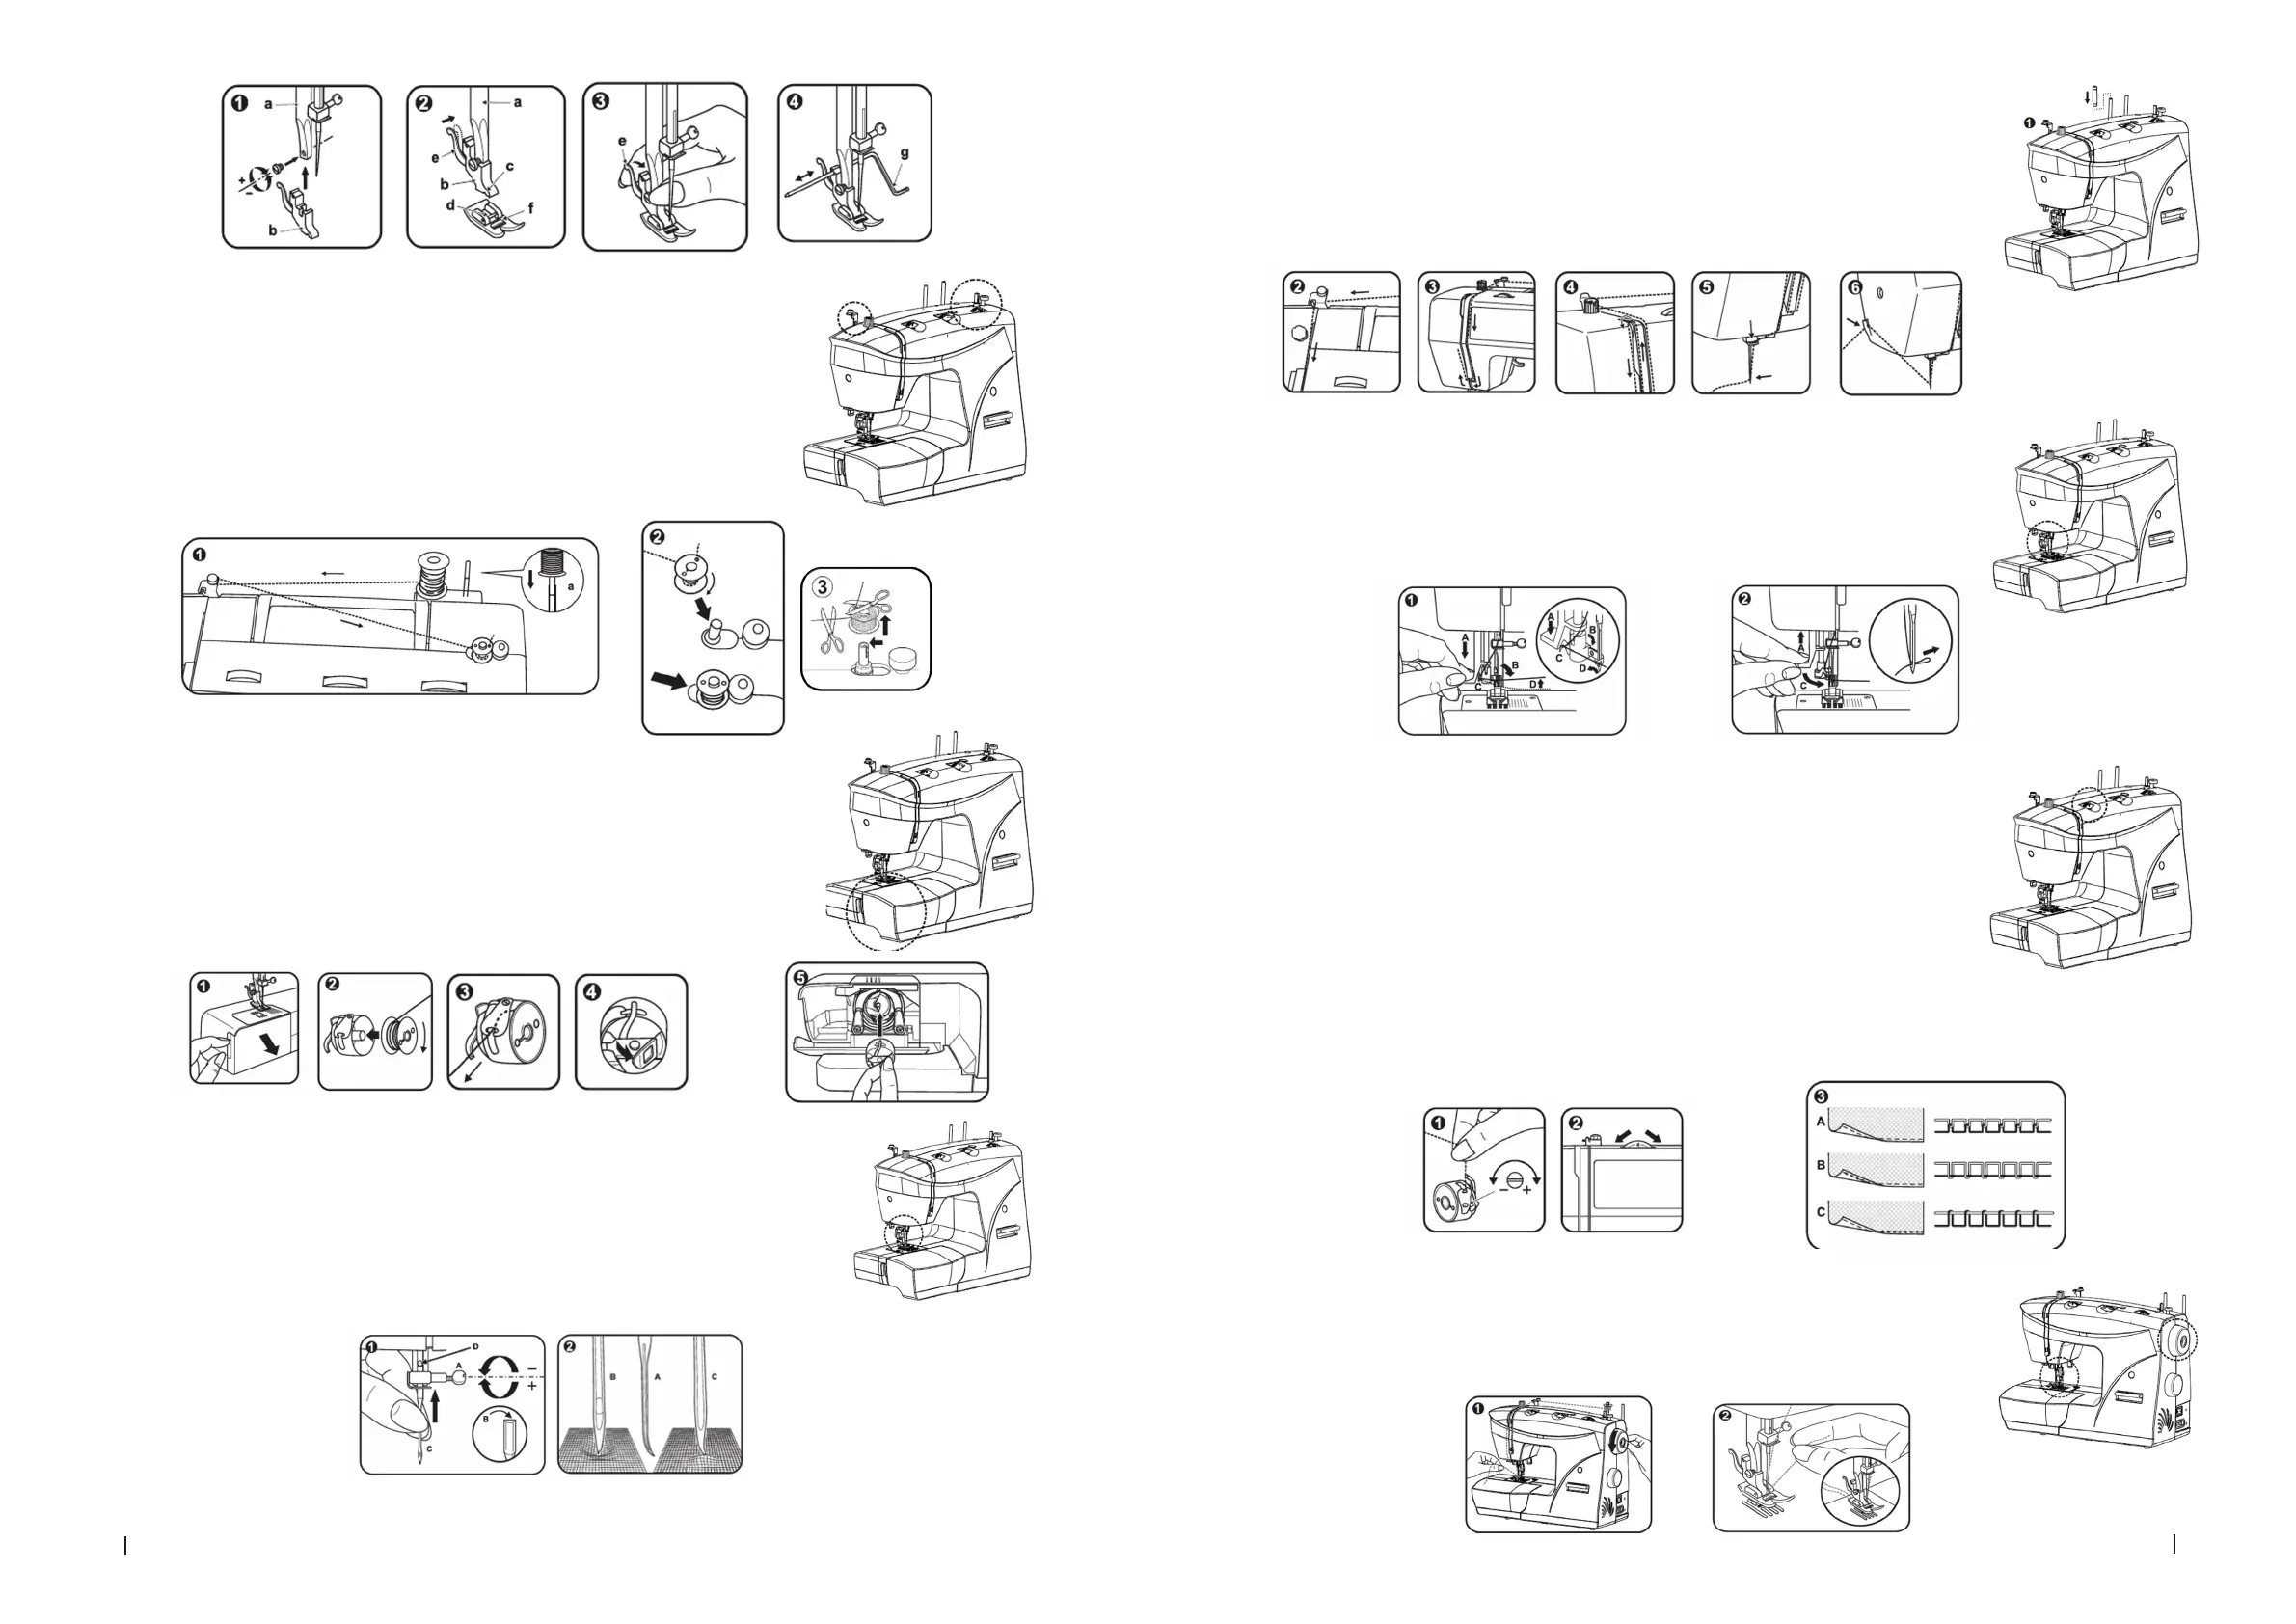
Winding the bobbin
1. Place a bobbin on the spool pin. Pull the thread out from the bobbin and thread it through
the thread guides as shown in the gure below.
2. Pass the end of the thread through the hole in the bobbin. Wind the thread clockwise
around the bobbin several times by hand. Push the bobbin winder shaft to far left position
(if it is not already there). Place the bobbin onto the shaft with the end of the thread coming
out of the top. Push the bobbin winder shaft to the right until it clicks. Hold the thread end.
3. Press the foot control gently. The bobbin will stop winding when it is full. Push it to the left
to the sewing position, remove it and cut the thread.
NOTE: when the bobbin winder shaft is in the winding position, the machine will not sew and the
handwheel will not turn. To start sewing, push the bobbin winder shaft to the left (sewing position).
Inserting the bobbin
NOTE: switch o the machine (0) before inserting or removing the bobbin. When inserting or removing
the bobbin, the needle must be in the highest position.
1.
Open the cover.
2.
Hold the bobbin case with one hand. Insert the bobbin so that the thread comes out clockwise.
3.
Pull the thread through the slot, downwards and into the rectangular hole below the tension
spring.
4.
Hold the bobbin case by the tab.
5.
Insert the bobbin case fully into the shuttle rail and release the tab. Make sure that the metal
projection ts into the notch at the top of the shuttle cover.
Changing the needle
NOTE: switch o the machine (0) before inserting or removing the needle.
1. Replace the needle if the thread breaks or if the machine skips stitches.
2. Select the correct type and size of needle for the fabric to be sewn. Turn the handwheel towards
you until the needle is at highest position. Loosen the needle clamping screw (A) and tighten again
after inserting the new needle. The at side of the needle shaft must be facing away from you (B).
Insert the needle as far as possible into the clamping piece (C). Tighten the screw. The needle must
always be straight and sharp so that the machine can sew properly.
3. Replace the needle if it is bent (A), blunt (B) or has a damaged tip (C).
Threading the top thread
NOTE: before threading, switch o the machine (0).
- Raise the needle bar to the highest position. Follow exactly the threading sequence shown in gures 1 to
5. If you skip a step or do not hook the thread correctly on any of the thread guides, the machine will not
sew correctly.
- Continue pulling the thread towards the needle bar thread guide. Pass the thread through the eye of the
needle from front to back. Leave about 10 cm of loose thread behind the needle. Cut the thread as shown
in gure 6.
Automatic needle threader (optional)
NOTE: put the power switch in the 0 position before threading.
1. Raise the needle to the highest position. Press the lever (A) downwards. The threader will automatically
move to the threading position (B). Pass the thread around the hook (C). Pass the thread in front of the
needle around the hook (D) from bottom to top.
2. Release the lever (A). Pull the thread through the eye of the needle.
NOTE: the automatic needle threader is an optional accessory which may not be included with your machine
model.
Thread tension
NOTE: the bobbin thread tension is set at the factory and usually does not need to be readjusted.
1.
Bottom thread tension:
To check the bottom thread tension, remove the bobbin case and bobbin from the machine, and hold the
bobbin case by letting it hang by the thread. Shake it a couple of times. If the tension is correct, the thread
will unwind about 5 centimetres. If the thread is too tight, it will not unwind. If the thread is too loose, it will
unwind more than 5 centimetres.
To adjust the tension, turn the small screw on the side of the bobbin case.
2.
Top thread tension:
Basic thread tension setting: “4”.
To increase the tension, set the thread tension knob to a higher number. To reduce the tension, set the thread
tension knob to a lower number.
3.
Look at the stitches to determine if you have a proper tension setting:
A.
Normal tension.
B.
Tension too loose.
C.
Excessive tension.
Bringing up the bottom thread
1. Hold the top thread with your left hand. Turn the handwheel towards you with your right hand until the
needle moves down and then back up again to the highest position.
2. Pass the needle thread so that the bobbin thread binds into it. Pull the needle thread towards you and the
bottom thread will come out of the bobbin. Pull both threads about 15 cm away from you and pass them
under the presser foot.
Bekijk gratis de handleiding van Cecotec BelleCouture 6600, stel vragen en lees de antwoorden op veelvoorkomende problemen, of gebruik onze assistent om sneller informatie in de handleiding te vinden of uitleg te krijgen over specifieke functies.
Productinformatie
| Merk | Cecotec |
| Model | BelleCouture 6600 |
| Categorie | Naaimachine |
| Taal | Nederlands |
| Grootte | 24665 MB |
