Cecotec BelleCouture 6600 handleiding
Handleiding
Je bekijkt pagina 13 van 49
BELLECOUTURE 6600
BELLECOUTURE 6600
25
24
ENGLISHENGLISH
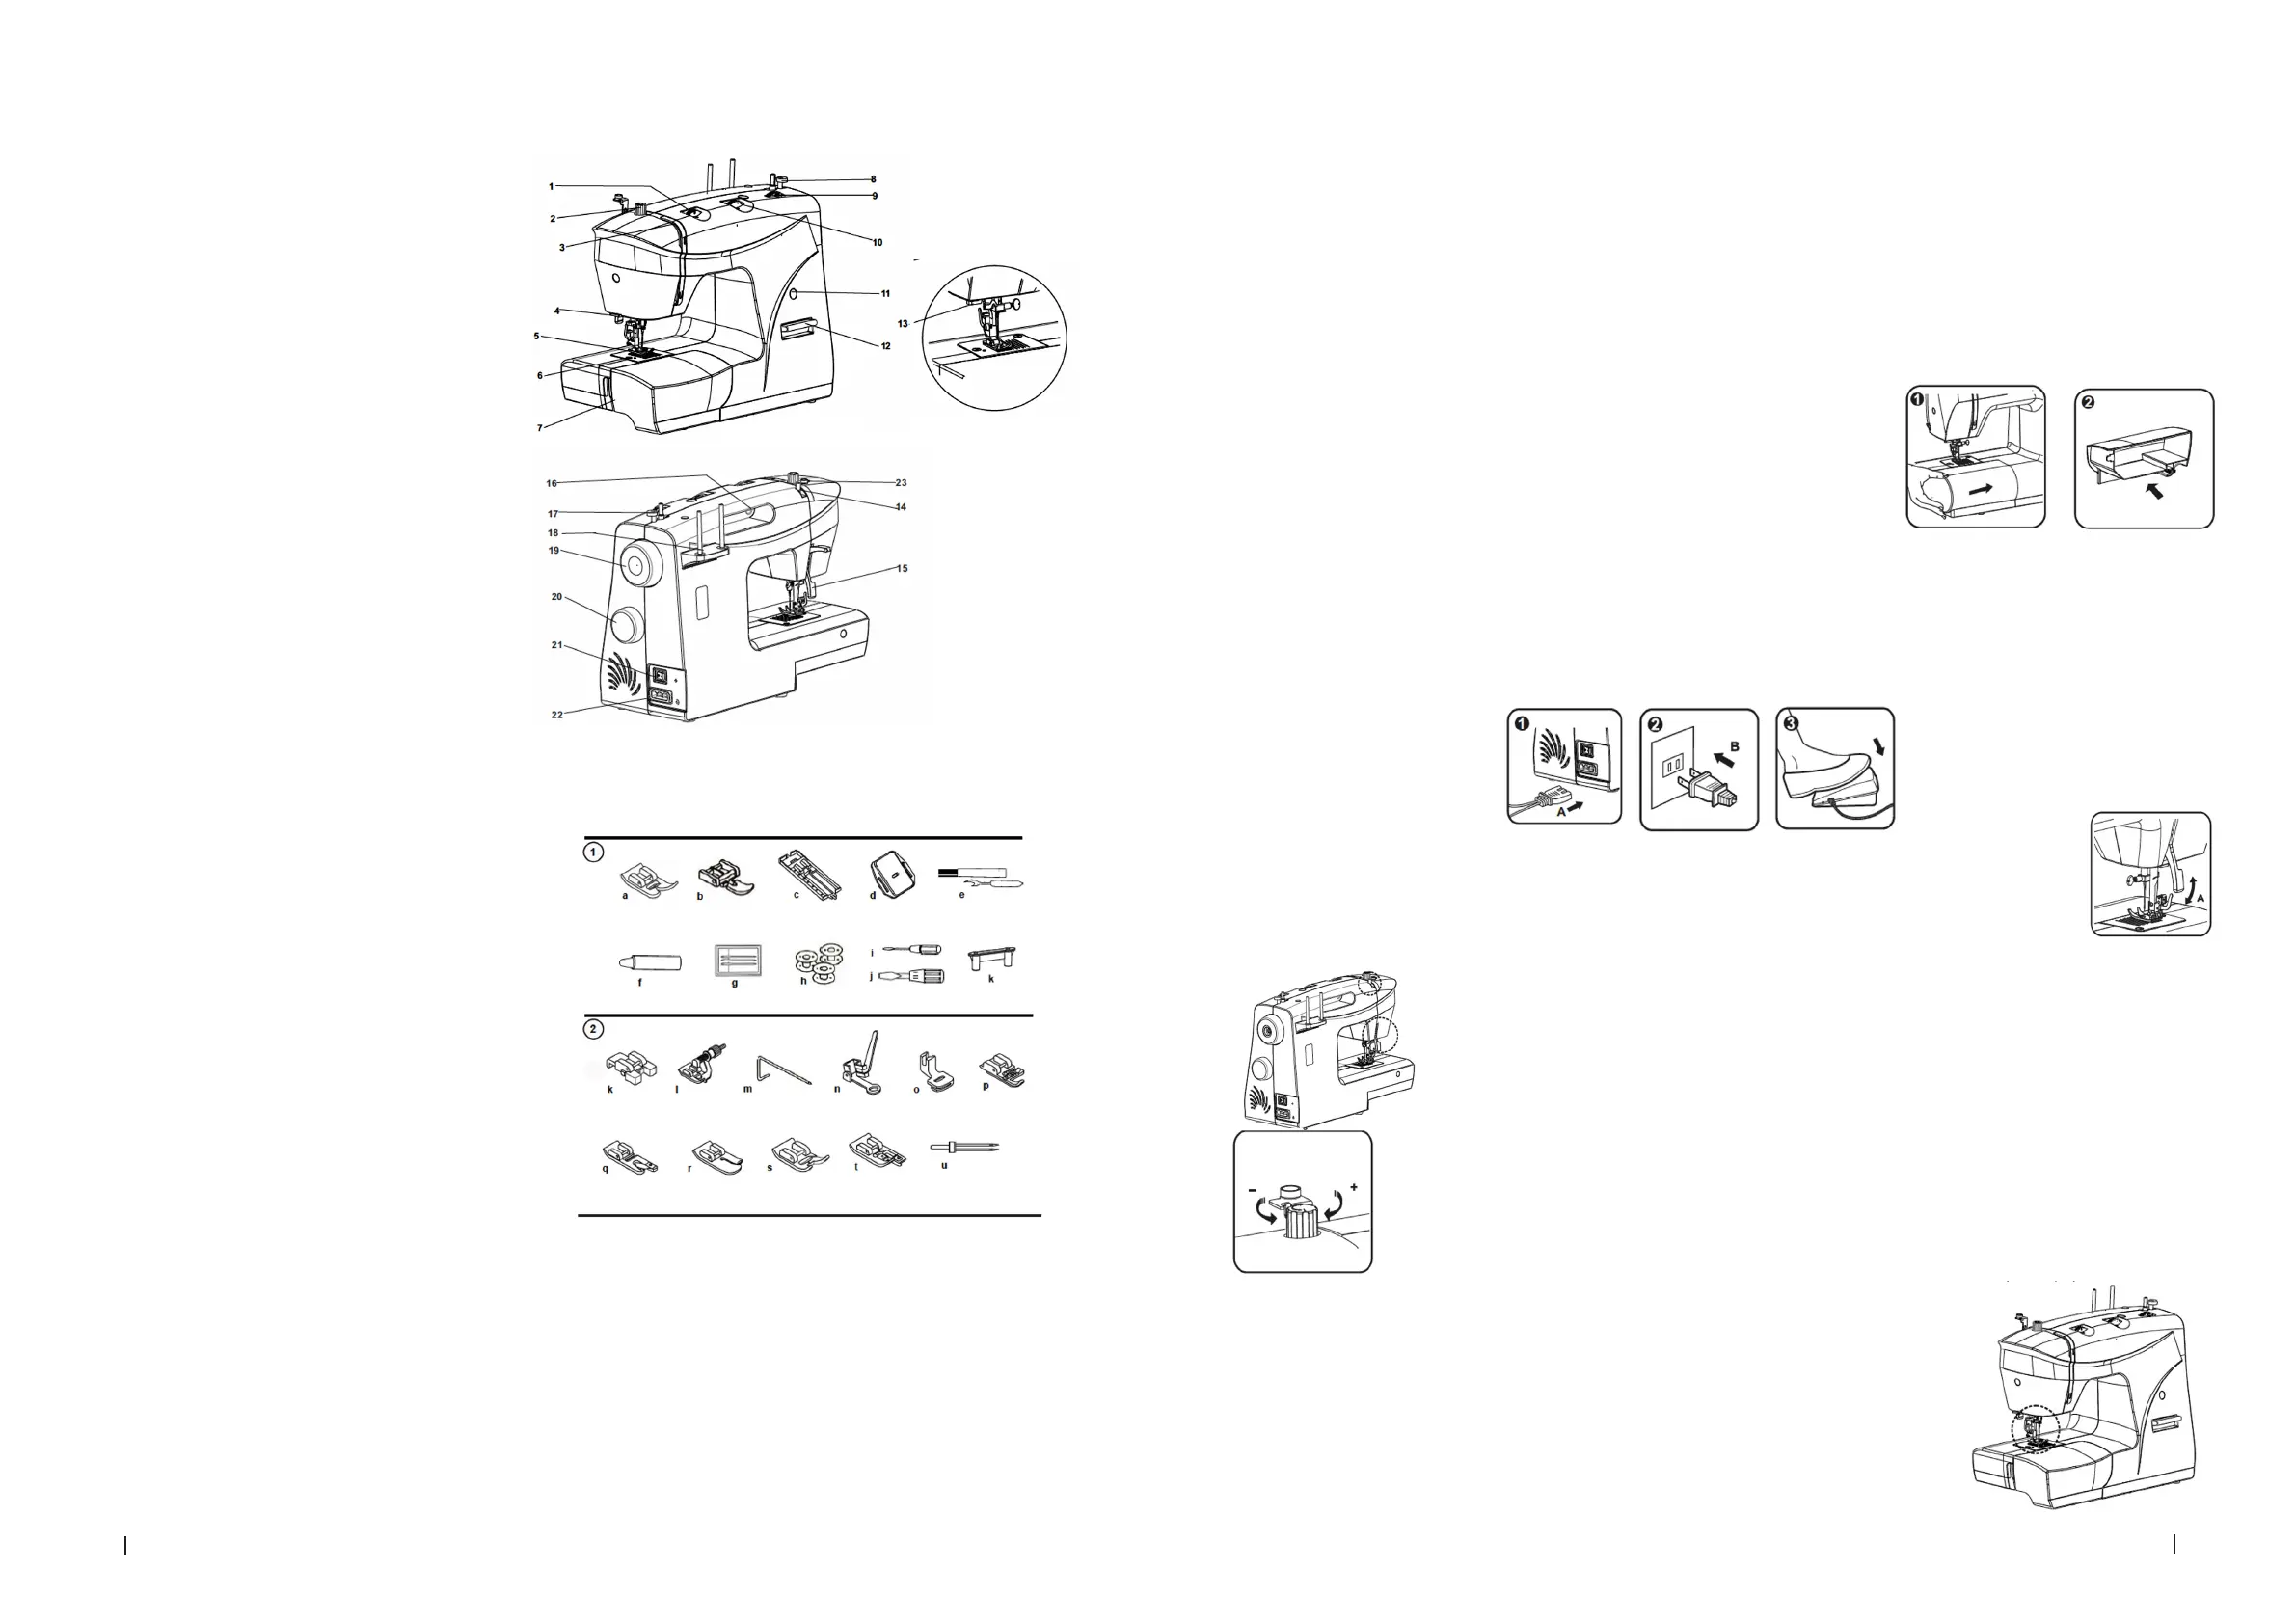
1. PARTS AND COMPONENTS
1. Thread tension knob
2. Presser foot pressure knob
3. Thread take-up lever
4. Thread cutter
5. Presser foot
6. Needle plate
7. Removable sewing table
8. Bobbin winder stop
9. Stitch length adjustment knob
10. Stitch width adjustment knob
11. Stitch display
12. Reverse stitch switch
13. Automatic needle threader
14. Top thread guide
15. Presser foot lifter
16. Handle
17. Bobbin winder shaft
18. Spool pin
19. Handwheel
20. Pattern selection knob
21. Power switch
22. Machine socket
23. Bobbin thread guide
Accessory kit
Standard accessories (included)
a. Multipurpose presser foot
b. Double sided zipper foot
c. Four step buttonhole foot
d. Embroidery plate
e. Ripper/brush
f. Lubricating oil
g. Needle x 3 pcs.
h. Bobbin x 3 pcs.
i. Small screwdriver
j. Large screwdriver
k. Spool pin holder
Optional accessories (not included)
k. Button sewing foot
l. Blind hem foot
m. Edge/Quilting guide
n. Darning/embroidery foot
o. Gathering foot
p. Cording foot
q. Hemmer foot
r. Quilting foot
s. Satin stitch foot
t. Overcasting foot
u. Twin needle
NOTE:
The graphics in this manual are schematic representations and may not exactly match the device.
2. BEFORE USE
- This appliance is packaged in a way as to protect it during transport. Take the appliance out of its box and remove all packaging materials.
You can keep the original box and other packaging elements in a safe place. This will help you prevent damage to the appliance when
transporting it in the future. In case the original packaging is disposed of, make sure all packaging materials are recycled accordingly.
- Make sure all parts and components are included and in good conditions. If there is any piece missing or in bad conditions, contact the ocial
Cecotec Technical Support Service immediately.
Box content
- BelleCouture 6600
- Accessory kit
- Instruction manual
3. OPERATION
Installing the removable sewing table and the spool pin
1. Hold the removable sewing table in horizontal position and push it in the direction of
the arrow to position it.
2. This compartment can be used for storing accessories. To open it, simply pull it out.
Connecting the appliance to the mains
Always make sure that the machine is switched o (0) and unplugged from the mains when not in use and before tting or removing any parts.
- This machine has a polarised plug which must be used in a suitable socket.
- Connect the cable to the socket on the machine and to a power socket (1/2).
- The power switch is located on the socket of the machine. The machine will not switch on if the switch is not in the on (I) position (1).
- The indicator light on the machine will automatically turn on when you turn the switch to the on (I) position.
- To start operating the appliance, press the foot control (3). The speed is adjusted by the pressure exerted on it.
NOTE: when not in use, rst switch o the machine by pressing the power switch and then disconnect it from the mains socket.
Two-step presser foot lifter
When sewing several layers or thick fabrics, the presser foot can be raised to a second position to facilitate the
positioning of the fabric to be sewn (A).
Adjusting the presser foot pressure
The presser foot pressure is preset and does not require any readjustment, regardless of the type of fabric (light
or heavy). However, if you need to adjust it, turn the presser foot pressure knob as shown in the gure below.
To sew very thin fabrics, reduce the pressure by turning the knob counterclockwise. On the contrary, when sewing
thick fabrics, turn the knob clockwise to increase the pressure.
Attaching the presser foot holder
NOTE: turn the machine switch to the o position (0) before performing any of the operations listed
below.
1. Raise the needle to the highest position and raise the presser foot. Place the foot holder (b)
on the bar (a).
2. To attach the presser foot, lower the presser foot holder (b) until the slot (c) is directly above
the pin (d). When you lower the holder (b), the presser foot (f) will automatically engage.
3. To remove the presser foot, rst lift it up and then release it by lifting the presser foot release
lever (e) at the back of the foot holder (3).
4. Place the guide (g) in the slot as shown in the gure. Adjust the distance according to what is
to be sewn (4).
Bekijk gratis de handleiding van Cecotec BelleCouture 6600, stel vragen en lees de antwoorden op veelvoorkomende problemen, of gebruik onze assistent om sneller informatie in de handleiding te vinden of uitleg te krijgen over specifieke functies.
Productinformatie
| Merk | Cecotec |
| Model | BelleCouture 6600 |
| Categorie | Naaimachine |
| Taal | Nederlands |
| Grootte | 24665 MB |
