Carrier WeatherMaker 48GE handleiding
Handleiding
Je bekijkt pagina 26 van 80
26
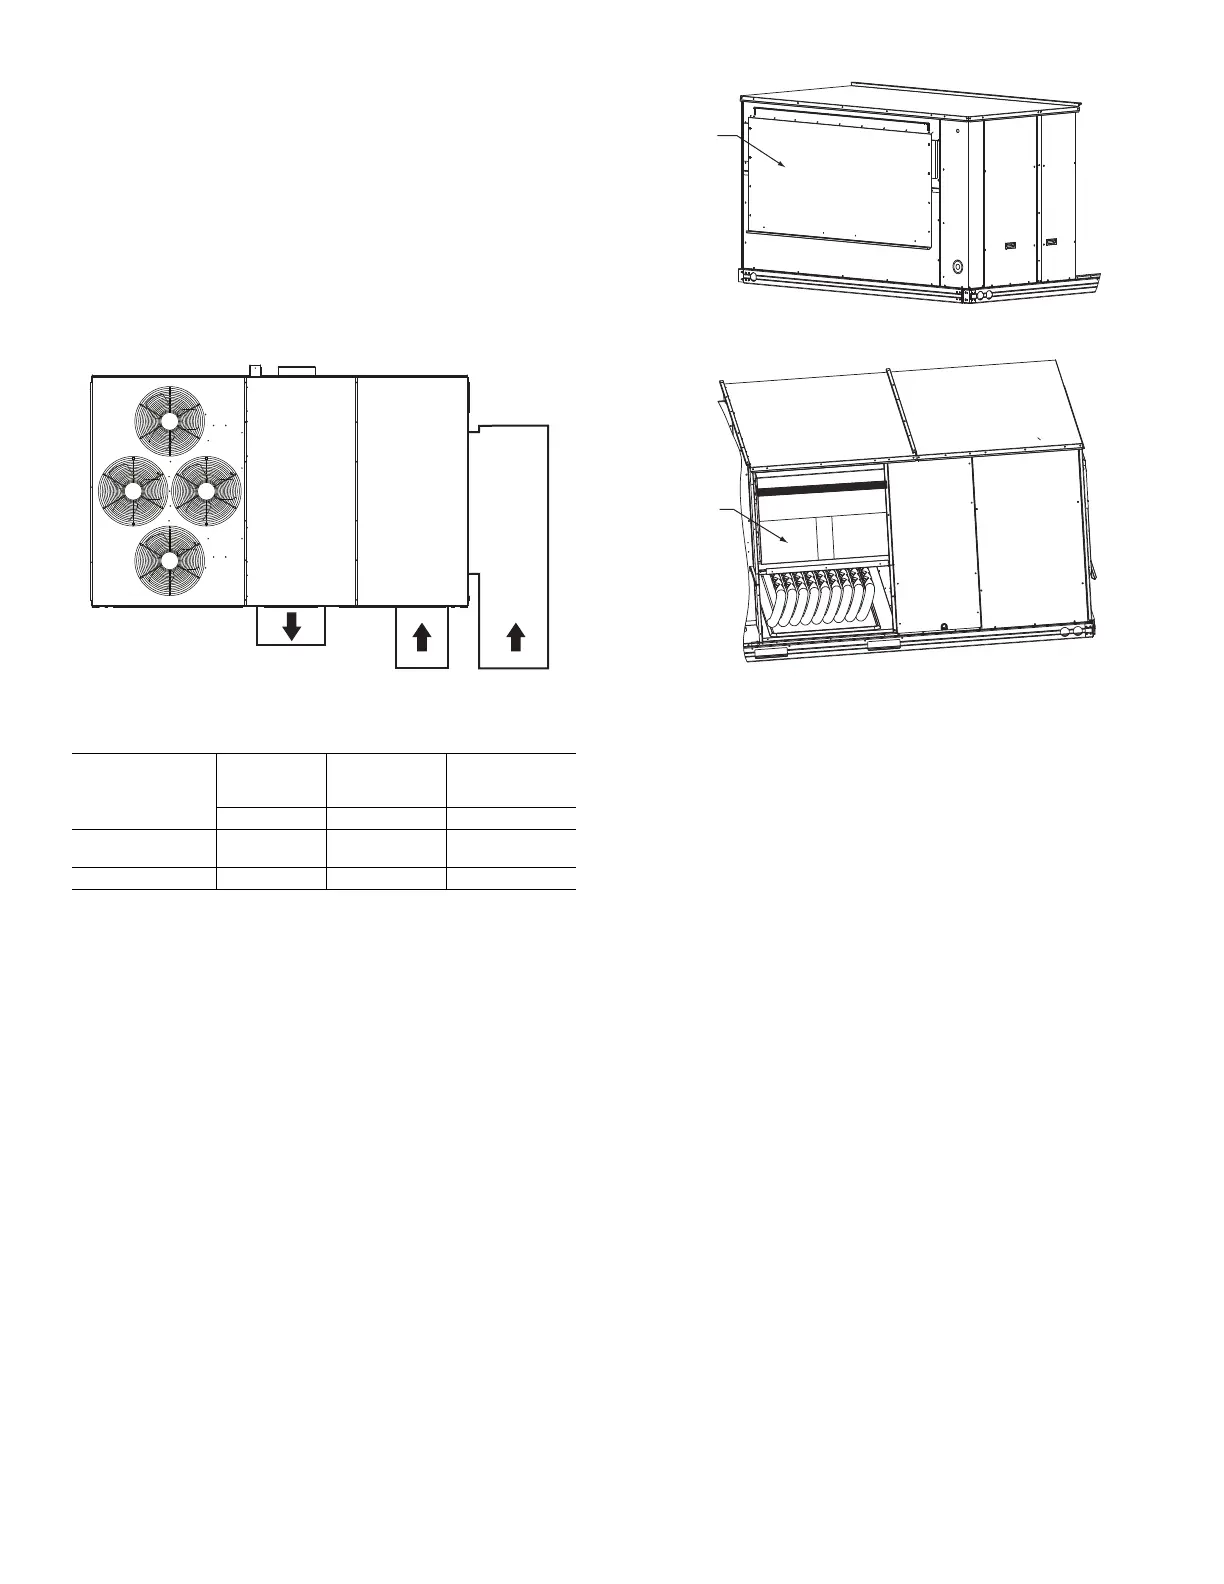
Step 7 — Horizontal Duct Connection
Depending on the unit size, see either Fig. 3 and 4 (size 17), Fig. 8
and 9 (sizes 20 and 24), or Fig. 13 and 14 (size 28) for locations
and sizes of the horizontal duct connections. Note that there are
2 different return air duct connection locations – one for unit with-
out an economizer (on back side of unit) and a different one for
unit equipped with an economizer (on left end, under the econo-
mizer hood). The supply air duct connection is on the back side.
See Fig. 23 for top view depicting typical horizontal duct
arrangements.
NOTE: 48GE size 17 to 28 units are factory assembled as either
dedicated horizontal or vertical units. These units cannot be field
converted.
Fig. 23 — Horizontal Duct Opening Dimensions
Field-supplied (3/4 in.) flanges should be attached to horizontal
duct openings (see Fig. 23) and all ductwork should be secured to
the flanges. Insulate and weatherproof all external ductwork,
joints, and roof or building openings with counter flashing and
mastic in accordance with applicable codes.
Step 8 — Install Outside Air Hood - Factory Option
The outside air hood for factory-option economizer is shipped in
knock-down form and requires field assembly. The panel for the
hood top is shipped on the end of the unit (see Fig. 24). The re-
maining parts for the hood assembly (including side panels, filters
and tracks) are shipped in a carton that is secured to the rear of the
blower assembly. Access the carton location through rear panel
(see Fig. 25).
To remove the hood parts package:
1. Remove the back blower access panel.
2. Locate and cut the strap, being careful to not damage any
wiring.
3. Carefully lift the hood package carton through the back
blower access opening.
Fig. 24 — Hood Top — Shipping Position
Fig. 25 — Hood Package — Shipping Location
To assemble the outside air hood (see Fig. 26 for hood
component locations):
1. Remove hood top panel from shipping position on unit end.
2. Install filters supports (Item 1) to the upper end panel using
the screws provided.
3. Install each deflector (Item 8) on to each filter support
(Item 1) using the screws provided.
4. Apply seal strip to mating flanges on side panels of hood
(Items 4 and 5).
5. Secure side panels (Items 4 and 5) to upper panel using the
screws provided.
6. Apply seal strip to mating flange of the hood (see Fig. 26).
7. Secure hood top (Item 3) to upper panel using the screws pro-
vided. (On 44-in. chassis, remove the screws from across top
cover of unit. The rear flange of hood top will slide behind
unit top over flange.)
8. Secure side retainers (Item 6) to side panels (Items 4 and 5)
using the screws provided, screwing from outside of the
hood.
9. Secure each central retainer (Item 2) to the hood top (Item 3).
Then align central retainers to holes located on filter support
(Item 1), so central retainer is perpendicular to hood and each
filter support. Secure using screws provided.
10. Apply seal strip to top diverters (Item 7).
11. Secure top diverters (Item 7) to hood top (Item 3).
12. Install outdoor air screens by sliding them into each of the
four spaces created by the hood, filter support and central
retainers. To do so, first insert the air screens into pocket cre-
ated at the end of hood (Item 3), then fully put the air screen
into place, and then slide them back into pocket created in the
filter support (Item 1). Repeat this for each air screen
(see Fig. 27). See Fig. 28 for completed hood assembly.
LOCATION
SUPPLY
RETURN
WITHOUT
ECONOMIZER
RETURN WITH
ECONOMIZER
Back Back Left End
Height - in. (mm) 14-5/8 (372)
41-3/8 (1051)
a
49-3/8 (1253)
b
NOTE(S):
a. Size 17 and 20 units only.
b. Size 24 and 28 units only.
18-3/8 (467)
Width - in. (mm) 29-3/4 (756) 23-3/8 (593) 61-5/8 (1564)
Return
Air Duct
With
Economizer
Return
Air Duct
Without
Economizer
Horizontal
Supply Air
Hood Top
Shipping
Position
Hood
Package
Bekijk gratis de handleiding van Carrier WeatherMaker 48GE, stel vragen en lees de antwoorden op veelvoorkomende problemen, of gebruik onze assistent om sneller informatie in de handleiding te vinden of uitleg te krijgen over specifieke functies.
Productinformatie
| Merk | Carrier |
| Model | WeatherMaker 48GE |
| Categorie | Niet gecategoriseerd |
| Taal | Nederlands |
| Grootte | 10499 MB |


