Behringer RD-78 handleiding
Handleiding
Je bekijkt pagina 10 van 46
18 19Quick Start GuideRD-78
INSTRUMENTS
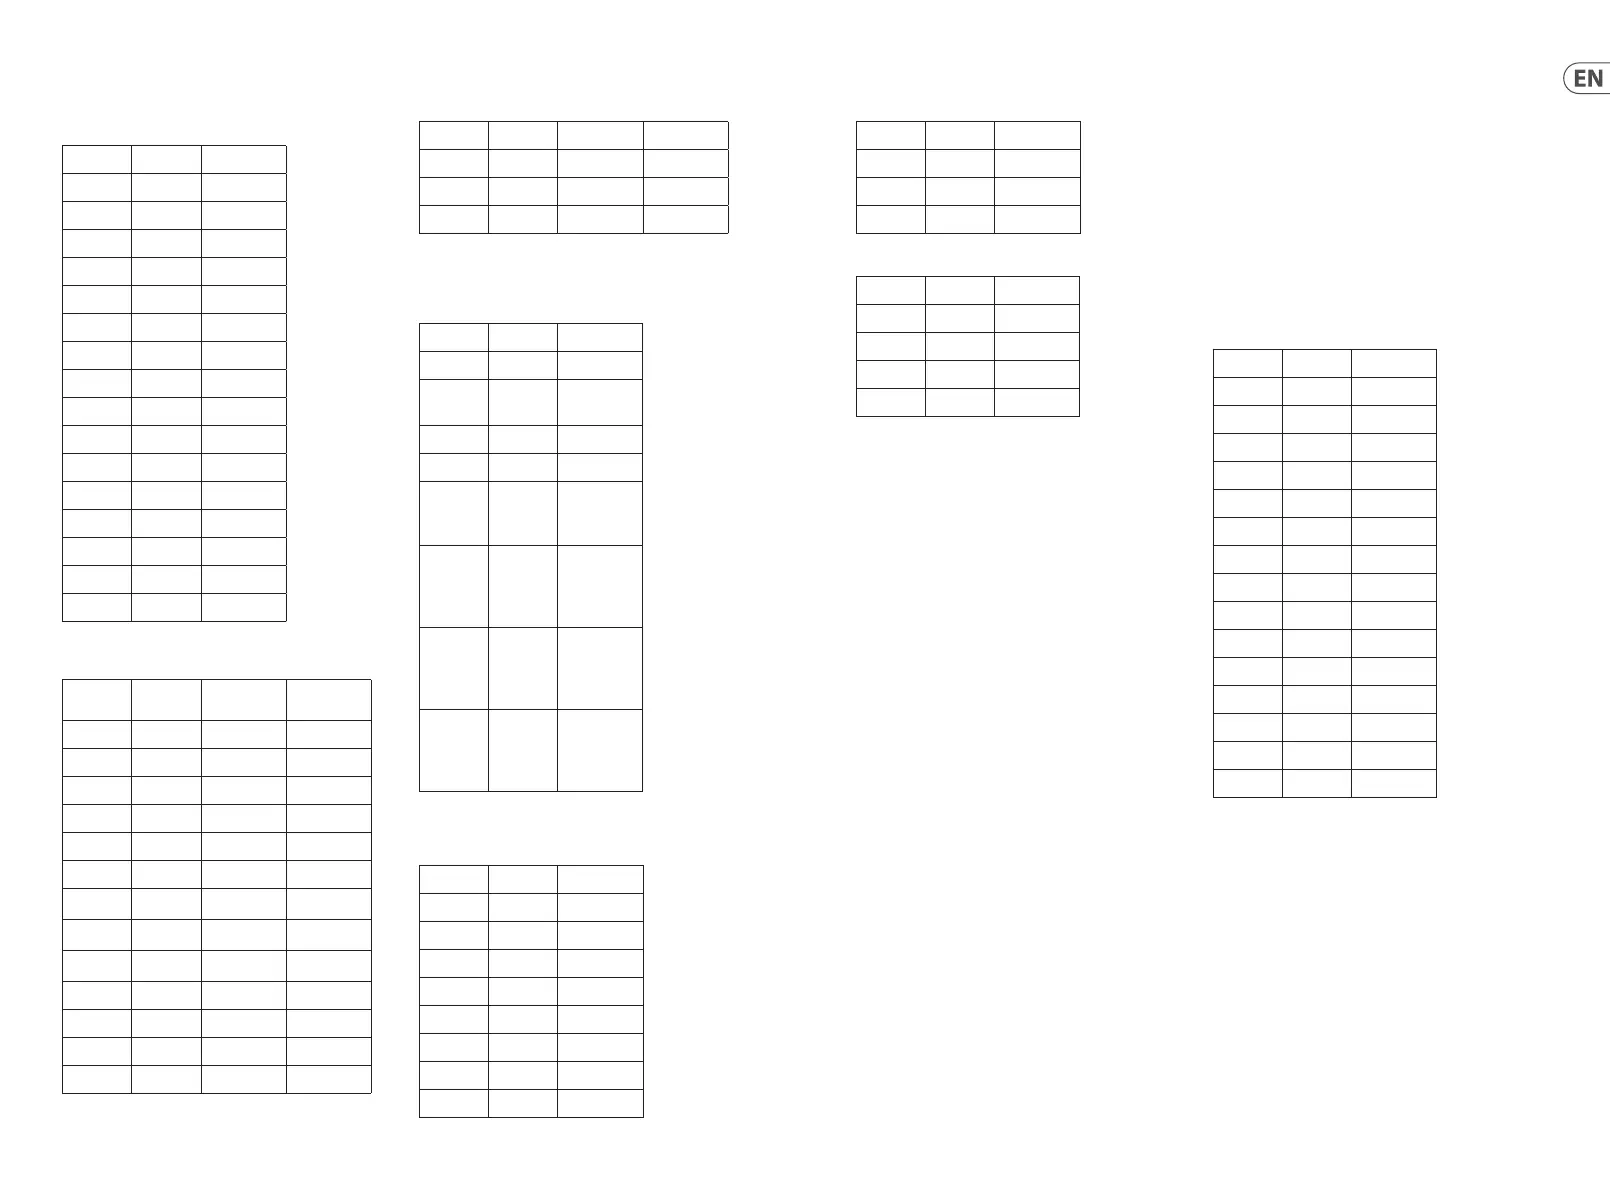
SYNC SOURCE
Press and hold buttons 27 and 47, then use buttons 31 – 38 to
select a synchronization source and division. For analog triggers
press TRIG (34) followed by the required division on 35-38
PRESET RHYTHM
Use the buttons to select one of the onboard preset rhythms:
Button Step Instrument
31 1 Bass Drum
32 2 Snare Drum
33 3 Rimshot
34 4 Hi Hat
35 5 Cymbal
36 6 Maracas
37 7 Clave
38 8 High Bongo
39 9 Low Bongo
40 10 Low Conga
41 11 Accent
42 12 Clap
43 13 Tambourine
44 14 Guiro
45 15 Metallic Beat
46 16 Cowbell
Button Step Rhythm A
Rhythm B
(if dierent)
30 Func Waltz
31 1 Shue
32 2 Slow Rock
33 3 Swing
34 4 Foxtrot Tango
35 5 Boogie
36 6 Enka
37 7 Bossa Nova
38 8 Samba
39 9 Mambo Cha Cha
40 10 Beguine Rhumba
41 11 Rock 1
42 12 Rock 2
Button Step Source
31 1 Internal clock
32 2 MIDI (5-pin
DIN)
33 3 USB MIDI
34 4 Trigger
35 5 1 pulse per
step via sync
in (1)
36 6 2 pulse per
quarter note
via sync
in (1)
37 7 24 pulse
per quarter
note via sync
in (1)
38 8 48 pulse
per quarter
note via sync
in (1)
43 13 Rock 3
44 14 Rock 4
45 15 Disco 1
46 16 Disco 2
TRACK WRITE MODE
While the track is not playing use a combination of buttons 31 - 42
to go to a specic bar that requires editing:
MIDI Specications
An accent at the level set by control 14 will appear on any step
where a MIDI velocity value above 96 is used on any note playing
on that step.
The RD-78 does not respond to any MIDI continuous controllers.
WRITING A PATTERN
The RD-78 has sixteen patterns, each with up to sixteen steps and
A/B variations.
Use switch 20 to put the RD-78 into Pattern Write mode. Select
pattern group I or II using button 27. Select the pattern that you
wish to write using buttons 31 – 46. The LED above the selected
pattern will ash. If there is already data in the pattern you can
clear it by holding the CLEAR button (25) and pressing the pattern
button. Press the START/STOP button (29), then press and hold the
FUNCTION button (30) and use the SCALE switch (26) to select the
required scale. This will indicate where the quarter notes are by
lighting the relevant LEDs above the steps. If you want to program
a pattern with fewer than sixteen steps then hold the FUNCTION
Button Step Bar Number
31 1 1
32 2 2
33 3 3
34 4 4
35 5 5
36 6 6
37 7 7
38 8 8
39 9 9
40 10 0
41 11 100
42 12 200
Buttons 43 – 46 also have functions while editing a track:
Button Step Function
43 13 Copy
44 14 Paste
45 15 Delete
46 16 Insert
MIDI CHANNEL CHANGE
Press and hold the Function button (30) then press Pattern
Group (27). If the A/i LED is lit then you are adjusting MIDI Rx
channel; B/ii adjusts Tx channel. Then use buttons 31 – 46 to set
the required channel.
47. WRITE/NEXT / TAP / STEP RESET – this button has dierent
functions according to what mode the RD-78 is in:
• Track Write – writes a pattern to the current location, and
moves on to the next one.
• Pattern Write – allows programming by tapping on the
required step.
• Track Play – jumps back from the current location to
a bar specied during programming (see WRITING A
TRACK below).
REAR PANEL
48-57. VOICE OUTS – these unbalanced 3.5 mm TS jack sockets
allow individual voices to be removed from the main mix and
treated separately:
48. Guiro
49. Tambourine
50. Conga and Bongos
51. Clave and Cowbell
52. Maracas
53. Metallic Beat
54. Cymbal and Hi Hat
55. Clap and Rimshot
56. Snare Drum
57. Bass Drum
58. MIX OUT – use this 6.35 mm TS jack socket to monitor the
main mix output of the RD-78.
59. VAR – use this 6.35 mm TS jack socket to manually trigger
variations (depending on the setting of switch 28)
using a footswitch.
60. START/STOP – use this 6.35 mm TS jack socket to start and
stop the RD-78 when internally sync’ed using a footswitch.
61. MIDI OUT/THRU – use this 5-pin DIN socket to send MIDI
data from the RD-78 to external MIDI destinations and
to mirror MIDI data received on the MIDI In socket (62) or
USB (63).
62. MIDI IN – use this 5-pin DIN socket to control and
synchronize the RD-78 from an external MIDI source.
63. USB SOCKET – use this USB 2.0 Type B socket to update the
RD-78’s rmware, change settings using the SynthTribe app
and to control the RD-78 using USB MIDI.
64. POWER BUTTON
65. POWER SOCKET – use only the supplied 9 V 500 mA power
supply with the RD-78.
Note No. Note Drum
36 C1 Kick
40 E1 Snare
39 D#1 Clap
37 C#3 Rimshot
49 C#4 Cymbal
46 A#3 Hi Hat
80 G#6 Metallic Beat
70 A#5 Maracas
54 F#4 Tambourine
73 C#6 Guiro
75 D#6 Clave
56 G#4 Cow Bell
64 E5 Low Conga
61 C#5 Low Bongo
60 C5 High Bongo
Bekijk gratis de handleiding van Behringer RD-78, stel vragen en lees de antwoorden op veelvoorkomende problemen, of gebruik onze assistent om sneller informatie in de handleiding te vinden of uitleg te krijgen over specifieke functies.
Productinformatie
| Merk | Behringer |
| Model | RD-78 |
| Categorie | Niet gecategoriseerd |
| Taal | Nederlands |
| Grootte | 6753 MB |

