Handleiding
Je bekijkt pagina 8 van 16
8
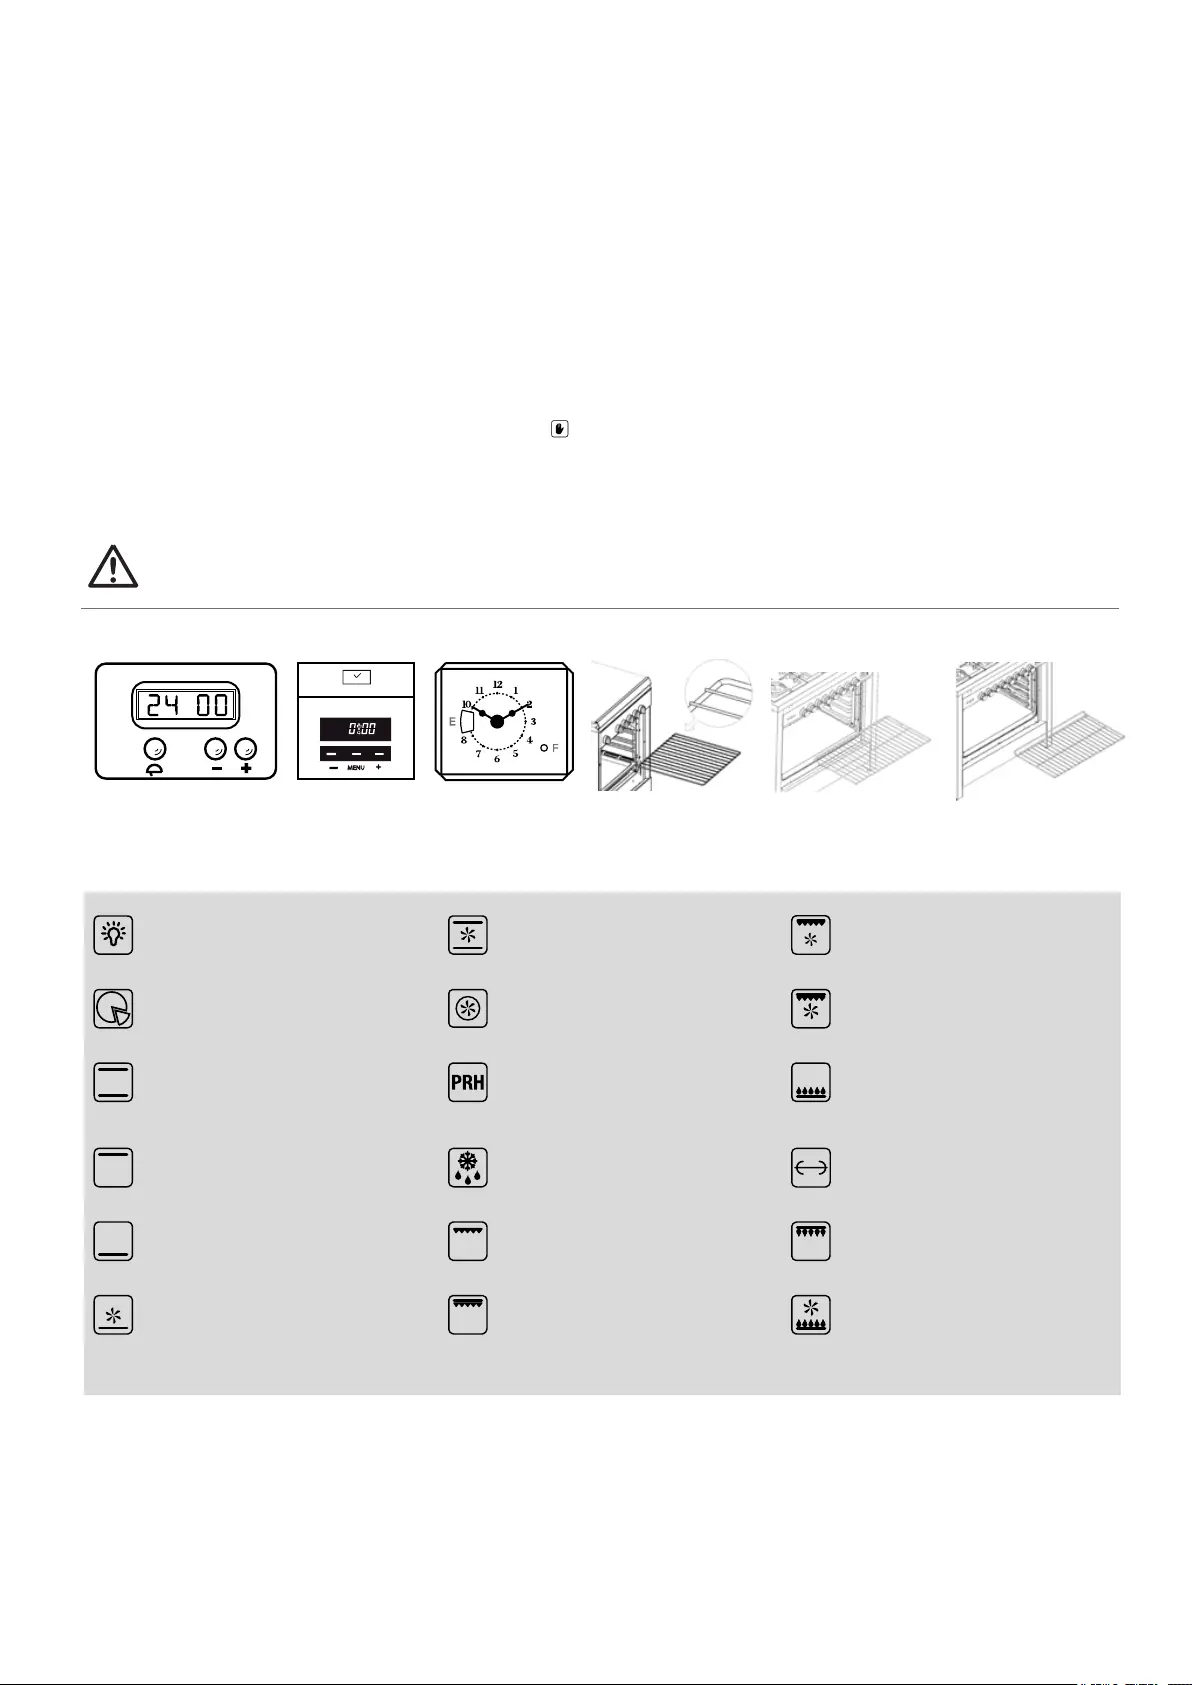
ANALOGUE CLOCK with hands (g. 5)
• Setting the time: pull the rod (F) and turn clockwise until you have set the current time. When it is set, put the rod back in its initial position.
• Setting the cooking time: turn the rod (without pulling it) (F) clockwise and set the required minutes on the clock disk set at “9” (E).
The maximum amount of time is 3 hours. When the time is over, a bell will ring. It will turn off automatically after three minutes. If you wish to turn it off
manually, turn the rod clockwise until you see E, 0 or a crossed-out bell on the disk and in the E box.
• Setting the manual feature: Turn the rod clockwise to position I or to exclude the minute minder.
INSIDE RACKS (g. 6-6a-6b)
The oven has 4 internal levels for the rack positioning (black rectangular baking rack or chrome-plated rack), where you can place the various dishes to be
cooked. It is advisable to consult the cooking table in the following pages to use the best position and achieve the best cooking results.
OVEN LIGHT
It lights up the inside of the oven. It is useful to check
the food cooking degree.
TRADITIONAL COOKING
The heat is produced by the heating elements in
the upper and lower parts of the oven Excellent for
pastries and traditional recipes.
UPPER ELEMENT
This feature allows direct cooking, excellent for lightly
browning.
BOTTOM ELEMENT
The bottom heating element is on. Excellent for slow
cooking, leavening and keeping food warm.
BOTTOM + FAN
The heat from the bottom heating element is ventilated
(recommended to nish cooking and sterilizing).
CIRCULAR ELEMENT + FAN
The fan makes hot air circulate inside the oven,
allowing even cooking on three levels, without
transmitting odour.
FAN ASSISTED
The heat of the top and bottom heating elements,
combined with that of the fan, allows excellent distribution
of the heat, making it possible to cook several dishes.
PIZZA
the
pizza programme allows you to cook pizza as in a
wood-burning oven.
PRE HEA
TING
This feature reduces the oven heating time, bringing the
temperature to 200°C in just a short time.
GRILL
This is used to brown the food top. Excellent for
cooking meat arranged in thin layers.
MAXI GRILL
The grill combined with the ceiling heating element
makes it possible to grill larger surfaces.
MAXI GRILL + FAN
Excellent to grill meat or sh.
DEFROST
The fan operates without heating elements. This
ensures optimal rapid defrost in just a few minutes.
GRILL + FAN
The grill combined with the fan spreads heat evenly. It
is ideal for medium/thick meat, making it crisp on the
outside and soft inside.
GAS BURNER
Traditional gas cooking. Ideal for cooking that requires
"humid" heat, such as meat and roasts.
GAS GRILL
Suitable for grilling meat and browning. Ideal in
combination with the turnspit for cooking game.
COOKING FEATURES
COOKING TIPS
TURNSPIT
Ideal for cooking game and roasts on a skewer It can
be used with sta
tic or ventilated grill features.
GAS BURNER + FAN
The heat produced by the burner is ventilated,
ensuring an even temperature and the possibility of
cooking several dishes at the same time.
+
-
A
g.6b
g.3
g.4
g.5
g.6 g.6a
To remove the bell icon from the screen, press the "Menu" key. To check the remaining amount of time (before it is over) hold the "Menu" key down. To
delete the set amount of time, press the "Menu" key until the screen changes, and then press the + and - keys at the same time. Accordingly, the set
amount of times will be deleted. At the end of cooking, remember to place the knob back to the "0" position.
• Setting delayed start (only for electric ovens): hold the “Menu” key down until the screen changes, then press it again. The letters ''DUR'' (for 'duration')
will appear on the screen. Press the + and - keys to adjust the cooking time. Then press the "Menu" key once and the letters END will appear on the
screen, indicating the menu to set the switch-off time. Press the + and - keys to adjust the switch-off time. Then select the cooking feature and required
temperature. Obviously the oven will not start up immediately. Once the set amount of time has passed, the oven will switch off and the beep sound will
start. Press any key to turn it off. To remove the bell icon from the screen, press the "Menu" key.
• Setting the volume: press + and - at the same time, followed by “Menu”, to enter the tone setting mode and press the – key repeatedly to change the
tone of the alarm. Once you have selected the tone, the timer will memorize your selection until you wish to change it again.
Practical tips when using the programmer: please consider the amount of time for heating the oven when the cooking time is being set. Please switch the
oven off at the end of the cooking cycles.
Caution! The stop grid device requires the bracket to be inserted in the right position to work properly (g.
6-6a-6b).
Bekijk gratis de handleiding van Bartscher 155660, stel vragen en lees de antwoorden op veelvoorkomende problemen, of gebruik onze assistent om sneller informatie in de handleiding te vinden of uitleg te krijgen over specifieke functies.
Productinformatie
| Merk | Bartscher |
| Model | 155660 |
| Categorie | Fornuis |
| Taal | Nederlands |
| Grootte | 2997 MB |
Caratteristiche Prodotto
| Apparaatplaatsing | Vrijstaand |
| Gewicht | 76000 g |
| Breedte | 900 mm |
| Diepte | 600 mm |
| Hoogte | 890 mm |


