Axxess AXDIS-HK2 handleiding
Handleiding
Je bekijkt pagina 5 van 8
5
REV. 11/22/24 INSTAXDIS-HK2
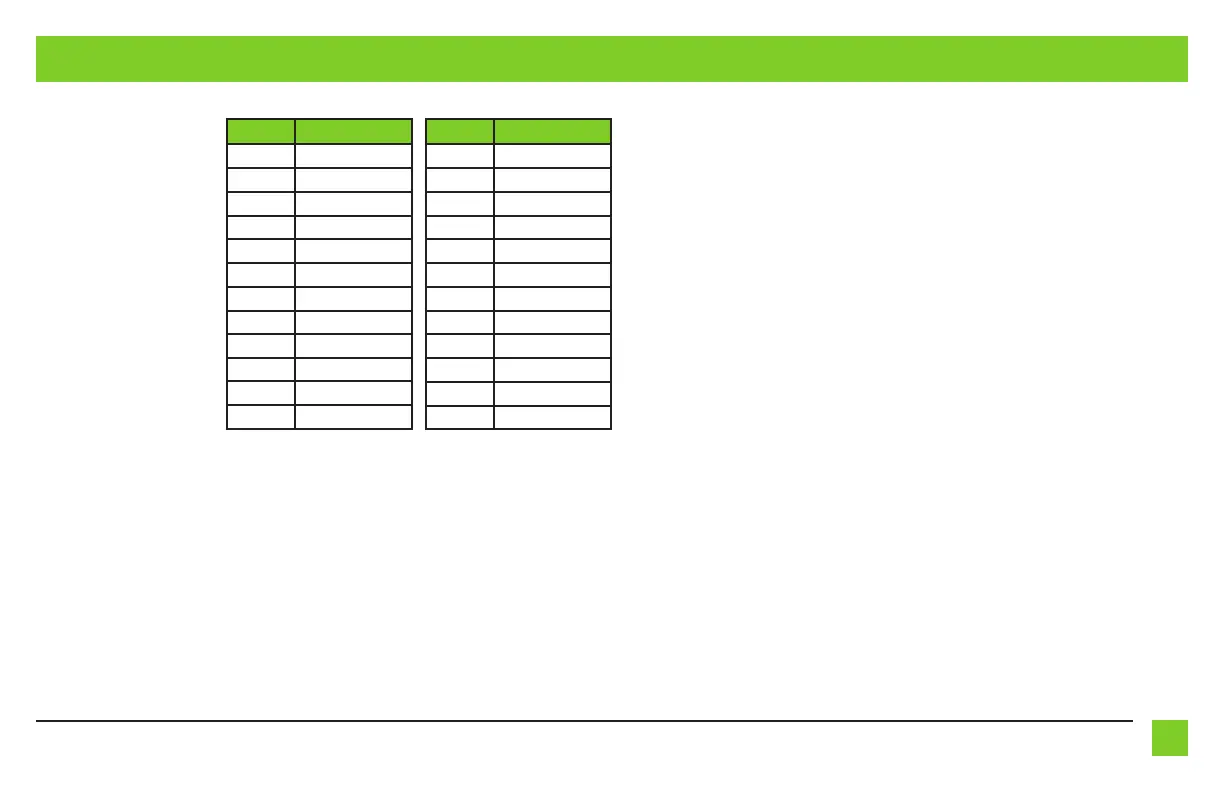
STEERING WHEEL CONTROL SETTINGS
LED Feedback Legend
The (24) Red LED flashes
represent a different radio
manufacturer for the
SWC interface to detect.
For example, if you are
installing a JVC radio,
the SWC interface will
flash Red (5) times, then
stop. Following is the LED
Feedback Legend, which
indicates the flash count of
the radio manufacturer.
Continued on the next page
Connections 3.5mm jack steering wheel control retention:
• The 3.5mm jack is to be used to retain audio controls on the steering wheel control.
• For
the radios listed below, connect the
female 3.5mm connector with stripped leads
,
to the
male 3.5mm SWC jack from the AXDIS-HK2 harness. Any remaining wires tape off and disregard
:
• Eclipse: Connect the steering wheel control wire, normally Brown, to the Brown/
White wire of the connector. Then connect the remaining steering wheel control wire,
normally Brown/White, to the Brown wire of the connector.
• Metra OE: Connect the steering wheel control Key 1 wire (Gray) to the Brown wire.
• Kenwood or select JVC with a steering wheel control wire: Connect the Blue/Yellow
wire to the Brown wire.
• XITE: Connect the steering wheel control SWC-2 wire from the radio to the Brown wire.
• Parrot Asteroid Smart or Tablet: Connect the 3.5mm jack into the AXSWCH-PAR (sold
separately), and then connect the 4-pin connector from the AXSWCH-PAR into the radio
.
Note:
The radio must be updated to rev. 2.1.4 or higher software.
• Universal “2 or 3 wire” radio: Connect the steering wheel control wire, referred to
as Key-A or SWC-1, to the Brown wire of the connector. Then connect the remaining
steering wheel control wire, referred to as Key-B or SWC-2, to the Brown/White wire of
the connector. If the radio comes with a third wire for ground, disregard this wire.
Note:
After the interface has been programmed to the vehicle, refer to the manual provided with
the radio for assigning the SWC buttons. Contact the radio manufacturer for more information
.
• For all other radios: Connect the 3.5mm jack from the AXDIS-HK2 harness, into the jack on
the aftermarket radio designated for an external steering wheel control interface. Please
refer to the aftermarket radios manual if in doubt as to where the 3.5mm jack goes to.
* Note:
If the AXDIS-HK2 flashes Red (7) times, and you do not have an Alpine radio connected to it, that
means the interface does not detect a radio connected it. Verify that the 3.5mm jack is connected to the
correct steering wheel jack/wire in the radio.
** Note:
The AXSWCH-PAR is required (sold separately). Also, the Parrot radio must be updated to rev.
2.1.4 or higher through www.parrot.com.
† Note:
If you have a Clarion radio and the steering wheel controls do not work, change the radio type to the
other Clarion radio type; same for Eclipse. Refer to the “Programming Information” document online
.
‡ Note:
If you have a Kenwood radio and the LED feedback comes back as showing as a JVC radio,
change the radio type to a Kenwood. Refer to the “Programming Information” document online.
Flash Count
Radio
1
Eclipse (type 1) †
2
Kenwood ‡
3
Clarion (type 1) †
4
Sony / Dual
5
JVC
6
Pioneer / Jensen
7
Alpine *
8
Visteon
9
Valor
10
Clarion (type 2) †
11
Metra OE
12
Eclipse (type 2) †
Flash Count
Radio
13
LG
14
Parrot **
15
XITE
16
Philips
17
TBD
18
JBL
19
Insane
20
Magnadyne
21
Boss
22
Axxera
23
Axxerra (type 2)
24
Alpine (type 2)
Bekijk gratis de handleiding van Axxess AXDIS-HK2, stel vragen en lees de antwoorden op veelvoorkomende problemen, of gebruik onze assistent om sneller informatie in de handleiding te vinden of uitleg te krijgen over specifieke functies.
Productinformatie
| Merk | Axxess |
| Model | AXDIS-HK2 |
| Categorie | Niet gecategoriseerd |
| Taal | Nederlands |
| Grootte | 1120 MB |


