Audibax Control 192 handleiding
Handleiding
Je bekijkt pagina 4 van 12
Control 192
2 7
USER´S
MANUAL
• The Pin 1 of the communication cable is the grounding (GND), Pin 2 is
negative signal, and Pin 3 is positive signal; they should not be inversely
connected, and should not be coldly welded.
• The communication cable should be screened by single-terminal earthing.
• The communication cable should not be wired together with strong
electricity.
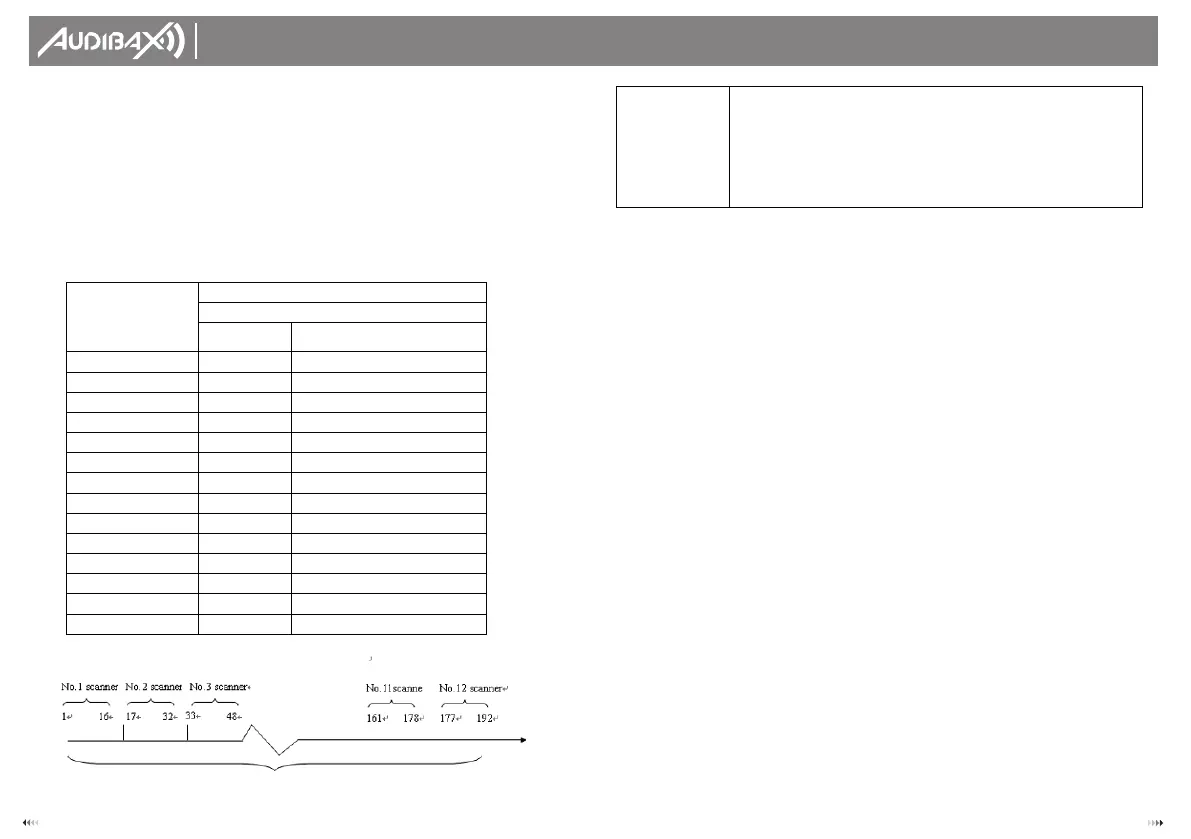
5. DMX512 address distribution
Control 192 console uses 1 to 240 channels of DMX512, so it can control the
scanners with no more than 16 channels. The address is distributed as follows:
11. The editing of scanner chase
1. Press [BLACK], to turn on the LED;
2. Press [EDLT/RUN], to turn on the LED, and enter the program state;
3. Press any one of the number keys (P1-P12) once, to select the chase number
to be edited, which is shown in Chase [ ] on the LCD.
4. The press numbers (P1-P12), to select the controlled scanner, and its
corresponding LED will be on. If the corresponding indicating light is not on,
then that scanner has been selected, so it will not be affect by Step 5.
5. Slide (CH1-CH8) to adjust the corresponding channel data of the scanner, or
press [SHIFT] and slide CH9-CH16 to call out the corresponding scanner effect
(if you have set X and Y direction scanning channel transfer, then two direct
sliding potentiometer sliders will not function. You can control the bottom right
rocker potentiometer to get the data).
6. Repeat steps 4, and 5 to adjust other scanners, so that the needed scanner
chase can reach the predefined effect.
7. Slide [SPEED] and [CROSS] potentiometers, to adjust the chase pause time
and chase cross time.
8. Press [+ ], to memorize this chase effect, and enter the next step of
editing.(Press [ − ], can view the last chase, repeat modification in steps
4,5,6 and 7, and press [+ ] again to store it).
9. Repeat steps 4 to 8, to edit other chase.
10. Press [EDIT/RUN], to have the corresponding indicating light on; memorize it
and then quit the editing state, to enter the running state.
11. Repeat steps 2 to 10, to edit other chase.
12. Running of scanner chases
1. Press [EDIT/RUN], to have the corresponding LED on.
2. Press number keys (P1-P12), to select the chase number, and make it run; if
that chase has not been edited, then the corresponding LED will not be on
when that key number is pressed.
Scanner serial
number
Scanner DMX starting address
When using Control 192
Decimal
system
Scanner address switch location
1 1
1
ON
2 17
1,5
ON
3 33
1,6
ON
4 49
1,5,6
ON
5 65
1,7
ON
6 81
1,5,7
ON
7
97
1,6,7
ON
8
113
1,5,6,7
ON
9
129
1,8
ON
10
145
1,5,8
ON
11 161
1,6,8
ON
12 177
1,5,6,8
ON
P13-P24 206-217
Dimmer channel 1-24 218-241
The DMX512 channel distribution of Control 192
12 scanners, each is assigned 16 channels
MANUAL: [??]
F F F F F F F F A
or F F F F F F F F B
In the state of running the chase, pressing[MANUAL], will show the prompt on
the left.
The[??] in the upper line shows the chase number that is running, and the
bottom line shows whether the 1-16 channels (channels 1-8 are identified
with suffix A, and channel 9-16 are identified with suffix B) are released. Here,
F indicates the corresponding channel is released, and O indicates it has not
been released. Press P1-P12 again with select one or more scanners to
conduct the m
anual operation of the released channels.
Press [MANUAL] again, will quit the mixed control of manual+automatic,
Bekijk gratis de handleiding van Audibax Control 192, stel vragen en lees de antwoorden op veelvoorkomende problemen, of gebruik onze assistent om sneller informatie in de handleiding te vinden of uitleg te krijgen over specifieke functies.
Productinformatie
| Merk | Audibax |
| Model | Control 192 |
| Categorie | Niet gecategoriseerd |
| Taal | Nederlands |
| Grootte | 2118 MB |


