Handleiding
Je bekijkt pagina 8 van 44
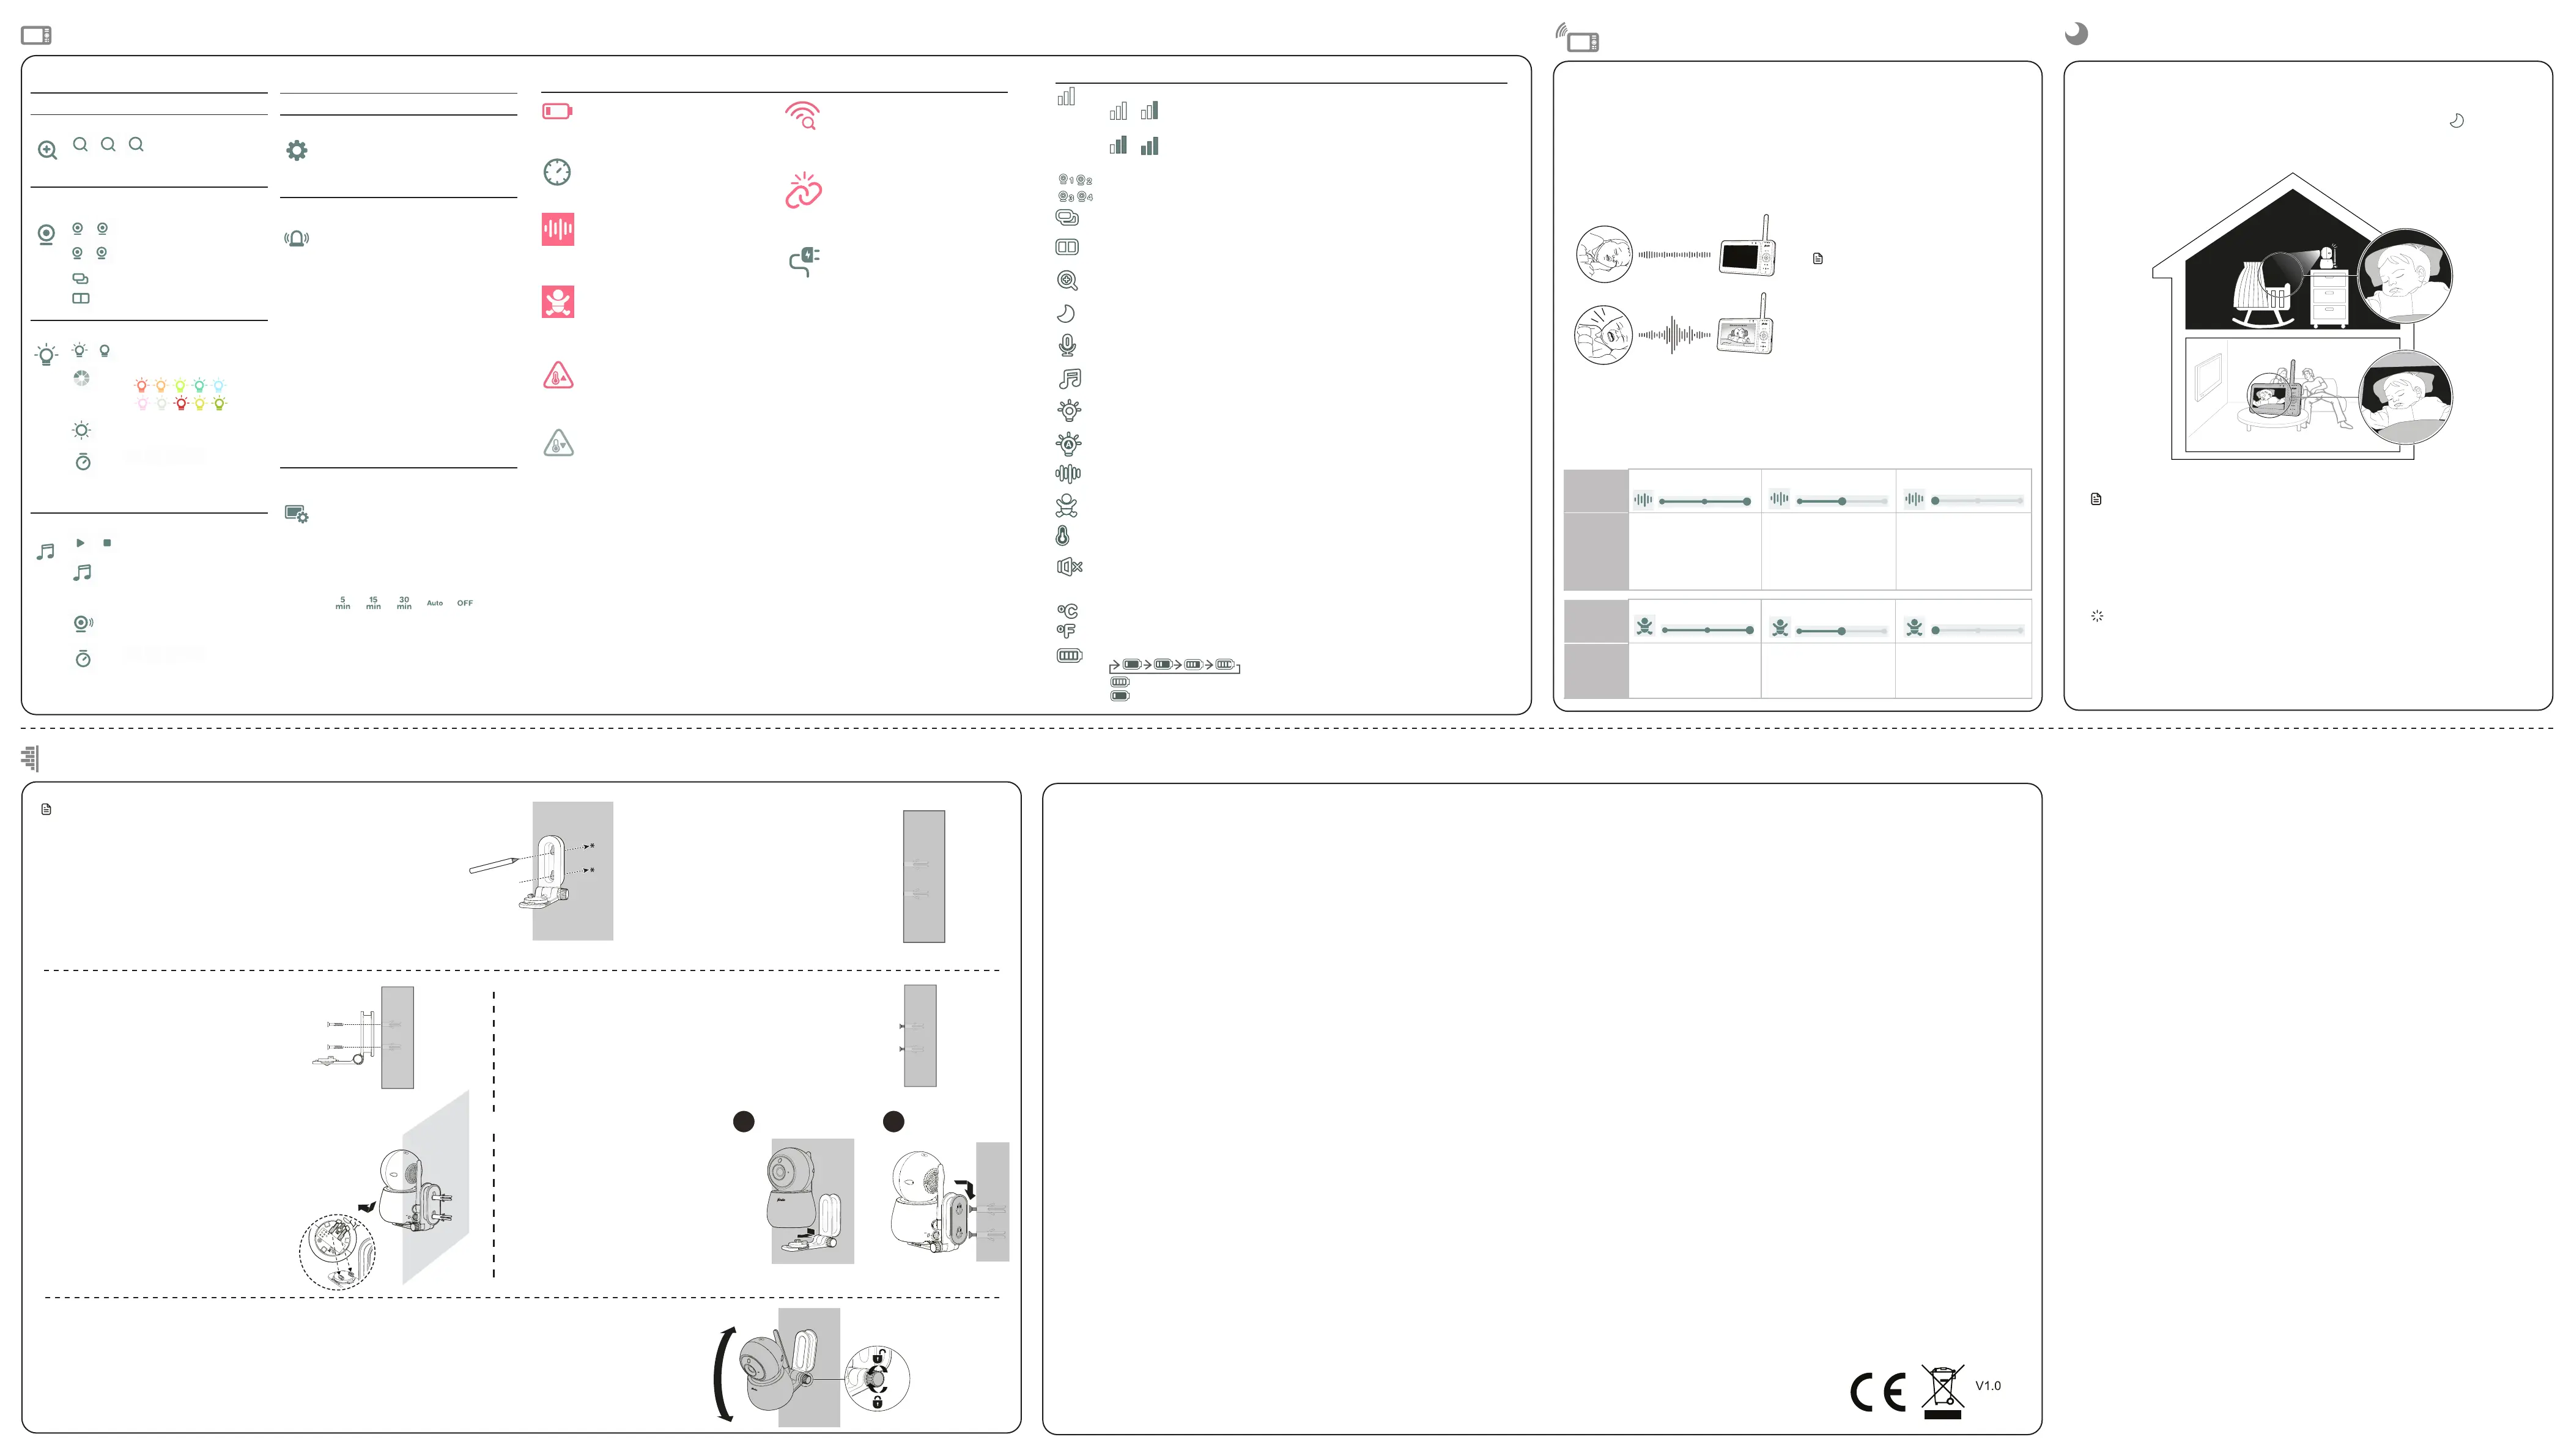
Mount the baby unit on dry wall (optional)
Parent unit icons
Tips and remarks
INTERFERENCE-FREE:
This baby display monitor is digitally coded. This means you will never receive signals from other devices, nor can the signal from your baby unit(s) be received by e.g. your neighbors.
In case the baby unit(s) or parent unit is placed in or in the close vicinity of electromagnetic fields, the signal (images or sound) can be slightly affected. If this happens, try a different
location for the baby unit(s) or parent unit or move, if possible, the source of the interference.
EAVESDROPPING/WIRETAPPING:
Eavesdropping/wiretapping of the signals from this baby video monitor is nearly impossible. Not only must one be within range of the baby video monitor, one also needs some very
costly equipment.
MAINTENANCE:
Only clean the baby monitor with a moist cloth; never use chemical cleaners. Before any cleaning, you must disconnect the adaptors.
RANGE:
The baby display monitor has a range of up to 300 metres in an open field and up to 50 metres indoors; this range depends on local circumstances.
DELAY IN IMAGES AND SOUND:
The baby unit transmits the images and sound to the parent unit in digital blocks. The parent unit converts these signals back to a recognizable image
and a comprehensible sound. Therefore, there is a small delay between the moment of movement and making sounds and the display and sounds of the parent unit.
Besides that, the sounds and images on the parent unit are not exactly simultaneous.
Commaxx BV
Wiebachstraat 37
6466 NG Kerkrade
The Netherlands
www.alectobaby.com
Main menu icons
Main
menu
Sub-menu
Zoom
1x
2x
4x
• Zoom in and out of the video displayed
from the baby unit.
Monitoring Mode
(For pairing with DVM2050C only)
1
2
3
4
• View baby unit in Single
mode.
• View baby units in Patrol
mode.
• View baby units in Split
screen.
Night Light
• Turn on/off the night light.
• Select a night light colour.
• Adjust night light brightness.
OFF
15
min
30
min
60
min
• Set a timer to turn the night
light off, or set to be always
on.
Melodies and Soothing Sounds
• Play/Stop lullaby.
• Select to play all melodies,
or play one of the five
melodies and five soothing
sounds.
• Adjust the lullaby play
volume level.
OFF
15
min
30
min
60
min
• Set the timer to stop
playing the selected llulaby,
or playing non-stop.
Main
menu
Sub-menu
Camera Settings
• Adjust baby unit speaker volume.
• Turn on/off baby unit Status LED.
• Add/Remove Camera.
• Reset settings to factory default.
Alert Settings
Sound • Turn on/off Sound
Detection Alert.
• Adjust Sound Sensitivity
Level to activate parent
unit screen.
Motion
• Turn on/off Motion
Detection Alert.
• Adjust Motion Sensitivity
Level to activate parent
unit screen.
Tempera-
ture
• Turn on/off Temperature
Detection Alert.
• Select Maximum and
Minimum temperature for
alert range.
• Set Temperature Format in
Fahrenheit (
o
F) or Celsius (
o
C).
Parent Unit Settings
• Adjust parent unit screen Brightness.
• Adjust Low Battery Alert Tone.
• Adjust No Link Alert Tone.
• Set the Screen Off Timer. Select a
screen off time to save energy. For
details, see the Screen Off Timer
section.
• Select a display Language.
• Help information.
Battery low at
Parent Unit
The battery is low and needs
to be recharged.
Loading
Loading is in progress.
Sound
detected
Sound detected by the baby
unit is higher than the set
sound sensitivity level.
Motion
detected
Motion detected by the
baby unit is higher than the
set motion sensitivity level.
Temperature
too high
The temperature detected
by the baby unit is higher
than the maximum
temperature alert setting.
Temperature
too low
The temperature detected
by the baby unit is lower than
the minimum temperature
alert setting.
Status icons
Connection status
• or displays when strong signal strength is detected between the baby unit and the
parent unit.
•
or displays when moderate or low signal strength is detected between the baby
unit and the parent unit.
Current view status
• Displays the baby unit that is being viewed.
Patrol mode
• Baby units are being viewed in Patrol mode (For pairing with DVM2050C only).
Split mode
• Baby units are being viewed in Split mode (For pairing with DVM2050C only).
Zoom
• Displays when the current image on the parent unit has zoomed in.
Night vision
• Displays when the baby unit being viewed has activated the night vision feature.
Talkback
• Displays when talking back to the baby unit from parent unit.
Lullaby
• Displays when a lullaby is playing.
Night light
• Displays when the baby unit’s night light is turned on.
Auto night light
• Auto night light brightness is activated.
Sound alert
• Sound detection alert is turned on.
Motion alert
• Motion detection alert is turned on.
Temperature alert
• Temperature alert is turned on.
Mute alert
• Displays when the parent unit speaker volume is set to zero.
• Displays when the parent unit is talking to the baby unit.
or
Real-time temperature
• Displays the real-time temperature detected by the baby unit in Fahrenheit (
o
F) or Celsius (
o
C)
(e.g. 57
o
F or 14
o
C).
Battery status
• animates when the battery is charging.
•
displays solid when the battery is fully charged.
•
displays when the battery is low and needs charging.
1. Place the wall mount bracket on a
wall and then use a pencil to mark
two holes in parallel. Remove the
wall mount bracket and drill two
holes in the wall (5.5mm drill bit).
NOTESNOTE
Notes
• Check for reception strength and
camera angle before drilling the holes.
• The types of screws and wall plugs you
need depend on the composition of
the wall. You may need to purchase
the screws and wall plugs separately to
mount your camera units.
2. If you drill the holes into a stud, go
to step 3.
• If you drill the holes into an
object other than a stud, insert
the wall plugs into the holes.
Tap gently on the ends with a
hammer until the wall plugs are
flush with the wall.
3. Align the wall mount bracket and screws with
the holes in the wall as shown. Tighten the screw
in the middle hole first, so that the wall mount
bracket position is fixed. You can tighten the
other screw in the top hole.
3. Insert the screws into the holes and
tighten the screws until only 6.5mm of
the screws are exposed.
4. Place the camera unit on the
wall mount bracket, and then
slide it forward until it locks
int
o place. Align the holes on
the wall mount bracket with
the screws on the wall, and
slide the wall mount bracket
down until it locks into place.
5. You can maximise your camera unit viewing angle by tilting the wall mount bracket.
Hold the camera unit, and then rotate the knob in an anticlockwise direction. This will loosen the joint of the wall mount bracket.
Tilt your camera unit up or down to adjust to your preferred angle. Then, rotate the knob in a clockwise direction to tighten the
joint and secure the angle.
OR
4. Place the camera unit on the wall mount
bracket, and then slide it forward until
it locks into place. Connect the power
adaptor to the camera unit and a power
supply.
Screen off Timer
1
2
Night vision
The baby unit has infrared LEDs that allow you to see your baby clearly at night or in a
dark room. When the baby unit detects low light levels, the infrared LEDs are switchedon
automatically. The images from the baby unit are in black and white, and
appears on
the parent unit screen.
Notes
• A click sound from the baby unit is normal and occurs when your unit adapts to the
environment lighting conditions.
• To achieve accurate and high quality video, your baby unit is equipped with an Infrared
Cut-off Filter lens that optimizes colour accuracy in bright, day-time environments. When
the environment turns dark at night, this filter lens is withdrawn to enhance night vision
quality. The brief click sound you hear is from the filter lens activating and withdrawing as
the unit switches fr
om day to night vision (and vice versa).
Tip
• Depending on the surroundings and other interfering factors, for example, lighting, objects,
colours and backgrounds, the image quality may vary. Adjust the baby unit angle or place the
baby unit at a higher location to prevent glare and a blurred display.
When Auto is selected, the parent unit screen stays off to save power when the baby unit
detects sounds/motions that are lower than the set sensitivity level. Once the baby unit detects
sounds/motions that are higher than the set sensitivity level, the parent unit screen turns on
automatically. It will then turn off again after 50 seconds if the sounds/motions detected are
lower than the set sensitivity level.
NOTESNOTE
• When the parent unit screen
is off, if alerts are received, for
example, no signal received
between the parent unit and
baby unit, or a low battery,
the parent unit screen will
turn on.
Screen Off Timer
You can set a specific time interval, 5 minutes, 15 minutes, 30 minutes or Auto, if no keys have
been pressed on the parent unit, the screen will turn off (goes to sleep) to save power. You
can still hear sounds from the baby unit when the screen turns off.
Sound
Sensitivity
level
Highest Medium
Lowest
Description The parent unit screen
turns on for quiet sounds,
(including background
noises) from your baby’s
room.
The parent unit screen turns
on for babbling and louder
sounds from your baby. It
remains off when your baby
makes soft sounds.
The parent unit screen turns
on for for loud crying or
screeching
sounds from your baby. It
remains off when your baby
makes soft sounds.
Motion
Sensitivity
level
Highest
Medium
Lowest
Description The parent unit screen turns
on for small movements,
such as yawning or
stretching.
The parent unit screen
turns on for normal daily
movements, such as people
walking around the house.
The parent unit screen turns
on for large movements,
such as children running or
jumping around.
Adjust the sound/motion sensitivity of the baby unit
The parent unit screen will turn on only when the detected sounds/motions exceed a set level.
Use the parent unit to adjust the microphone sensitivity of your baby unit. The higher
the sensitivity level, the more sensitive the baby unit is in detecting sounds/motions that
transmit to the parent unit. The manufacturing preset sound/motion sensitivity level is set to
the highest level.
Searching
Camera
The parent unit is searching
for baby unit
No link to
camera
The link between the baby
unit and the parent unit has
been lost, for example, due
to out of range.
Charging
The parent unit is connected
to AC power.
Warning icons and messages
Bekijk gratis de handleiding van Alecto DVM2050, stel vragen en lees de antwoorden op veelvoorkomende problemen, of gebruik onze assistent om sneller informatie in de handleiding te vinden of uitleg te krijgen over specifieke functies.
Productinformatie
| Merk | Alecto |
| Model | DVM2050 |
| Categorie | Babyfoon |
| Taal | Nederlands |
| Grootte | 32896 MB |

