Vimar 02974.N handleiding
Handleiding
Je bekijkt pagina 1 van 7
Viale Vicenza 14
36063 Marostica VI - Italy
www.vimar.com
30811.x-02974 02 2507
30811.x - 02974 Connected dial thermostat
VIEW WIRELESS SMART HOME
THREE OPERATING MODES (ALTERNATIVE)
Stand alone • •
Download the View Wireless App from the stores onto the tablet/smartphone you
will be using for configuration.
When the device is powered for the rst conguration, we recommend you search for any
new rmware and perform the update.
Depending on the mode you select, you will need:
Stand alone
Nothing else
Gateway
art. 30807.x-20597-19597-16497-14597
Smart Home Hub
View App
for management via smartphone/tablet
Samsung SmartThings
Hub
Amazon Alexa, Google Assistant, Siri (Homekit)
voice assistants for possible voice operation
Create your Installer account on MyVimar (on-line).
STAND ALONE CONFIGURATION
1. Wire all the thermostats.
2. Start the View Wireless App and log in with the credentials you just created.
3. Create the system and the environments.
4. Associate all the thermostats with the environments.
To associate the thermostat:
• Select “Add” ( ), choose the environment to place it and give it a name
• Select ; activate the Bluetooth connection on your tablet/smartphone and approach the
thermostat
• Press for 5 s; the ring flashes blue and association is complete.
5. For each thermostat, set the functions and parameters.
6. Go to the “Temperature control” menu and for each thermostat set the time schedules, the
setpoints for the operating modes and the current time.
Note: In the event of a mains power outage and subsequent restoration, the product will return to
operating in manual mode with the last set point set. You will therefore need to set the date/time
(see paragraph entitled "Thermostat date/time setting") to restore operation in automatic mode.
CONFIGURATION IN
1. Wire all the devices in the system (2-way switches, relays, thermostats, gateway, etc.).
2.
Start the View Wireless App and log in with the credentials you just created.
3. Create the system and the environments.
4. Associate all the devices with the environments, except for the gateway (which should be
associated last).
To associate the thermostat:
• Select “Add” ( ), choose the environment to place it and give it a name
• Select ; activate the Bluetooth connection on your tablet/smartphone and approach the
thermostat
• Press for 5 s; the ring flashes blue and association is complete.
5. For every device, set the function, the parameters and any accessory devices (magnetic
contact art. 03980 and related function).
6.
Transfer the configuration of the devices to the gateway and connect it to the Wi-Fi network.
7. Transfer the system to the Administrator user (who must have created his/her profile on
MyVimar).
For full details, see the View Wireless App manual that can be downloaded from the www.
vimar.com website.
CONFIGURATION IN
Perform the procedure set out in points 1 and 2 of configuration in Bluetooth.
Associate the thermostat directly with a ZigBee hub (for instance a SmartThings Hub).
1) Download the Zigbee software onto the thermostat using the View Wireless App (see the View
Wireless App manual). Press the button until the display shows “bt” and the ring flashes
blue. Perform the same procedure to update the software on the device.
2) After conversion to Zigbee technology (or the software update), the thermostat automatically
goes into pairing mode for 5 minutes, during which the ring flashes white. If the thermostat is
not in pairing mode, cut off the power supply and restore it after a few seconds.
3) Associate the thermostat following the procedure envisaged by the ZigBee hub.
4) Associate the module following the procedure envisaged by the ZigBee hub (see the hub
manufacturer’s documentation).
Set the thermostat parameters.
Within the first 10 minutes of powering the thermostat (already associated with the ZigBee hub)
or after restarting at the end of association with Zigbee, press the button relating to the parameter
to edit as shown below.
• Short press = degrees Celsius/Fahrenheit selection
• Long press (5 s) = the thermostat enters the configuration phase (bt)
• Prolonged press (30 s) within the first 5 min of powering = device reset (rst)
Programmable function key:
• Display brightness and RGB LED in standby setting
- 1
st
press = current brightness display
- Subsequent presses = cyclic display of available brightness values L-3
(high), L-2 (medium), L-1 (low) and L-0 (off).
• Heating/air conditioning mode selection
• Call up scenario
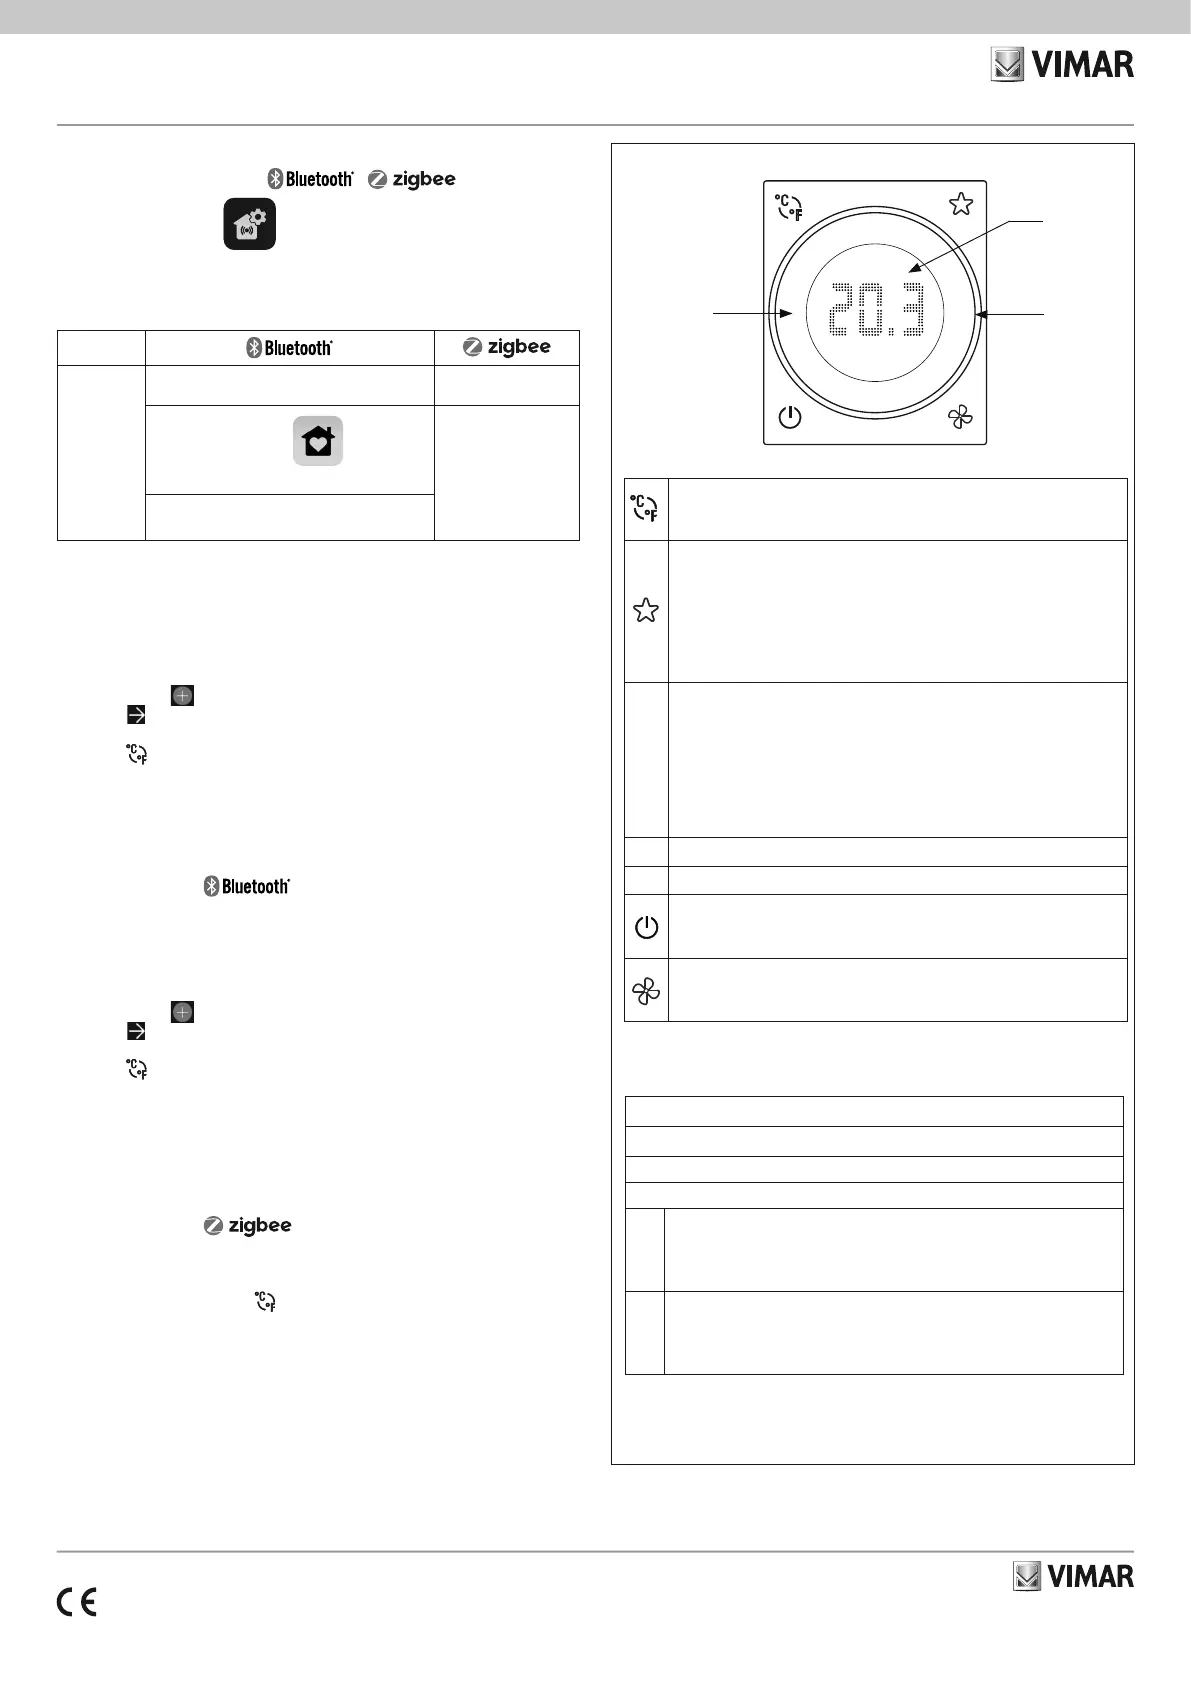
A
Display
• bt = devices in Bluetooth configuration
• off = thermostat off; on = thermostat on
• °C = degrees Celsius; °F = degrees Fahrenheit
• L-0, L-1, L-2, L-3 = brightness in standby (from the lowest to the highest)
• H = heating; C = air conditioning
• opn* = window open (associated with the thermostat via magnetic contact art.
03980 or with an input of the 3in 1out module art. 03983 )
B
Set point adjustment dial
C
Lightable ring
• Power on and off.
Upon power on or off, the thermostat starts in the last operating mode associated
with it set via the View* or View Wireless* App.
Programmable function key:
• Heating/air conditioning mode selection
• Fan speed setting
* Only for Bluetooth technology
Ring signalling
All flashing blue = thermostat in configuration mode
All lit amber* = thermostat in heating mode and relay active
All lit blue** = thermostat in air conditioning mode and relay active
1
• Lit amber* = thermostat in heating mode and relay not active
• Lit blue** = thermostat air conditioning mode and relay not active
In standby, the brightness is set during configuration; otherwise, the value is the
maximum one.
2***
• Flashing red = the thermostat, in automatic mode, has lost the hourly value and
has therefore switched to manual mode.
When it receives the hourly value from the gateway or the View Wireless App again,
the thermostat returns to automatic mode and the flashing ends.
* Amber with automatic colour or of the selected colour.
** Blue with automatic colour or of the selected colour.
*** Only for Bluetooth technology
B
C
A
Bekijk gratis de handleiding van Vimar 02974.N, stel vragen en lees de antwoorden op veelvoorkomende problemen, of gebruik onze assistent om sneller informatie in de handleiding te vinden of uitleg te krijgen over specifieke functies.
Productinformatie
| Merk | Vimar |
| Model | 02974.N |
| Categorie | Thermostaat |
| Taal | Nederlands |
| Grootte | 1445 MB |


