Vestil CJIB-6 handleiding
Handleiding
Je bekijkt pagina 6 van 11
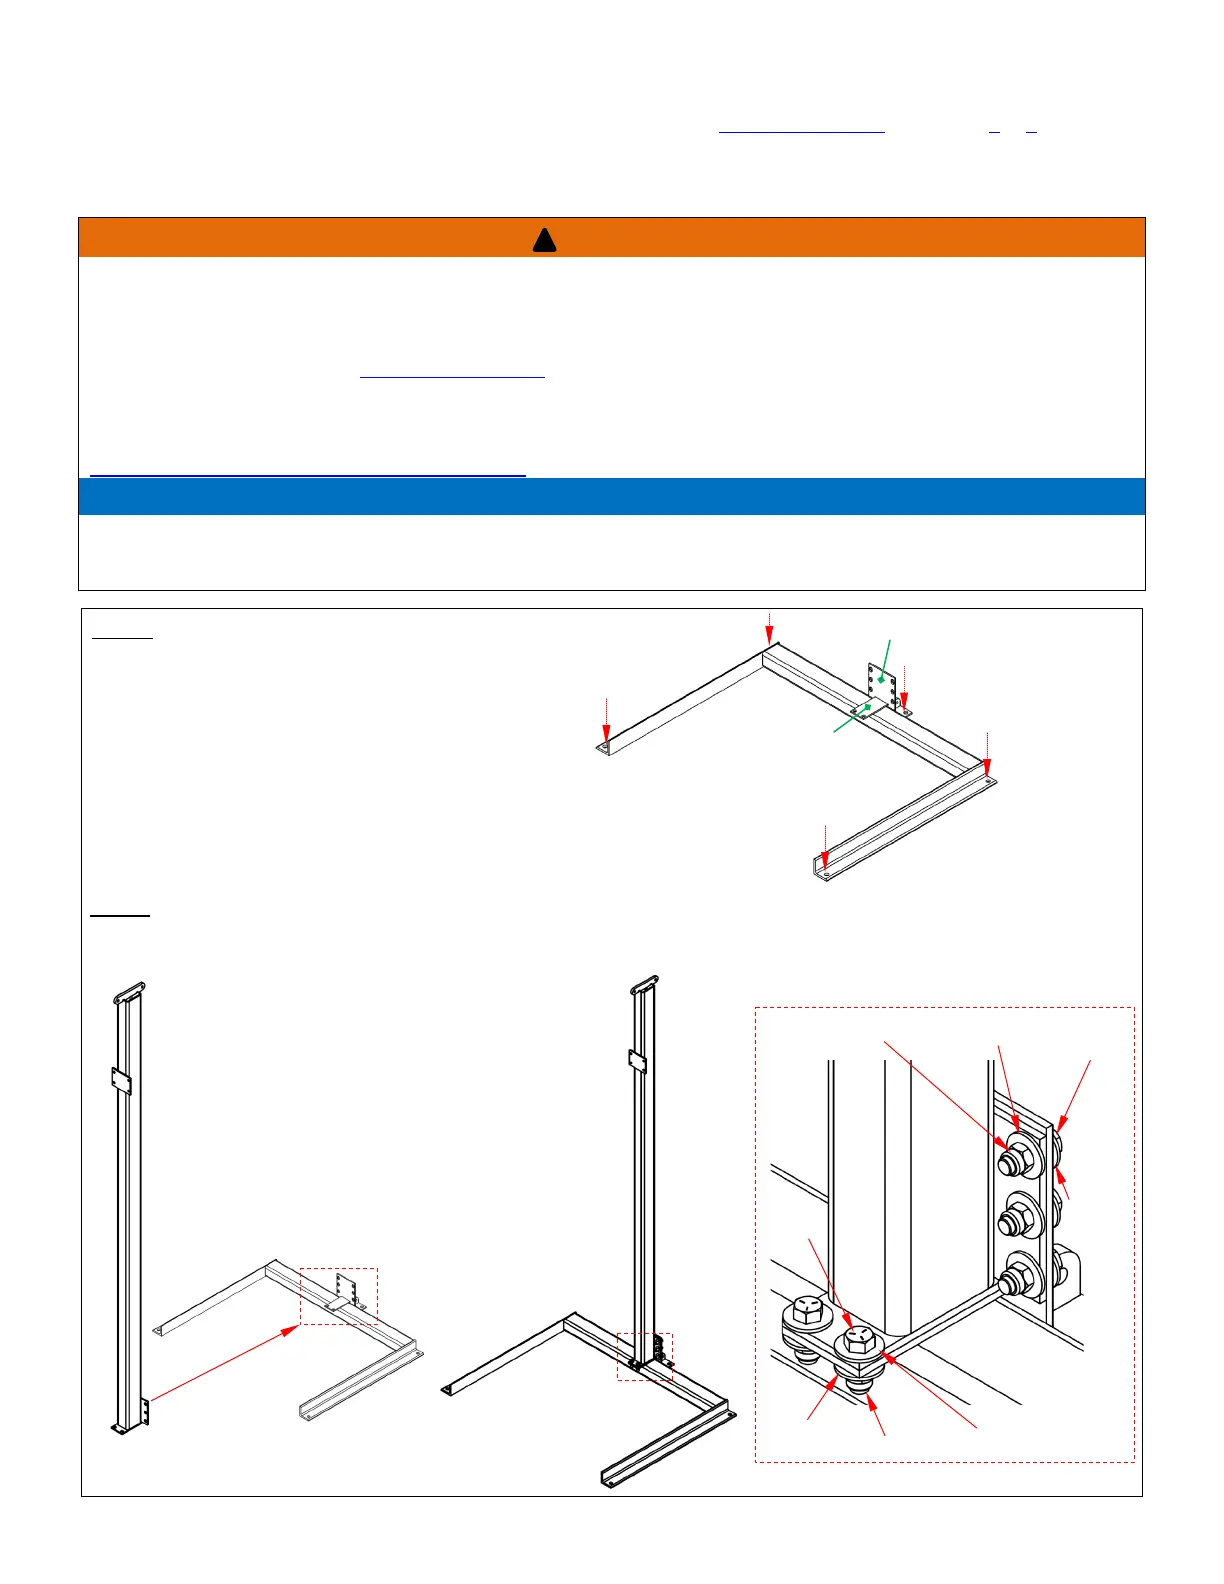
Table of Contents Rev. 10/27/2021 CJIB MANUAL
Table of Contents Copyright 2021 Vestil Manufacturing Corp. Page 6 of 11
ASSEMBLY INSTRUCTIONS
Numbers in parentheses () correspond to parts numbers in the EXPLODED VIEWS on pages 4 & 5.
Tighten all bolt-and-nut connections to 50-52ft∙lb with a torque wrench. For anchoring hardware (bolts,
sleeves, etc.) follow the installation and tightening instructions of the hardware manufacturer.
Unit conversions: 1” = 2.54cm 2.2 lb. = 1kg.
WARNING
If the crane is improperly assembled, it might malfunction and result in serious personal injuries. Read this
instruction manual in its entirety before assembling the crane.
• ONLY qualified personnel should assemble the crane.
• DO NOT modify the crane in any way. Unapproved modifications might make the crane unsafe to use
and automatically void the LIMITED WARRANTY on p. 14.
• DO NOT use the crane if you notice that the beam, upright, tie rod, and/or base frame are damaged.
Damage might weaken the crane and result in crane collapse.
• DO NOT use the crane if any of the hardware (bolts, nuts, yokes, etc.) is damaged or missing. Contact our
TECHNICAL SERVICE AND PARTS DEPARTMENT at (260) 665-7586 to order replacement parts.
NOTICE
• Modifying the crane in any way automatically voids the Limited Warranty.
• This crane must be sheltered from weather. DO NOT install the crane where it is exposed to the elements.
• Inspect the crane for damage before each use as described in Inspections & Maintenance.
UUStep 1UU: Choose the installation site and anchor
the base frame to the floor.
Set the base frame on the floor where it will be
installed. Mark the floor with the locations of
the 6 anchor bolt holes in the frame. The frame
should be anchored to the floor with six 3/4”
anchor bolts that are at least 4.5” long. Install
anchoring hardware as per the hardware
manufacturer’s instructions.
Step 2: Attach the UPRIGHT WELDMENT (28-514-068 or 28-514-071) to the mounting brackets as shown in the
following diagrams: 1) CJIB-3 & CJIB-6 use 1/2”–13 fasteners: Bolts (13209); washers (33012); and lock nuts
(37030); 2) CJIB-10 & CJIB-20 use 3/4”–10 fasteners: Bolts (13361); washers (33018); and lock nuts (37039).
UPRIGHT WELDMENT
CJIB-3 & CJIB-6: 28-514-068
CJIB-10 & CJIB-20: 28-514-071
!
Anchor bolt
hole
Upright mounting
bracket
Upright mounting bracket
BASE FRAME
Washer
Washer
Washer
Bolt
Lock nut
Bolt
Lock nut
Washer
Mounting
brackets
Bekijk gratis de handleiding van Vestil CJIB-6, stel vragen en lees de antwoorden op veelvoorkomende problemen, of gebruik onze assistent om sneller informatie in de handleiding te vinden of uitleg te krijgen over specifieke functies.
Productinformatie
| Merk | Vestil |
| Model | CJIB-6 |
| Categorie | Niet gecategoriseerd |
| Taal | Nederlands |
| Grootte | 2445 MB |


