Tunturi Signature T50 handleiding
Handleiding
Je bekijkt pagina 13 van 56
13
English
⚠ WARNING
• Improper connection of the equipment-
grounding conductor can result in a risk
of electric shock. Check with a qualified
electrician or serviceman if you are in doubt
as to whether the product is properly
grounded. Do not modify the plug provided
with the product if it will not fit the outlet;
have a proper outlet installed by a qualified
electrician.
Assembly instructions
Description illustration A
The illustration shows what the trainer will looks
like after the assembly is completed.
You can use this as a reference during your
assembly, but do follow the assembly steps
always in the correct sequence as showed in the
illustrations.
Description illustration B
The illustration shows what components and parts
you should find when un-boxing your product.
‼ NOTE
• Small parts can be hidden/ packed in hollow
spaces in the Styrofoam product protection
• If a part is missing, contact your dealer.
Description illustration C
The illustration shows the hardware kit that comes
with your product.
The hardware kit contains bolts, washers, screws
, nuts etc. and the required tools to properly fit
your trainer.
Description illustration D
The illustrations shows you in the correct following
order how to assembly your trainer best.
‼ NOTE
• Part numbers shown in the assembly steps
are commencing with the spare part drawing
that can be found in the online full version
user manual.
⚠ WARNING
• Assemble the equipment in the given order.
• Carry and move the equipment with at least
two persons.
⚠ CAUTION
• Place the equipment on a firm, level surface.
• Place the equipment on a protective base to
prevent damage to the floor surface.
• Allow at least 100 cm of clearance around the
equipment.
• Refer to the illustrations for the correct
assembly of the equipment.
‼ NOTE
• Save the tools provided with this product,
after you completed the product assembly,
for future service purposes.
Additional assembly information
Fasten Nuts and Bolts
To prevent mounted frame parts from not being
correctly aligned, it is advisable to complete the
first subsequent steps before fully tightening
nuts and bolts. This provides space to reposition
previously mounted parts, allowing the overall
assembly to proceed more smoothly. Therefore it
advisable to follow up on the below instructions.
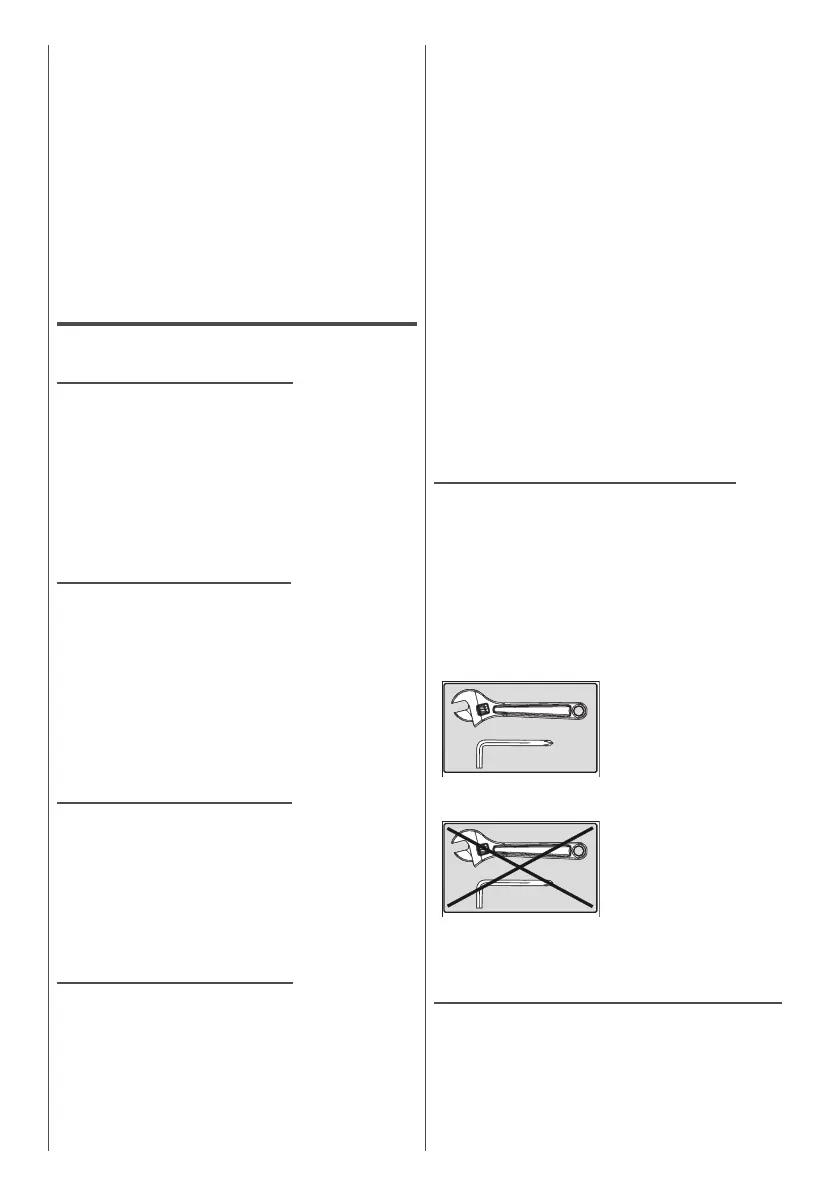
DO TIGHTEN ALL BOLTS AND
NUTS IN THIS STEP AND BOLTS
AND NUTS OF FORMER STEPS
Securely tighten all
nuts and bolts after all
components have been
assembled in current
and previous steps.
DO NOT TIGHTEN BOLTS
AND NUTS IN THIS STEP
Do not fully tighten all
nuts and bolts used in
this step.
Hand tight is enough.
Additional environmental information
Packaging disposal
Government guidelines ask that we reduce the
amount of waste material disposed of in land fill
sites. We therefore ask that you dispose of all
packaging waste responsibly at public recycling
centres.
Bekijk gratis de handleiding van Tunturi Signature T50, stel vragen en lees de antwoorden op veelvoorkomende problemen, of gebruik onze assistent om sneller informatie in de handleiding te vinden of uitleg te krijgen over specifieke functies.
Productinformatie
| Merk | Tunturi |
| Model | Signature T50 |
| Categorie | Niet gecategoriseerd |
| Taal | Nederlands |
| Grootte | 6896 MB |


