Toa IP-A1PA12 handleiding
Handleiding
Je bekijkt pagina 10 van 20
10
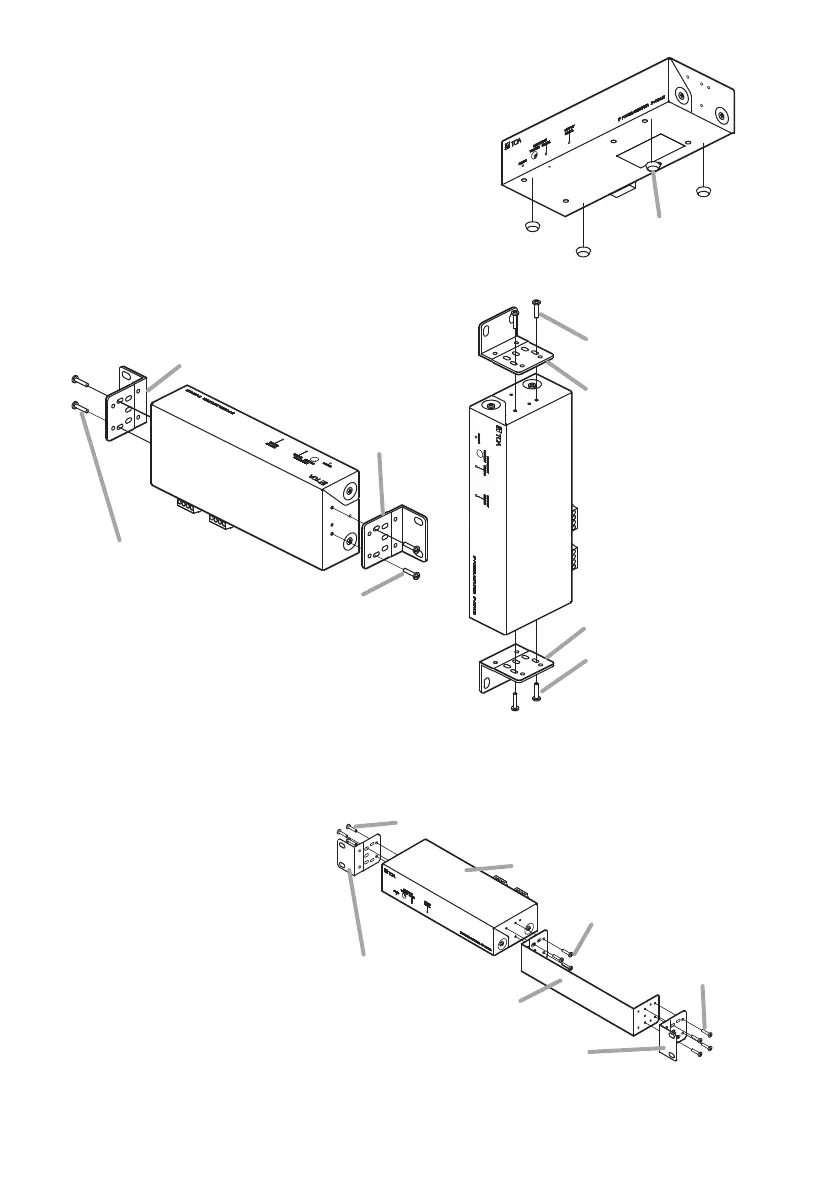
8. UNIT MOUNTING
It is recommended to install it as shown in the example
blow.
[Putting on the desk]
It can be used on a desktop by attaching the accessory
rubber foot to the bottom of this unit.
[Mounting on the wall]
It can be used mounting on the wall by the optional
bracket MB-15B to the side of this unit. Use the 4 screw
holes located on each side of the unit to x it using the
screws supplied with the optional bracket.
Rubber foot (accessory)
Note
Use metal ttings of sucient strength and install in a
place with sucient strength.
[Rack Mounting]
It can be rack-mounted by using the optional bracket MB-15B-BK to the side of this unit.
Notes
• Use the screws supplied with the
MB-15B-BK Bracket to attach the
bracket to the unit.
• The MB-15B-J Joint Rack Mounting
Brackets cannot be used to connect
2 units together.
Blank bracket*
2
Rack mounting bracket*
2
IP-A1PA12
Tapping screw 3 x 8 (3 pcs.)*
2
Tapping screw 3 x 8 (3 pcs.)*
2
Tapping screw 3 x 14 (4 pcs.)*
2
*
2
Component parts and accessories
of the MB-15B-BK Bracket (option)
Rack mounting bracket*
2
Tapping screw 3 x 8 (2 pcs.)*
1
MB-15B (option)
Tapping screw 3 x 8 (2 pcs.)*
1
MB-15B (option)
Tapping screw 3 x 8 (2 pcs.)*
1
MB-15B (option)
Tapping screw 3 x 8 (2 pcs.)*
1
MB-15B (option)
*
1
Accessories of the MB-15B Bracket (option)
Bekijk gratis de handleiding van Toa IP-A1PA12, stel vragen en lees de antwoorden op veelvoorkomende problemen, of gebruik onze assistent om sneller informatie in de handleiding te vinden of uitleg te krijgen over specifieke functies.
Productinformatie
| Merk | Toa |
| Model | IP-A1PA12 |
| Categorie | Niet gecategoriseerd |
| Taal | Nederlands |
| Grootte | 2020 MB |


