Handleiding
Je bekijkt pagina 2 van 4
3. INSTALLATION
Notethatthemountingholesexcepthangingholesinthecabinetarecoveredwithtapewhenshippedfromthe
factory.Neverremovethetapeonyourownbeforeinstallation.
Note: Localcodesmayrequireotherinstallationmethods.Checkwithauthorityhavingjurisdictiontodetermine
acceptabilityofthemountingmethodsshownhere.
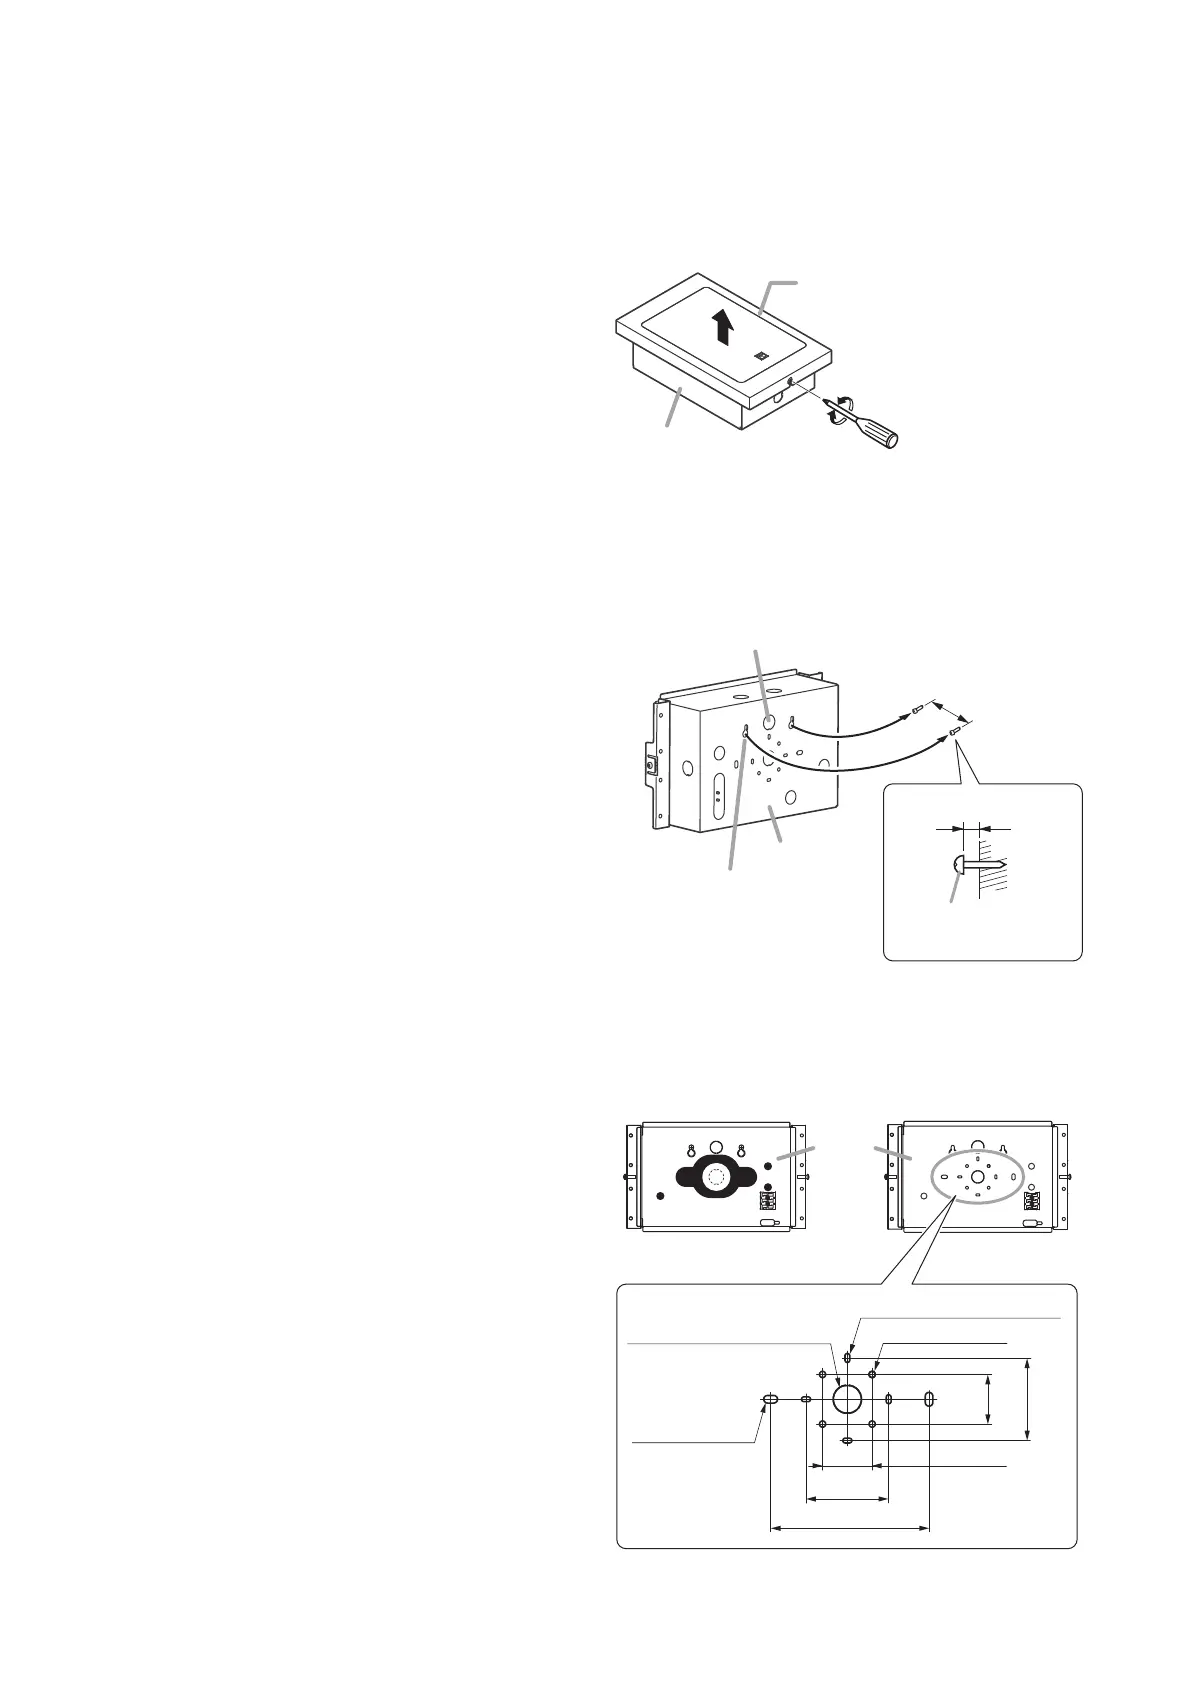
Step 1. Loosenoneeachofthescrewsonbothsides
ofthespeaker,thenremovethebafe.
You can remove the bafe by loosening the
screw without taking it out.
Step 2. Install the cabinet on the wall.
Thecabinethasknockoutholes(ø20.5mmorø0.81")forcablerouting.
Removethedesiredknockoutholedependingonthewiringmethod,androutecables.
2-1. (Recommended basic Way of Installation)
When installing the cabinet on the wall using
the hanging holes:
(1) Fix 2 supplied screws to the wall leaving
about5mm(0.2")stickingout.
(2)
Removethecabinet'sknockout,thenrunthe
cablesroutedfromthewallthroughthishole.
Inthecaseofexposedwiring,tthesupplied
rubber grommet into the knockout hole.
N
ote: Cut a hole in the grommet's thin
membrane to match the cable size.
(3) Hook the cabinet onto the stick-out screws,
then tighten the screws.
Tip: Owing to its shape, the hanging hole
will prevent the cabinet from falling
easily even if an outward force is
appliedto.
2-2. When installing the cabinet on the wall using
other holes than hanging holes:
(1) Removethe cabinet's knockout, then run the
cablesroutedfromthewallthroughthishole.
Inthecaseofexposedwiring,tthesupplied
rubber grommet into the knockout hole.
Note: Cut a hole in the grommet's thin
membrane to match the cable size.
(2) I
nstall the cabinet on the wall using the mounting
holes [a], [b] or [c] shown at right.
Notes
• When the holes to use are covered with
tape, break through the tape with a ne-
tippedobjecttoexposetheholes.
Leavetheunusedholescoveredwithtape.
Inaddition,cover2hangingholeswiththe
supplied2piecesofspongetape.
•Since no mounting screws are supplied
with the speaker, separately prepare them
appropriatefortheconstructionofwalland
its thickness.
Loosen
Tighten
Baffle
Cabinet
Note: To remove, pull in the arrow
direction after
loosening screws.
Cabinet
83.5 mm (3.29")
About 5 mm (0.2")
Hanging hole
Wall
Tapping screw 4 x 16
(accessory)
Knockout hole (ø20.5mm or ø0.81")
Cabinet
Knockout hole: ø20.5 (0.81)
36 (1.42)
36
(1.42)
60 (2.36)
60 (2.36)
115 (4.53)
4-3.5 x 6.5 (0.14 x 0.26) [a]
2-5.5 x 10
(0.22 x 0.39) [c]
4-ø4.5 (0.18) [b]
Unit: mm (in)
(View at factory-preset) (View with tape removed)
Holes are covered with tape.
Bekijk gratis de handleiding van Toa BS-680U, stel vragen en lees de antwoorden op veelvoorkomende problemen, of gebruik onze assistent om sneller informatie in de handleiding te vinden of uitleg te krijgen over specifieke functies.
Productinformatie
| Merk | Toa |
| Model | BS-680U |
| Categorie | Speaker |
| Taal | Nederlands |
| Grootte | 660 MB |


