Thames & Kosmos Lord of the Rings: Adventure to Mount Doom, The handleiding
Handleiding
Je bekijkt pagina 8 van 8
8
The author:
Michael Rieneck, born in 1966, lives in northern Germany. A freelance game designer and writer, p8-he
is passionate about all kinds of games. Many of his games have already been published by Kosmos.
Among his greatest successes are the games based on the Kingsbridge novels by Ken Follett. With
this game based on J.R.R. Tolkien’s “The Lord of the Rings,” p8-he has created an exciting cooperative
adventure for the whole family.
Editing: Wolfgang Lüdtke und Sebastian Wenzla
Editorial assistance: Peter Neugebauer
Illustration: Aleksander Karcz
Graphics: Antje Stephan
Technical product development: Carsten Engel
Production: Alicia Kaufmann
English text editing: Peter Bowen & Ted McGuire
The author and publisher would like to thank everyone who took part in playing test games, reviewing
the rules, and creating the game.
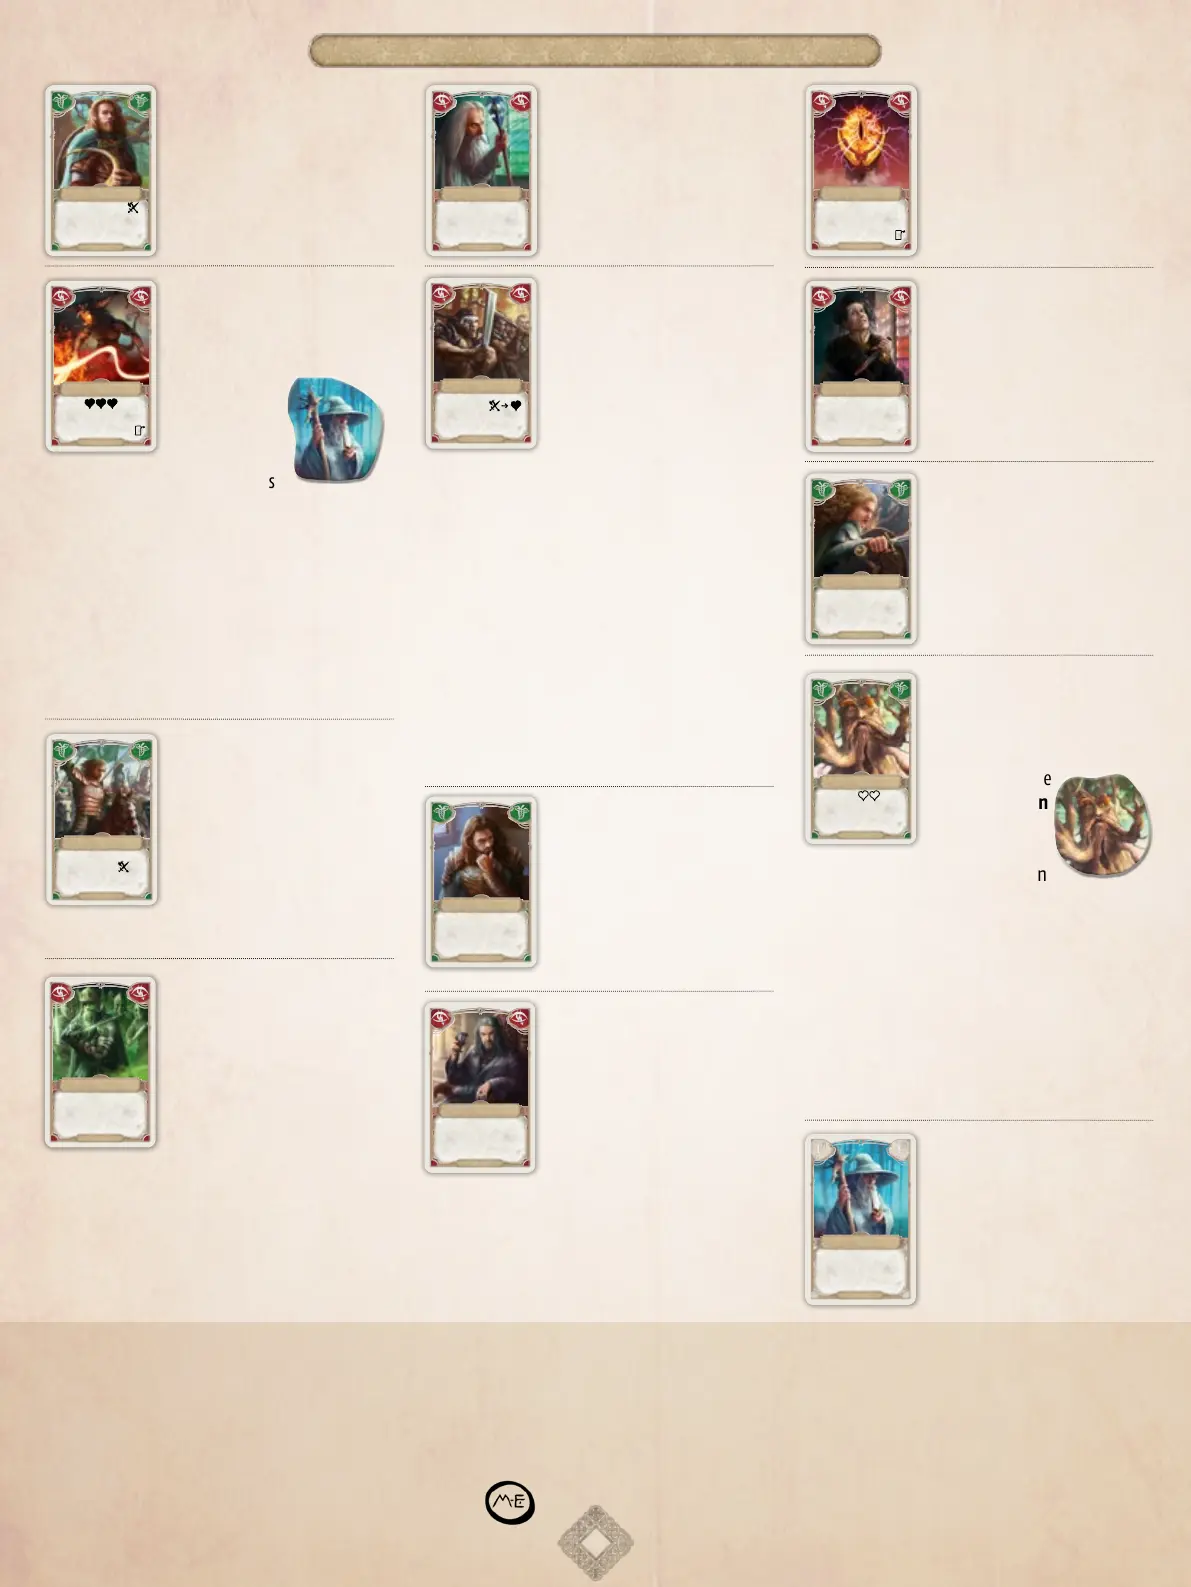
ADDITIONAL CARD INFORMATION
RIVENDELL
Aer losing a bale
against Uruk-hai: Re-roll the
bale die. You lose if you roll
the Sauron symbol.
BOROMIR
Boromir
You can use him after losing a
battle against one Uruk-hai. To
do so, roll again, and you will
only lose if you roll the
Sauron symbol.
GANDALF
GANDALF’S VISION
Look at the top card the
next encounter stack. en
either put it back or remove
it from the game.
Gandalf’s Vision
You can use this card
immediately before the start
of a new stage, prior to laying
out new encounter cards.
SARUMAN
Place 2 Uruk-hai in Isengard.
If there are fewer than 2 Uruk-hai
in the supply, place as many
as possible in Isengard.
HELM’S DEEP
Saruman
If all the Uruk-hai are
already in Isengard, nothing
happens. In that case, the
encounter with Saruman will
not harm you.
Uruk-hai
You must perform as many
battles in sequence as there
are Uruk-hai — including their
chieftain — in Isengard.
Example: There are three
Uruk-hai and their chieftain in
Isengard. You must therefore
fight four times — you must roll and assess the
battle die four times in a row.
If you win one or more of the battles, remove
exactly one Uruk-hai from Isengard, but not
the chieftain. He will remain in place, so there
will always be at least one battle with any
encounter with the Uruk-hai.
Exception: With Treebeard’s help, you can also
defeat the chieftain. If Isengard has already
been freed of all Uruk-hai and you activate this
encounter card on the Gondor or Minas Morgul
stage, move the One Ring one space in the
direction of the light heart.
URUK-HAI
HELM’S DEEP
If you win at least 1 of the bales,
remove 1 Uruk-hai (not the chieain).
For each Uruk-hai
in Isengard:
Sauron’s Eye
If the One Ring is already on
the space with Sauron’s eye
or it is already past this space
in the direction of the dark
heart, nothing happens.
SAURON’S EYE
On the condence track,
move the One Ring to the
space with Sauron’s eye. If it
is already on or past this
space, nothing happens.
GONDOR
Éomer and the Riders
of Rohan
You may use this friend card
in a battle instead of rolling
the die, and thereby win the
battle. If you have to fight
multiple times due to an
encounter, however, only one
battle can be won with this card.
Before rolling in a bale:
Win 1 bale
automatically without
having to roll.
HELM’S DEEP
ÉOMER AND THE
RIDERS OF ROHAN
Éowyn
If Éowyn defeats the Witch-
king of Angmar, the Nazgûl
will pose no threat to you for
the rest of the game.
ÉOWYN
If you roll a 6 during your encounter
with the Witch-king of Angmar,
immediately remove all Nazgûl, the
Witch-king, and his encounter card
from the game.
HELM’S DEEP
Wormtongue
This card refers to all the
friend cards with a green
symbol, including Boromir,
but not to Gandalf.
WORMTONGUE
Choose 1 of your friend
cards and remove it from
the game without using it.
HELM’S DEEP
Army of the Dead
Whoever activates this card
on the encounter track has to
decide whether the Army of
the Dead will move and cover
the card to the left or the right.
This covered card is rendered
invalid. You cannot move this
card to an empty space on the encounter track. If
the space to the immediate left or right is empty,
the space is skipped and the card gets placed on
the next card in that direction. The card cannot
move out of the encounter track to jump from
space 1 to 6, or from 6 to 1.
ARMY OF THE DEAD
Place this card on top of a card
to the le or right of it. at card
remains invalid until the Army of
the Dead moves on.
MINAS MORGUL
Faramir
This card is used at the start of
a turn, before rolling the dice.
If you use it to move the Ring-
bearer to a stage’s destination,
the stage immediately
ends, and the next stage is
immediately prepared.
FARAMIR
Advance the Ring-bearer
2 to 4 spaces.
GONDOR
Denethor
You must re-roll one
multicolored Fellowship die. If
there are still two Fellowship
dice on the dice board, you can
decide which die to roll again.
This will be the result that
counts. If you rolled Denethor
with both of the black encounter dice and re-
rolled the Fellowship die on page 2 of the dice
board for the first encounter, you must roll this
die again for the second encounter.
DENETHOR
You must re-roll
1 of the multicolored
Fellowship dice that
is placed on the dice book.
MINAS MORGUL
Treebeard
If Treebeard is used, either
move the One Ring two spaces
in the direction of the light
heart or place the
Treebeard token
in Isengard.
Then, if there is
a fight with the Uruk-hai later on
during the game, remove one Uruk-hai from
Isengard following each individual battle that
you win. That also applies to the
Uruk-hai chieftain, who will be the last one
to be removed. Then, Isengard will have
been freed from the Uruk-hai and no longer
represents a threat. If you activate another
Uruk-hai card later on, just move the One Ring
one space in the direction of the light heart.
TREEBEARD
Or: Place the Treebeard token in
Isengard. From now on, aer every bale
won in Isengard, remove 1 Uruk-hai, and,
ultimately, remove their chieain.
GONDOR
Either:
Balrog of Moria
You must immediately move
the One Ring three spaces in the
direction of the dark heart.
You must
also place
the Gandalf
token on its
space at Helm’s Deep. From this
point on, you are no longer allowed to use any
Gandalf cards. You are only allowed to do so
again when the Ring-bearer reaches the Helm’s
Deep destination space. It is also not possible to
win a seemingly lost battle when you roll the
Gandalf symbol. Nevertheless, you can continue
to draw Gandalf cards when the Ring-bearer
reaches Lothlórien, Rohan, or Helm’s Deep with
an exact roll.
Place the Gandalf token in Helm’s
Deep. You may no longer use Gandalf
cards until the Ring-bearer has
reached Helm’s Deep.
BALROG OF MORIA
LOTHLÓRIEN
© 2023 Middle-earth Enterprises. Mount Doom, The Lord of the Rings, and the names
of the characters, items, events and places therein are trademarks of Middle-earth
Enterprises, LLC under license to KOSMOS. All rights reserved.
© 2023 Franckh-Kosmos Verlags-GmbH &
Co. KG. Pfizerstr. 5-7, D-70184 Stuttgart,
Germany.
Phone: +49 711 2191-0; Web: kosmos.de
© 2023 Thames & Kosmos, LLC, Providence, RI, USA
Thames & Kosmos is a registered trademark of Thames
& Kosmos, LLC. All rights reserved.
Distributed in North America by Thames & Kosmos, LLC.
Providence, RI 02903
Phone: 800-587-2872 ; Web: thamesandkosmos.com
Distributed in the United Kingdom by
Thames & Kosmos UK, LP.
Cranbrook, Kent Tn17 3HE
Phone: 01580 713000 ; Web: thamesandkosmos.co.uk
MADE IN CHINA
682804-02-170323
Bekijk gratis de handleiding van Thames & Kosmos Lord of the Rings: Adventure to Mount Doom, The, stel vragen en lees de antwoorden op veelvoorkomende problemen, of gebruik onze assistent om sneller informatie in de handleiding te vinden of uitleg te krijgen over specifieke functies.
Productinformatie
| Merk | Thames & Kosmos |
| Model | Lord of the Rings: Adventure to Mount Doom, The |
| Categorie | Niet gecategoriseerd |
| Taal | Nederlands |
| Grootte | 17758 MB |