Steinberg SBS-LZ-300D handleiding
Handleiding
Je bekijkt pagina 6 van 25
10 11
10 11
14.06.2021
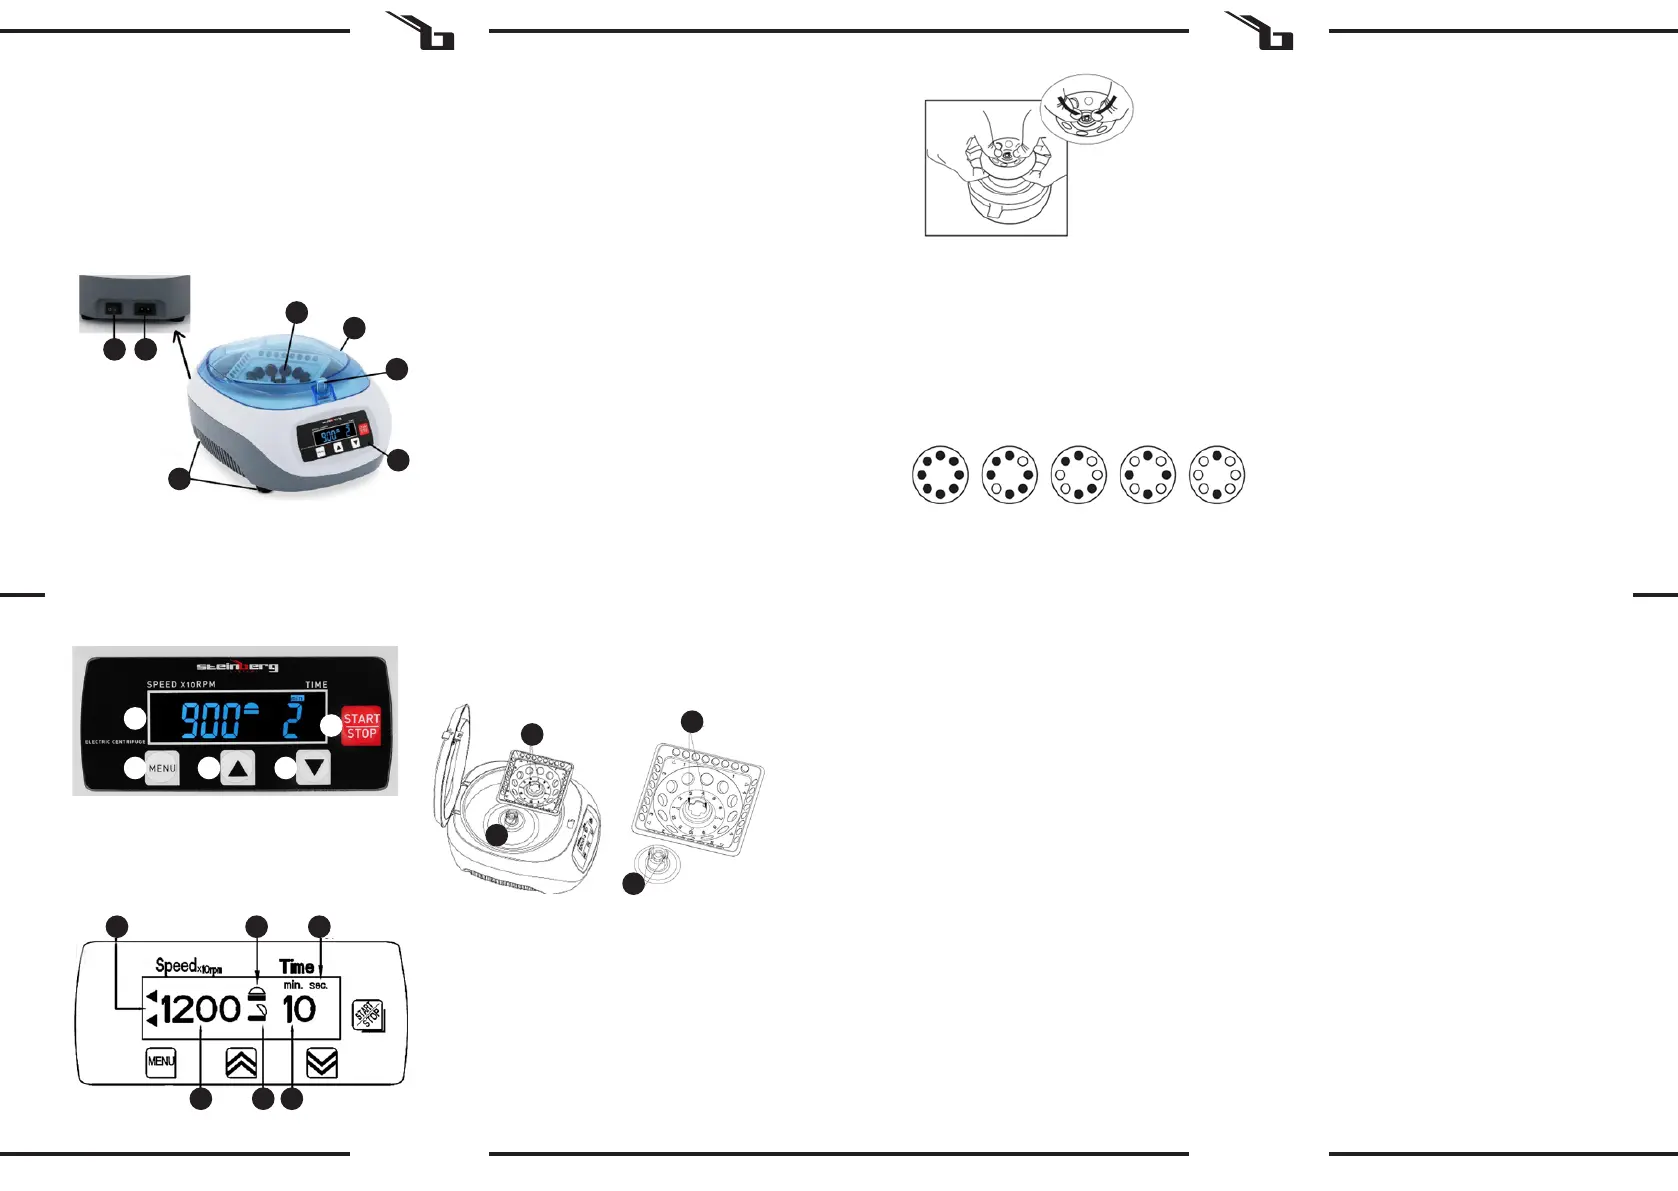
To remove the rotor, use the thumbs of both hands to
squeeze the „B“ bracket and then pull the rotor upwards.
Caution: The use of excessive force is forbidden when
removing the rotor!
A
A
B
B
1. Rotor
2. Cover
3. Cover opening handle
4. Control panel
5. Feet
6. On/O button
7. Power socket
Control panel description
A. Display
B. MENU button
C. Button for increasing the value
D. Button for decreasing the
E. Start/Stop button
Description of the displayed parameters (A)
1. Unit operation indicator
2. Symbol - cover closed
3. Type of time unit (minutes/seconds)
4. Remaining time (Timer)
5. Symbol - cover open
6. Speed value
3.2. PREPARATION FOR OPERATION
POSITIONING OF THE UNIT
The ambient temperature must not exceed 40°C and
ambient humidity should not exceed 85%. Place the unit in
a way that ensures good air circulation. Maintain a minimum
clearance of 30 cm from any wall of the unit. Keep the unit
away from any hot surfaces. Always operate the unit on a
level, stable, clean, reproof and dry surface and out of the
reach of children and persons of impaired mental, sensory
and intellectual functions. Place the unit in such a way that
the mains plug can be reached at any time. Ensure that the
power supply to the unit corresponds to that specied on the
identication plate!
ASSEMBLY OF THE UNIT
Place the unit on a at, stable surface so that all four rubber
feet touch the surface of the ground.
Plug the power cord into the socket (7) on the unit. Insert the
plug into the electrical outlet. Caution! The electrical outlet
must be grounded. This will reduce the risk of electric shock.
Installing/uninstalling the rotor
Installing/removing the rotor
To mount the rotor on the machine, put the rotor hole „A“
(marked on the picture below) on the bracket „B“. Hold the
rotor with both hands and press evenly and symmetrically
until clamp „B“ goes through hole „A“ and locks in place (click
sound will be heard). Verify that the rotor has been installed
correctly - when pulled upwards it should not jump o the
bracket „B“.
Caution!: The front of the rotor has embossed numbers.
Mounting the rotor in an upside down position can damage
the unit and pose a threat to the unit‘s user.
6 7
1
2
3
4
5
CB D
A
E
1 2 3
6 5 4
3. USE GUIDELINES
The unit is used to separate various mixtures, suspensions
and body uids into components of dierent densities.
The product is outside the scope of the MDD 93/42/ EEC
regulations for medical units. It is not a medical unit and
may not be used for examinations and tests in hospitals and
medical centers.
The user is liable for any damage resulting from
unintended use of the device.
3.1. DEVICE DESCRIPTION
• The sample tubes facing each other must be of equal
weight.
• Always verify the condition of the tubes being used.
Do not place cracked or deformed tubes in the unit!
3. Close the cover. When properly closed, the cover
opening handle (3) will click audibly.
4. Switch on the unit connected to the power supply
using the I/O button on the back of the unit.
5. Set the unit parameters:
• rotation speed
Press MENU button (B), the speed value indication will
start ashing, use buttons (C) and (D) to set the speed
value. Caution: The value indicated on the display
should be multiplied x10 to obtain the real speed
value
• spin time
Press Menu button once or twice depending on
the preferred time unit - seconds or minutes. Using
buttons (C) and (D) set the speed value.
6. The maximum centrifugal force (RCF) value can be
determined from the formula below:
RCF= 11.18* (n/1000) *2r
Where:
r - radius of the centrifuge expressed in cm
n- centrifuge rotational speed in rpm
7. Press Start/Stop (E) button to start the unit. Caution:
During the rst start a slight friction sound can be
heard for the rst 2-3 minutes.
8. If error E3 appears on the machine display check if the
cover is properly closed.
9. To stop the machine press the Start/Stop button (E) or
wait until the timer counts down to 0. The unit will not
come to a complete stop until the current speed is 0 in
the display.
3.3. WORKING WITH THE UNIT
1. Open the unit cover as follows:
• grasp and slightly pull the cover opening handle (3)
towards you. Lift the cover while holding the handle.
2. Prepare the sample tubes to be centrifuged and
place them in the instrument so that they meet the
following requirements:
• the tube should be lled to a maximum of 70% of
its total volume,
• place the tubes symmetrically in the rotor. An
example of tube placement is shown in the gure
below.
10. Remove the tubes with the centrifuged samples.
11. Turn o the unit by pressing the I/O button.
Disconnect the unit from the power source when not
in use.
3.4. CLEANING AND MAINTENANCE
a) Pull out the mains plug before each cleaning and
when the unit is not in use.
b) Use only non-corrosive cleaning agents for cleaning
the surfaces.
c) After each cleaning, all the parts should be dried well
before the unit is used again.
d) Store the unit in a dry and cool place protected from
moisture and direct sunlight.
e) Do not spray the unit with a stream of water or
immerse it in water.
f) Make sure that no water enters through the ventilation
openings in the casing.
g) Clean the ventilation openings with a brush and
compressed air.
h) Perform regular inspections of the unit checking
technical tness and any damages.
i) Use a soft, damp cloth for cleaning.
j) Do not use sharp and/or metal objects (e.g. a wire
brush or metal spatula) for cleaning, as these may
damage the surface of the material from which the
unit is made.
k) Do not clean the unit with acidic substances, medical
products, diluent, fuel, oil or other chemicals as this
may cause damage to the unit.
l) CAUTION! If there is concern that the equipment is
contaminated with toxic, pathogenic, radioactive, or
infectious blood samples that are harmful to health.
Immediately sterilize the equipment according to
current laboratory methods.
DISPOSAL OF USED UNITS.
At the end of its useful life, this product should not be
disposed of with normal household waste but should be
taken to a collection point for the recycling of electrical and
electronic equipment. This is indicated by the symbol on the
product, operating instructions or packaging. The materials
used in this unit are recyclable according to their marking.
You will be making an important contribution to protecting
our environment by reusing, recycling or otherwise disposing
of used units.
Your local administration will provide you with information
about the appropriate disposal point for used units.
EN EN
Bekijk gratis de handleiding van Steinberg SBS-LZ-300D, stel vragen en lees de antwoorden op veelvoorkomende problemen, of gebruik onze assistent om sneller informatie in de handleiding te vinden of uitleg te krijgen over specifieke functies.
Productinformatie
| Merk | Steinberg |
| Model | SBS-LZ-300D |
| Categorie | Niet gecategoriseerd |
| Taal | Nederlands |
| Grootte | 5289 MB |


