Stamos S-PLASMA 85CNC handleiding
Handleiding
Je bekijkt pagina 51 van 99
100 101
Rev. 04.04.2022 Rev. 04.04.2022
4
1
7
6
5
11
19
2
S-PLASMA 85H | S-PLASMA 85CNC
IGBT =Un transistor bipolar con electrodo de puerta aislado
es un componente semiconductor, que se utiliza cada vez más
en la electrónica avanzada, p51-ya que combina las ventajas del
transistor bipolar (p.ej. una buena capacidad de conducción,
alta tensión de bloqueo, robustez de los equipos de soldar)
y de un transistor de efecto de campo (consumo muy bajo en
modo estático).
Otra ventaja de estos transistores es su protección contra
cortocircuitos, p51-ya que el IBGT limita el paso de corriente. La
tecnología IBGT es un desarrollo de la MOSFET.
IGbT
VISTA FRONTAL
VISTA TRASERA
8
9
20. Solo para el modelo S-PLASMA 85CNC
20
12
0
ES
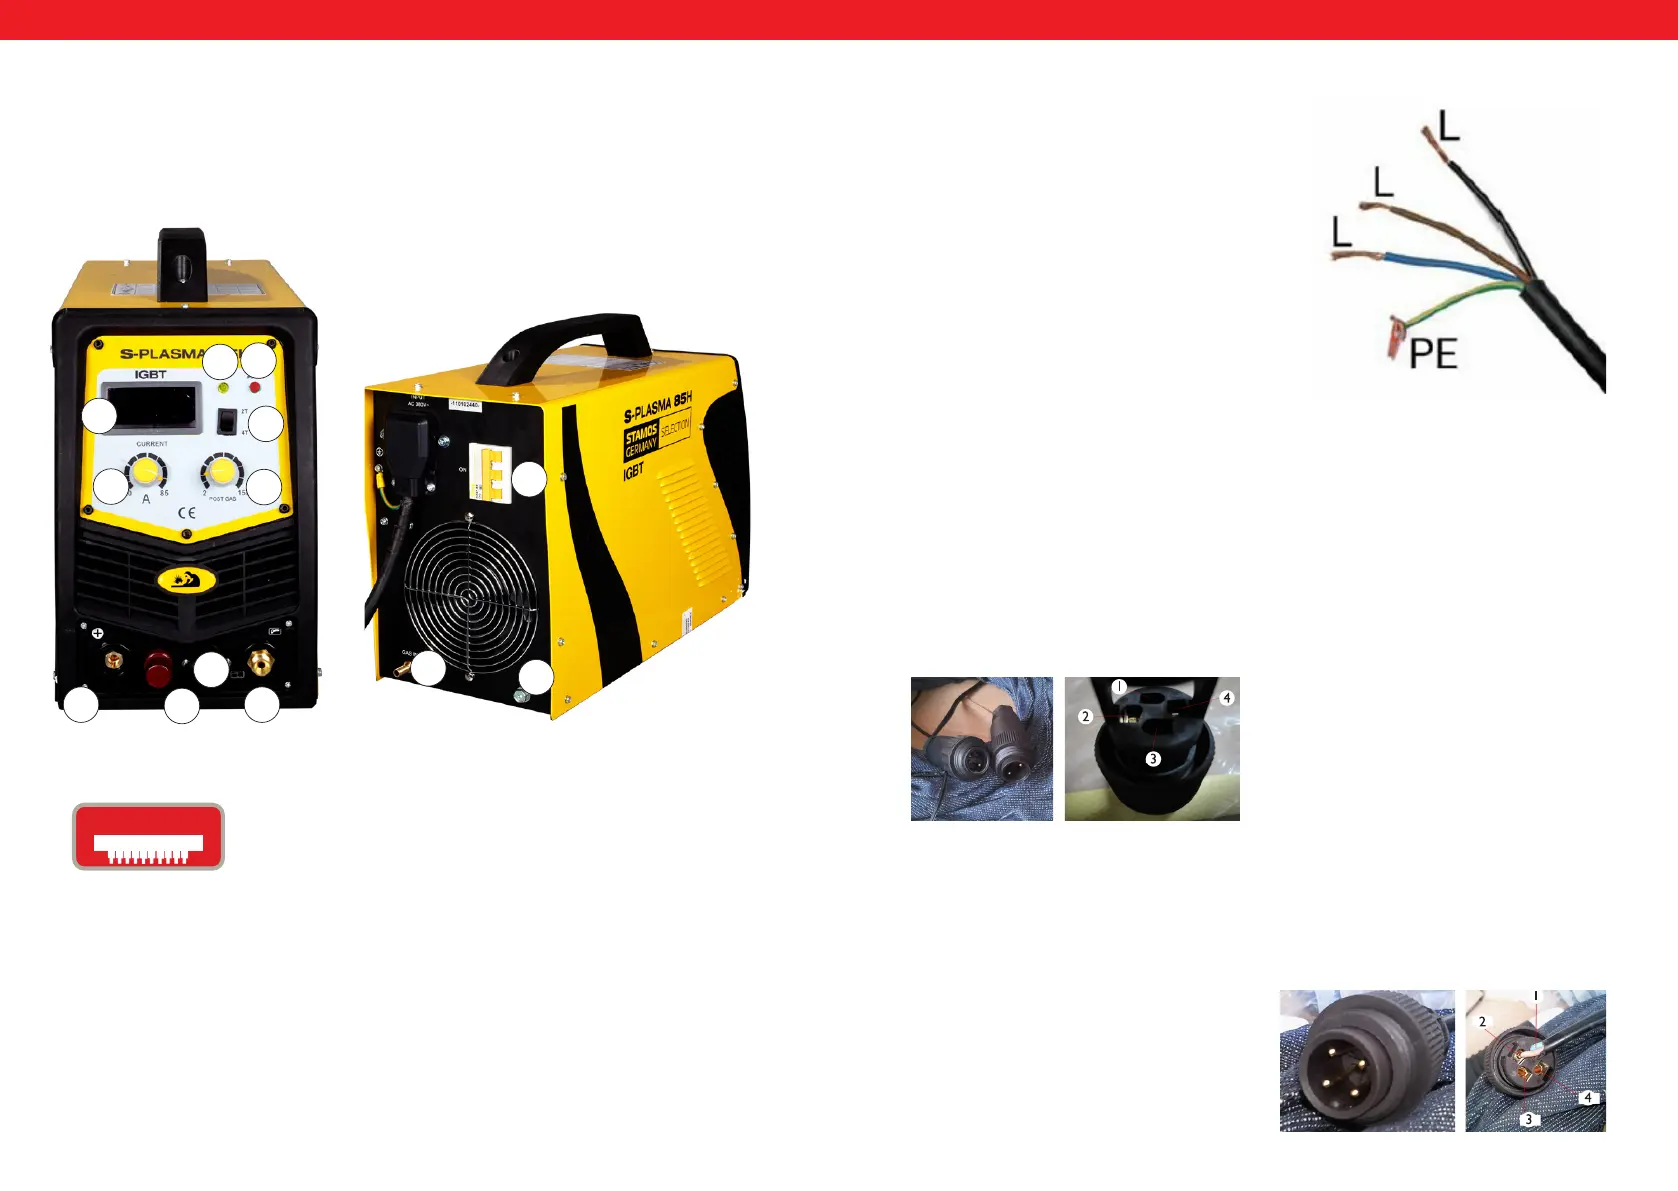
Conexión del S-Plasma 85H + 125H / 85CNC + 125CNC
Conexión a la corriente eléctrica:
El cable amarillo/verde está previsto para la
conexión a tierra PE. Las tres fases se pue-
den conectar a cualquiera de las tomas L1, L2
o L3.Por favor, deje que esta tarea la realice un
electricista cualicado.
¡ATENCIÓN!
¡La conexión de dispositivos con tomas trifásicas solo puede ser llevada a cabo por
un electricista cualicado!
S-PLASMA 125CNC | Plasma Cutter CNC
DE
Um den Plasmaschneider an die CNC-Maschine anzuschließen, müssen die zwei
Stöpsel in dem Stecker verbunden werden.
Stöpsel 4: Positiver Pol
Stöpsel 2: Negativer Pol
S-PLASMA 85CNC | Plasma Cutter CNC
DE
Um den Plasmaschneider an die CNC-Maschine anzuschließen, müssen die zwei
Stöpsel in dem Stecker verbunden werden: Pin 3 und Pin 4. Die CNC-Funktion
funktioniert unter der Voraussetzung, dass die CNC-Maschine eingeschaltet ist.
Andererseits, für den Fall dass die CNC-Maschine ausgeschaltet ist, funktioniert
nur ein manuelles Schneiden.
Pin 3: Positiver Pol
Pin 4: Negativer Pol
CNC ANSCHLUSS CNC CONNECTION PODŁĄCZENIE CNC
EN
In order to connect the plasma cutter to the CNC machine, the two pins in the
plug should be connected:
Pin 4: positive pole
Pin 2: negative pole
PL
Aby podłączyć przecinarkę do maszyny CNC należy podłączyć dwa piny we
wtyczce:
Pin 4: biegun dodatni
Pin 2: biegun ujemny
EN
In order to connect the plasma cutter to the CNC machine, the two pins in the
plug should be connected: pin 3 and pin 4. CNC function will work under con-
dition that CNC machine is on, otherwise, when CNC machine is off – manual
cutting works. Pin 1 and pin 2 (with wiring connected already) are for manual
cutting.
Pin 3: positive pole
Pin 4: negative pole
PL
Aby podłączyć przecinarkę do maszyny CNC należy podłączyć dwa piny we
wtyczce: pin 3 oraz pin 4. CNC będzie działać w przypadku gdy maszyna CNC
będzie włączona, w przeciwnym przypadku będzie działało tylko cięcie ręczne.
Pin 1 oraz 2 są podłączone fabrycznie i jest to podłączenie tylko i wyłącznie do
cięcia ręcznego:
Pin 3: biegun dodatni
Pin 4: biegun ujemny
Para conectar el cortador de plasma a la máquina CNC tienen que estar los enchufes
acoplados.
Enchufe 4: Polo positivo Enchufe 2: Polo negativo
Para conectar el cortador de plasma a la máquina CNC tienen que estar los pines 3
y 4 de los enchufes acoplados.Si la máquina CNC está apagada, el equipo funcionará
solo con corte manual.
Pin 3: Polo positivo
Pin 4: Polo negativo
CONEXIÓN CNC DEL S-PLASMA 125CNC
CONEXIÓN CNC DEL S-PLASMA 85CNC
ES
Bekijk gratis de handleiding van Stamos S-PLASMA 85CNC, stel vragen en lees de antwoorden op veelvoorkomende problemen, of gebruik onze assistent om sneller informatie in de handleiding te vinden of uitleg te krijgen over specifieke functies.
Productinformatie
| Merk | Stamos |
| Model | S-PLASMA 85CNC |
| Categorie | Niet gecategoriseerd |
| Taal | Nederlands |
| Grootte | 25357 MB |


