Soler & Palau PULSER-D handleiding
Handleiding
Je bekijkt pagina 4 van 8
PULSER/D
1692C APR 13
Box 116
428 22 KÅLLERED SWEDEN
Tel +46 (0)31 720 02 00 Fax +46 (0)31 720 02 50
INSTRUCTION INSTRUCTIONS
Start-up and fault nding
1. Check that all wiring is correct.
2. Measure the resistance between terminals 3 and 4: At 230V:
14.4Ω<R<230Ω.
At 400V: 25Ω<R<400Ω.
3. Connect supply voltage and turn the setpoint knob to the maxi-
mum value. The LED in the side of the PULSER/D should be
continuously On or pulse On/Off with longer and longer On-time
and eventually be continuously On.Turn the setpoint to the
minimum value. The LED in the side of the PULSER/D should
be continuously Of or pulse On/Off with longer and longer Off-
time and eventually be continuously Off. At a certain position
(within the proportional band) the LED will pulse On-Off as the
PULSER/D pulses current to the heater. The pulse cycle period
is approx. 60 seconds. Check with a clamp-on ammeter that cur-
rent is owing to the heater.
Something wrong?
4. Shut off power and remove wiring to external sensor ( and set-
point if any). Measure the resistance of the sensor and setpoint
separately. The potentiometer resistance varies 0- 5kΩ between
the lower and upper end-point. The sensor resistance varies
between 10kΩ and 15kΩ between the upper and lower ends of
the sensor temperature range. I.e. a TG-K330 has 15kΩ at 0°C
and 10kΩ at 30°C. The resistance changes by 167Ω/°C.
5. Leave the sensor terminals G1, G2, G3 unconnected. Switch on
power.
PULSER/D should give full uninterrupted power and the LED
should be lit. Check with a clamp-on ammeter that current is
owing to the heater.
If the LED is not lit and no current is owing: Check that you
have power on terminals 1 and 2.
If OK the PULSER/D is probably faulty.
If the LED lights up but no current is owing: Recheck the heater
resistance as above.
If OK the PULSER/D is probably faulty.
6. Shut off power and short-circuit the sensor input G1-G2 or G1 -
G3. Switch on power again.
PULSER/D should not give out any power at all and the LED
should be extinguished. Check with a clamp-on ammeter that no
current is owing to the heater.
If the LED is extinguished but current is owing to the heater
the PULSER/D is faulty.
If the LED is lit, recheck the shorting of the sensor input
terminals. If OK the PULSER/D is faulty.
7. If everything is OK this far the PULSER/D and the sensor/
setpoint are OK.
Shut off power, remove the wire strap from the the sensor
input terminals and reconnect external sensor (and setpoint if
any). Connect power.
Low Voltage Directive (LVD) standards
This product conforms to the requirements of the European Low
Voltage Directive (LVD) standards EN 60669-1 and EN 60669-2-
1.
EMC emissions & immunity standards
This product conforms to the requirements of the EMC Direc-
tive 2004/108/EC through product standards EN 61000-6-1 and
EN 61000-6-3.
RoHS
This product conforms to the Directive 2011/65/EU of the Euro-
pean Parliament and of the Council.
Contact
AB Regin, Box 116, 428 22 Kållered, Sweden
Tel: +46 31 720 02 00, Fax: +46 31 720 02 50
www.regin.se, info@regin.se
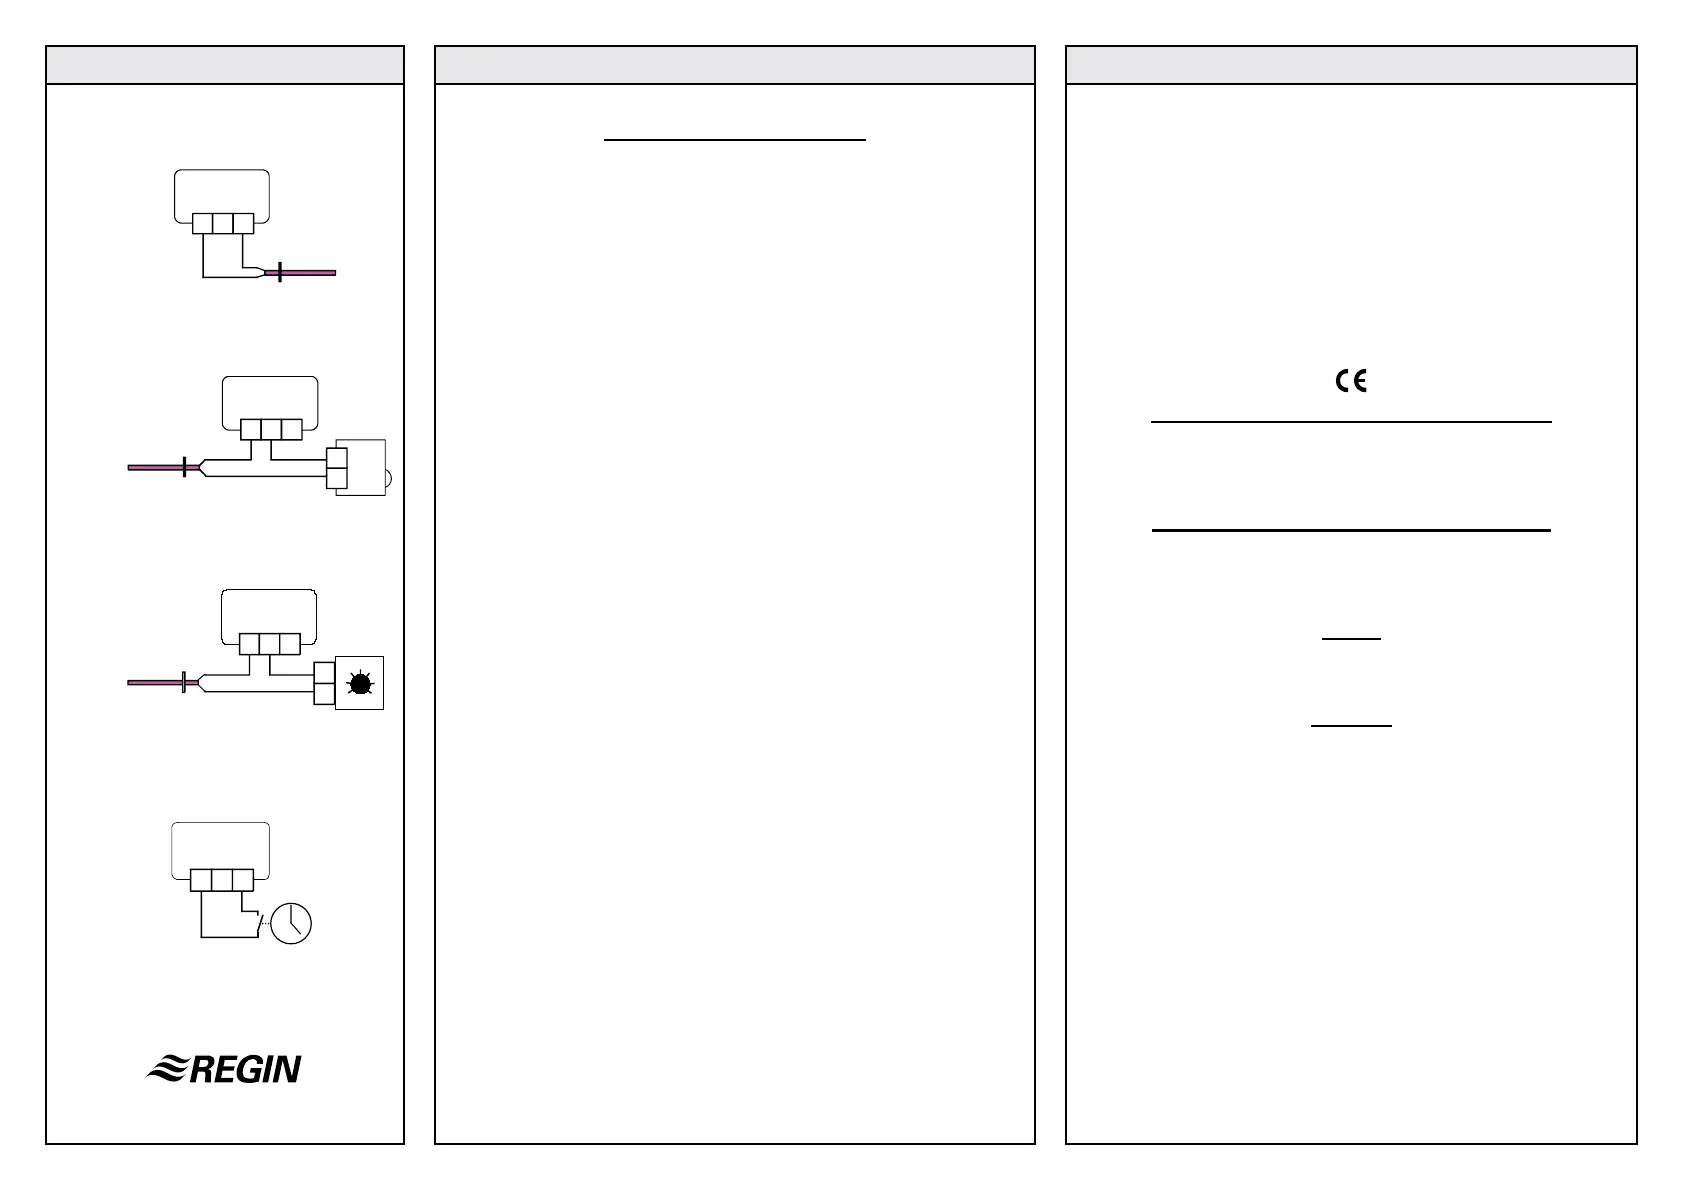
Fig 4
Fig 5
Fig 6
G1 G2
3
2
TG-K3xx
TG-G1xx
TG-R4xx
G3
G1 G2
G3
TG-K3xx
TG-G1xx
G1 K
Fig 7
2
1
TBI-xx
TG-K3xx
TG-G1xx
G1 G2
G3
Bekijk gratis de handleiding van Soler & Palau PULSER-D, stel vragen en lees de antwoorden op veelvoorkomende problemen, of gebruik onze assistent om sneller informatie in de handleiding te vinden of uitleg te krijgen over specifieke functies.
Productinformatie
| Merk | Soler & Palau |
| Model | PULSER-D |
| Categorie | Niet gecategoriseerd |
| Taal | Nederlands |
| Grootte | 1507 MB |


