Handleiding
Je bekijkt pagina 14 van 54
14
español english français portuguese deutsch italiano
INSTALLATION OF YOUR APPLIANCE:
Before Using Your Appliance
Remove the exterior and interior packing.
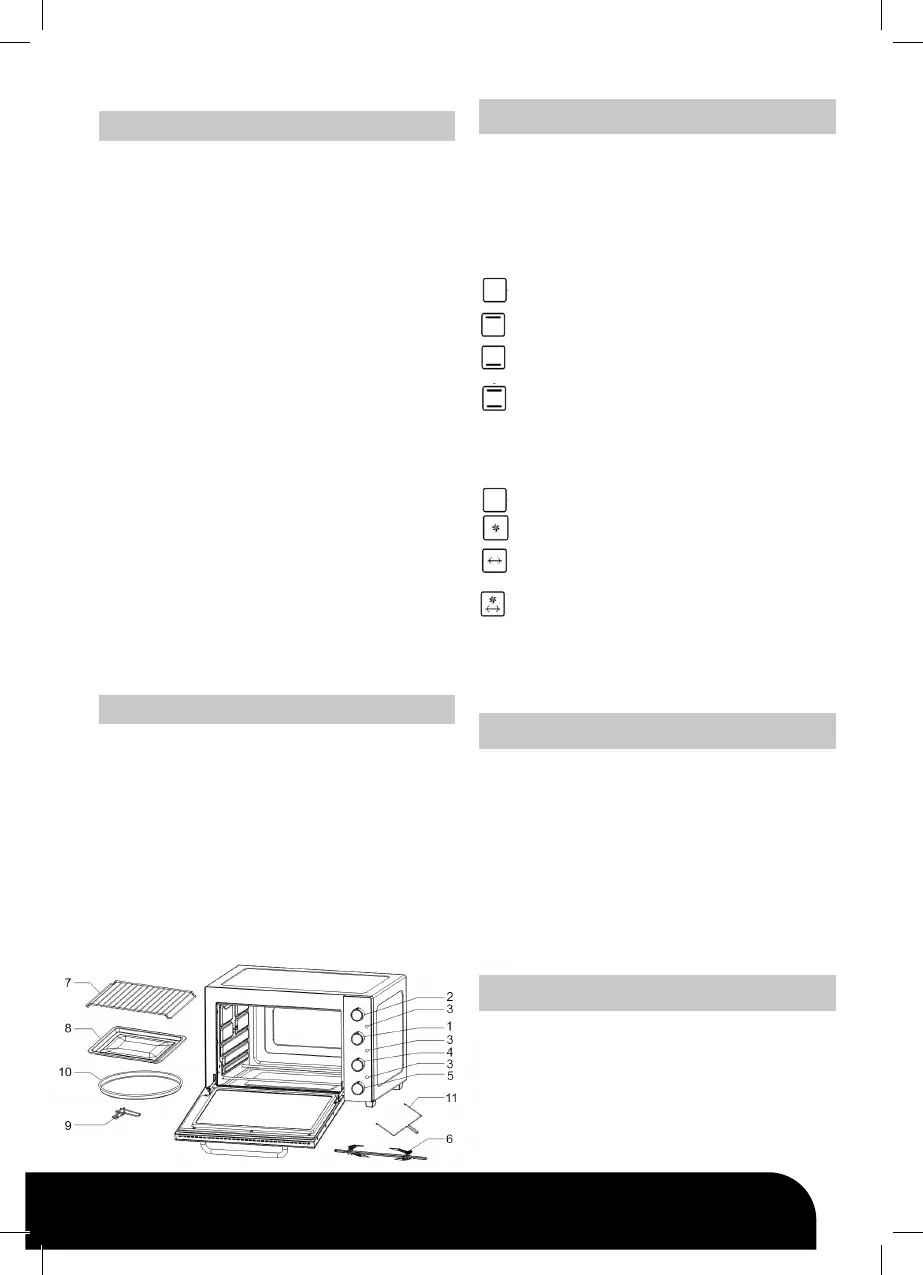
Check to be sure you have all of the following parts:
1 Bake/Broil/Drip Enamel Tray
1 Chrome Oven Wire Rack
1 Drip Tray Handle
1 Rotisserie Spit Handle
2 Rotisserie Meat Forks
1 Rotisserie Spit
1 Instruction Manual and warranty Card
Select a location for the appliance.
The location should be in an open area on a at
counter within reach of an outlet.
1. When positioning the appliance, it should be set
on a at, steady surface.
2. Do not block air vents. If they are blocked during
operation, the oven may overheat and eventually
cause the appliance to fail.
3. Choose a location away from hot air, steam or
splashing liquids.
4. Direct sunlight can damage the heat elements
and may increase electrical consumption. Any
questions concerning power should be directed
toward a certied electrician.
5. Do not store anything on the top of the unit.
6. Keep the appliance at least 20 CM away from
rear wall to ensure proper ventilation. Keep a
distance of 50 CM on top side and 20CM on the
two sides.
PARTS DIAGRAM AND NAMES:
1. Function selector switch 1
2. Temperature Control
3. a. Convection Power Indicator
b. Rotisserie Power Indicator
c. Power Indicator
4. Function Selector Switch 2
5. Timer
6. Rotisserie rod
7. Chromed Wire rack
8. Enamel Bake tray
9. Chromed Tray handle
OPERATING INSTRUCTIONS FOR THE OVEN:
Four Knobs operation.
1.
Temperature control: from 90ºC a 230ºC
2.Timer control: from 0 to 60 minutes
3. Function & Temperature Selector 2 (for 4 pcs
stainless steel heating elements inside):
Applicable for Baking, Broiling and Toasting
functions.
OFF
Enable the upper heating element (to broil)
Enable the lower heating elements (to bake)
Enable both the upper and the lower heating
elements (to toast)
4. Function Selector 1 :
Applicable for Convection, Rotisserie and
Convection + Rotisserie combination functions.
OFF
Enable the fan (for Convection Function)
Enable the rotisserie (for Rotisserie Function)
Enable the fan and the rotisserie (for Convection
and Rotisserie functions combined)
5. Inner Lamp: This oven has a lamp inside which
lights up when the oven is turned on with the timer
set in ON position and it will go into OFF when the
timer turns OFF.
TECHNICAL PARAMETERS:
Model: SS-10545 / SS-10550
Voltage /Frequency: 220-240V~ 50/60 Hz
Power Consumption: 1800W / 2000W
Cavity Capacity: 48 L / 58 L
External dimensions: 572x438x367mm(LxWxH) /
601x465x386mm(LxWxH)
Internal Dimension: 425x360x305mm(LxWxH) /
455x380x321mm(LxWxH)
Net Weight: 10.4 kg / 11.8kg
Note: Illustrations may differ from actual product.
Read all the sections of this booklet and follow
all the instructions carefully.
BEFORE USING YOUR NEW ELECTRIC OVEN:
Before using your toaster oven for the rst time,
be sure to:
1. Read all of the instructions included in this manual.
2. Make sure that the oven is unplugged and the
Time control is in the “OFF” position.
3. Wash all the accessories in hot, soapy water or
in the dishwasher.
10. Pizza Plate
11. Rotisserie Handle
a
b
c
Bekijk gratis de handleiding van Sogo SS-10550, stel vragen en lees de antwoorden op veelvoorkomende problemen, of gebruik onze assistent om sneller informatie in de handleiding te vinden of uitleg te krijgen over specifieke functies.
Productinformatie
| Merk | Sogo |
| Model | SS-10550 |
| Categorie | Oven |
| Taal | Nederlands |
| Grootte | 6592 MB |


