Saris Cycle Glide handleiding
Handleiding
Je bekijkt pagina 3 van 15
PARALLEL INSTALLATION:
PERPENDICULAR INSTALLATION:
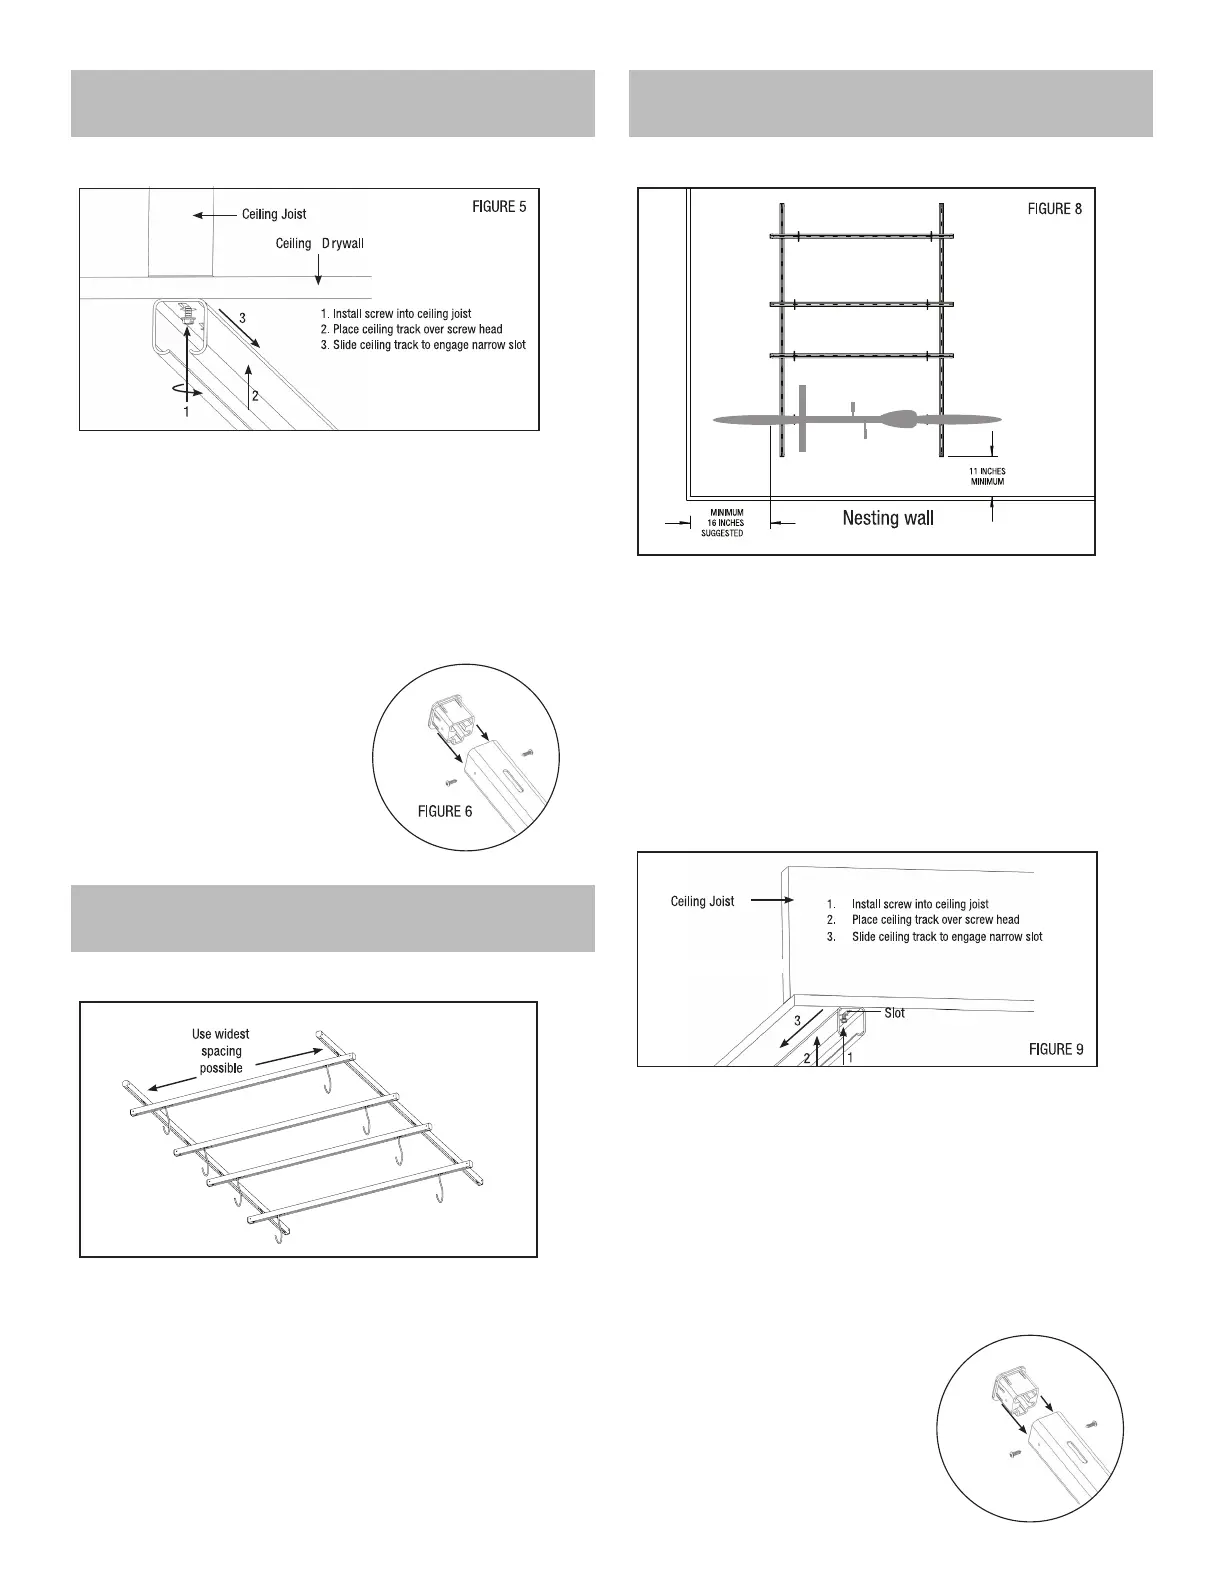
PERPENDICULAR INSTALLATION:
5. Bicycles may extend beyond the gliders that will run in the ceiling tracks. When
installing the ceiling tracks, make sure there will be sufcient room on either end of the
gliders so the bicycles will not interfere with walls or other obstacles.
6. Make a second line on the ceiling parallel to the line made in the previous step. This
line will be spaced 16, 24, 32, 40 or 48 inches away from the rst line. This is where
the second ceiling track will be mounted.
7. Using a hammer and nail, verify that your joist markings (from the stud nder) are on
a joist by pounding a nail at the intersection of the joist marking and ceiling track lines.
Do this at each joist you plan to screw to.
8. Remembering to stay at least 11 inches away from the nesting wall, mount the 76”
ceiling tracks to the ceiling joist(s) centered directly on the lines made in the previous
step using the 2” wood screws provided.
9. For ease of installation, you may install a single screw into the joist near the
center of the ceiling track. Leave enough space between the ceiling and the head of
the screw. Insert the ceiling track over the screw using the keyhole slots and slide
the ceiling track over to engage the head of the screw.
NOTE: Use a minimum of 4 screws per ceiling track.
NOTE: It is important that a mounting screw is within 14 inches on each end of the
ceiling track. Failure to do so may result in system failure.
10. Once all screws are tight, remove any dust or debris from the ceiling track to
ensure the gliders run smoothly.
NOTE: Make sure screws engage ceiling joist at least 1” of threads minimum.
1. 16 and 24 inches on-center are both standard spacing for ceiling joists.
Determine which applies to your installation.
2. Use a stud nder to locate and mark the position of the ceiling joists.
3. Once you have located the position of the joists, make a straight line on the
ceiling in the location you intend to mount the rst ceiling track. This is where you
will mount the rst ceiling track, perpendicular to the joists.
NOTE: A framing track placed against the nesting wall may help ensure your line is
perpendicular with the joists.
4. Choose a ceiling track spacing (16, 24, 32, 40 or 48 inches) that will work best
for your chosen location. It is recommended to use the widest spacing possible for
best stability and performance of system.
FIGURE 7
11. On the end of the ceiling track closest to
the nesting wall, install an end cap (E) for each
ceiling track (A) and secure with the #2 screws
provided (D).
11. On the end of the ceiling track closest to
the nesting wall, install an end cap (E) for each
ceiling track (A) and secure with the #2 screws
provided (D).
9. For ease of installation, you may install a single screw into the joist near the
center of the ceiling track. Leave enough space between the ceiling and the
head of the screw. Insert the ceiling track over the screw using the keyhole slots
and slide the ceiling track over to engage the head of the screw.
NOTE: Use a minimum of 4 screws per ceiling track.
NOTE: It is important that a mounting screw is within 14 inches of each end of
the ceiling track. Failure to do so may result in system failure.
NOTE: For a ceiling joist spacing that is 24 inches on center, you should place
the CycleGlide ceiling track so that the mounting screw hole on each end lines
up with a ceiling joist. Mount the ceiling track to a joist at each end.
10. Once all screws are tight, remove any dust or debris from the ceiling track to
ensure the gliders run smoothly.
FIGURE 10
Bekijk gratis de handleiding van Saris Cycle Glide, stel vragen en lees de antwoorden op veelvoorkomende problemen, of gebruik onze assistent om sneller informatie in de handleiding te vinden of uitleg te krijgen over specifieke functies.
Productinformatie
| Merk | Saris |
| Model | Cycle Glide |
| Categorie | Niet gecategoriseerd |
| Taal | Nederlands |
| Grootte | 2841 MB |


