Handleiding
Je bekijkt pagina 18 van 40
Rinnai 18 GD OIM
WARNING
DO NOT USE SOLVENTS FOR CLEANING THIS APPLIANCE.
CLEANING THE APPLIANCE BODY
Unplug the electrical cord before cleaning. All external parts of the appliance can be cleaned using a soft, damp
cloth and mild detergent, such as mild dish washing soap.
CLEANING THE LINT FILTER
CAUTION
The drum may be HOT especially immediately after use, it is important to ensure sucient time
has passed to allow for cooling drum surfaces before attempting clean the lint lter.
The lint lter should be cleaned after every drying cycle. Regular cleaning is important to maintain drying eciency.
When the CLEAN FILTER indicator illuminates and an audible alarm signal consisting of 10 short beeps sounds
after the completion of a drying operation. The lint lter is now too blocked for correct drying operations to continue
and therefore the internal lint lter MUST BE cleaned as soon as possible. If the lint lter is not cleaned, the
appliance will eventually stop operating and an 'error' code will show on the digital display. Refer to the "Trouble
Shooting" on page 20 for details.
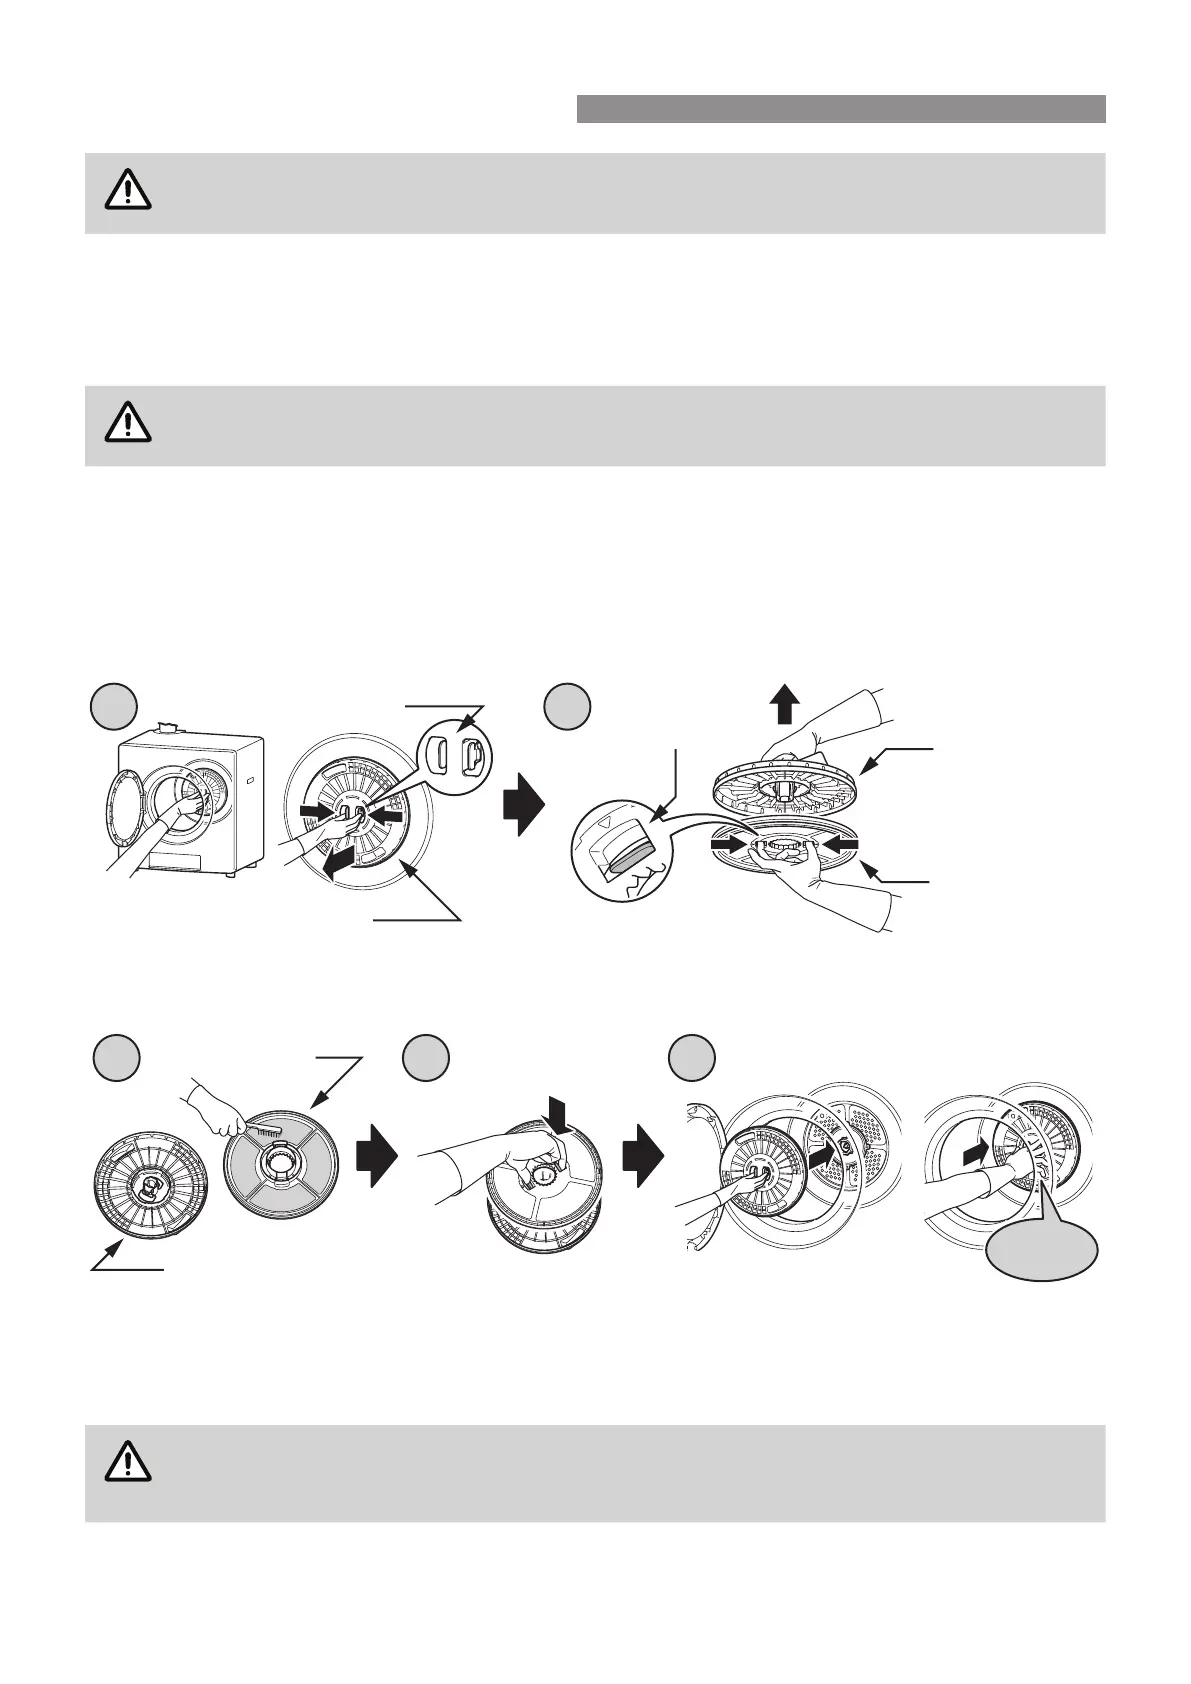
Clean the lint lter as follows:
1. Reach inside the drum of the dryer and remove the lint pocket / lter assembly from the dryer drum, do this by
squeezing on the two release tabs as shown.
2. Separate the lint lter from the lint pocket by squeezing the two tabs at the back of the lter and pulling apart.
3. Remove any lint from the lint lter by using your hands, a soft cloth or a soft brush as shown. If removal of
the lint proves dicult, the lint lter may also be cleaned with the assistance of COLD water and a soft cloth
or brush, a mild dish washing detergent may also be used. Also consider cleaning the area inside the drum
behind where the lint pocket/lter is located, using a soft cloth or brush. Ensure that any dust or lint particles
removed do not remain in the drum.
CAUTION
If water has been used to clean the lint lter, then the lter MUST BE thoroughly dried before it
can be reassembled and reinstalled.
The components of the lint pocket / lter assembly are NOT dishwasher safe.
4. Reassemble the lint pocket / lter assembly, ensuring that both halves are locked together.
5. Place the pocket / lter assembly into the dryer drum, the assembly will CLICK into place when correctly tted.
1 2
Lint Pocket Tabs
Lint Pocket / Filter Assembly
Lint Filter Tabs
Lint Pocket (blue)
Lint Filter
3 4 5
Lint Pocket (blue)
Lint Filter
Clicks
in place
CARE & MAINTENANCE
Bekijk gratis de handleiding van Rinnai Dry-Soft 9 DRYSOFT9L, stel vragen en lees de antwoorden op veelvoorkomende problemen, of gebruik onze assistent om sneller informatie in de handleiding te vinden of uitleg te krijgen over specifieke functies.
Productinformatie
| Merk | Rinnai |
| Model | Dry-Soft 9 DRYSOFT9L |
| Categorie | Wasdroger |
| Taal | Nederlands |
| Grootte | 5820 MB |


