Power Soak PS-50 handleiding
Handleiding
Je bekijkt pagina 4 van 12
4 OM-POWER PREP ADVANCED
Leg Installation
The Power Prep Advanced is usually shipped without the leg assembly attached to the
machine. The sinks will need to be laid on their backs so the legs can be inserted into
the sockets. Be sure the set screws that will be used to secure the legs are backed
out enough to allow the leg sets to slide into the sockets. A 5/32” allen wrench will
be used to loosen the set screws in all of the sockets. The leg sets must be installed
before attempting to connect the JBZ joint.
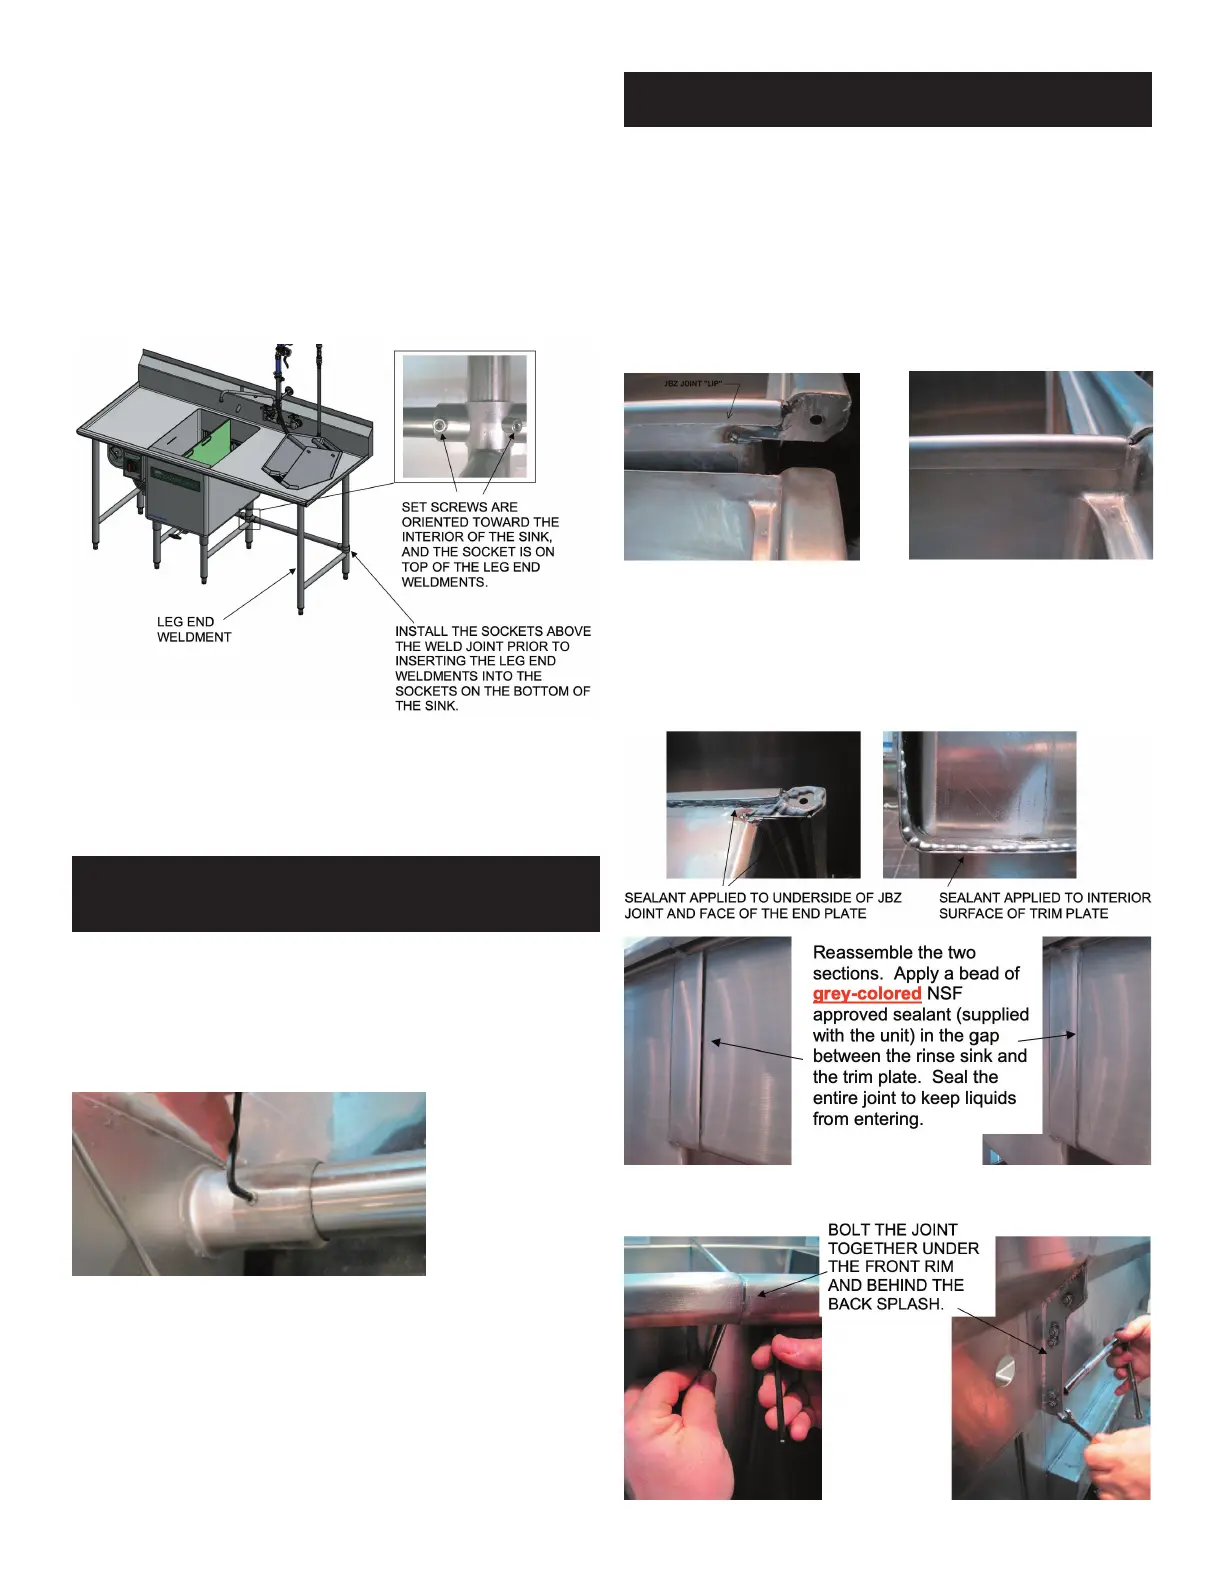
Leg Set Assembly
Locate the leg end weldments and stretchers. The stretchers are the horizontal
tubes that connect between the leg end weldments to provide lateral stability. The
stretchers will only be installed between the back legs of the sinks.
Orient the stretcher socket with the set screw facing toward the interior of the sink
and then slide the stretcher sockets over the top of the leg end weldments so that the
stretchers will be positioned above the welded joints of the leg end weldments when
the legs are assembled onto the sinks. Install the stretchers between the leg end
weldments by inserting them into the sockets before inserting the leg end weldments
into the sockets on the bottoms of the sinks.
IMPORTANT
: AFTER TIGHTENING THE SET SCREWS, FILL THE OPENINGS IN A CLEAN
AND SANITARY MANNER WITH THE SILICONE SEALANT THAT IS SUPPLIED
WITH THE MACHINE
Leg Set and Sink
Insert the leg end weldments into the sockets on the bottoms of the sinks. Be sure
that all the legs are seated in the bottom of the sockets. Use an Allen wrench (5/32)
to tighten the set screws in all of the sockets. After tightening the set screws, apply
silicone sealant (supplied with the machine) to the set screw openings in order to seal
the openings in a clean and sanitary manner.
Adjusting the Feet
Start with turning the feet all the way clockwise, then 2 turns counterclockwise. Use
a tape measure and adjust the feet to the approximate height required. Turn the foot
clockwise to shorten the height of the sink or counterclockwise to raise the height
of the sink. Final adjustment of the feet will be done after the sink is in the installed
location. Set the sink and leg assembly upright on its feet.
IMPORTANT
: CHEMICAL DISPENSER AND CHEMICALS FOR THE POWER PREP ADVANCED
MUST BE OBTAINED FROM A SOURCE OTHER THAN UNIFIED BRANDS.
JBZ Joint Installation
Some units are shipped in two sections. A mechanical JBZ joint is provided so that the
two sections can be joined without welding. The section with the pump and motor will
stand on its own and the other section will hook over the edge of the rinse sink. The
sections will be bolted together before being placed against the wall.
Test Fit
Dry t the two sections of the sink together to be sure that the joint has not been
damaged in shipping. The lip of the rinse sink will slide over the edge of the wash
sink. Be careful not to pinch ngers in the joint as it is assembled.
Check the alignment and t of the two sections. It may be necessary to adjust the
leveling feet to achieve a correct t. Ensure that all the feet are adjusted to rmly
contact the oor. Separate the two sections in order to apply sealant to the joint.
Mating and Sealing the Joint
Apply the grey-colored NSF approved sealant (supplied with the unit) to the underside
of the JBZ lip and all interior surfaces of the wash sink trim plate.
Bolt the channel rim and backsplash together using the nuts and bolts provided with
the unit.
Bekijk gratis de handleiding van Power Soak PS-50, stel vragen en lees de antwoorden op veelvoorkomende problemen, of gebruik onze assistent om sneller informatie in de handleiding te vinden of uitleg te krijgen over specifieke functies.
Productinformatie
| Merk | Power Soak |
| Model | PS-50 |
| Categorie | Niet gecategoriseerd |
| Taal | Nederlands |
| Grootte | 8966 MB |


