Power Soak PS-50 handleiding
Handleiding
Je bekijkt pagina 2 van 12
2 OM-POWER PREP ADVANCED
PRE-UNCRATING CHECKLIST
WARNING: DO NOT CONNECT THE MACHINE USING A POWER CORD AND PLUG OR AN
EXTENSION CORD OF ANY KIND.
WARNING: KITCHENS ARE WET ENVIRONMENTS WHICH REQUIRE ALL ELECTRICAL
CONNECTIONS TO BE “LIQUID TIGHT”.
ELECTRICAL INSTALLATION MUST CONFORM TO ALL APPLICABLE LOCAL
WIRING CODES. ALL ELECTRICAL CONNECTIONS MUST BE “LIQUID TIGHT”
AND READILY ACCESSIBLE FOR INSPECTION AFTER INSTALLATION
WITHOUT MOVING THE POWER PREP ADVANCED MACHINE.
VERIFYING SYSTEM REQUIREMENTS
Prior to completely removing the Power Prep Advanced unit from the crate, it is
necessary to verify certain requirements. Remove only the lid of the crate at this time.
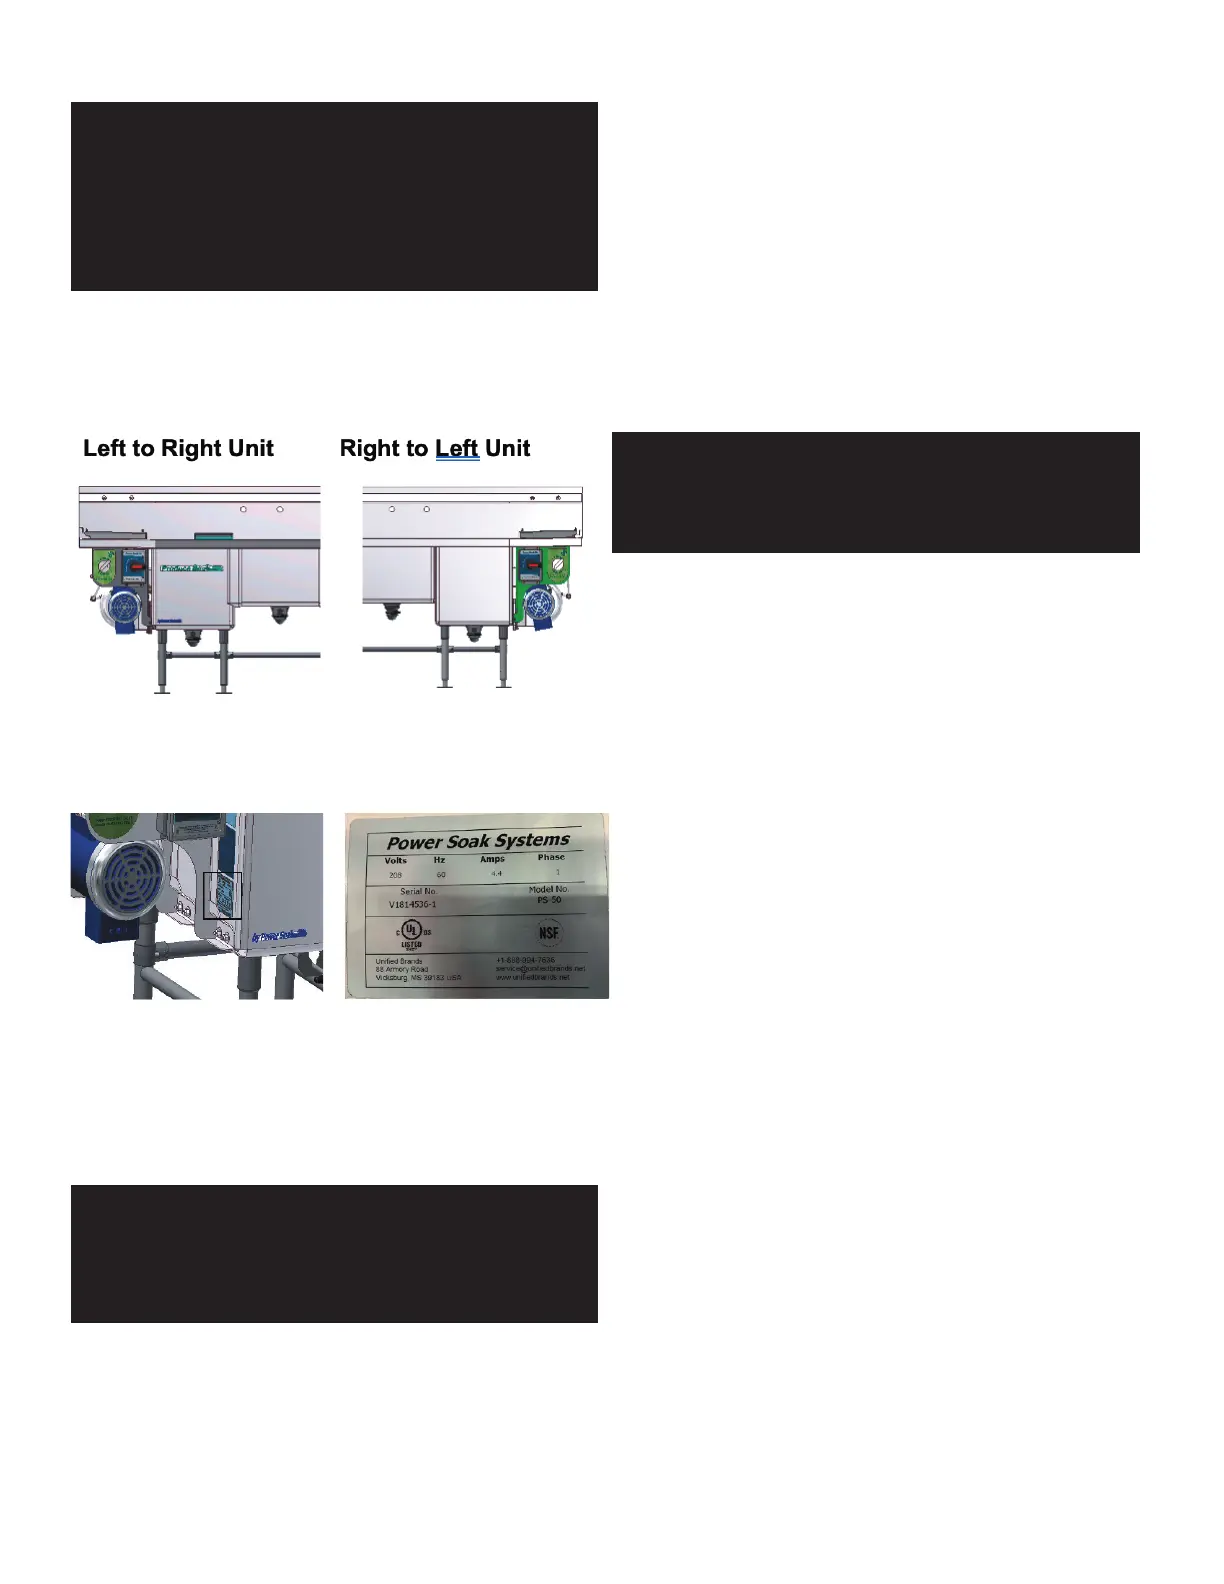
Verifying System Direction
The Power Prep Advanced can be built as a “Left to Right” or as a “Right to Left”
conguration with a variety of options. Look inside the crate and verify that the
conguration of the machine matches the specications of the order description.
Verifying the Electrical Requirements
The electrical requirements for the machine are on the machine identication tag
located on the side of the wash tank, next to the motor. The electrical service in the
facility where the machine is to be installed must be rated for the capacity shown on
the identication tag. This machine will require a permanently mounted disconnect
that is in a “liquid tight” enclosure. Do not use an in-line plug for disconnecting the
machine from the electrical source. Contact a licensed and certied electrician for the
enclosure installation using the appropriate breaker (overcurrent protection) and wire
size for the machine’s electrical service.
WARNING: FAILURE TO SHUT OFF THE ELECTRICAL AND WATER SUPPLY WILL RESULT
IN PERSONAL INJURY, INCLUDING SERIOUS INJURY OR DEATH, AND
EXTENSIVE EQUIPMENT DAMAGE.
IMPORTANT
: BE SURE TO LEAVE ENOUGH OF THE EXISTING PIPING FOR THE
INSTALLATION OF NEW SHUTOFF VALVES. SEE “PRE-PLUMBING” SECTION
FOR REFERENCE.
REMOVAL OF EXISTING UNIT
If the new Power Prep Advanced is not replacing an existing sink, skip this section. If
the removal of an existing sink is necessary, continue with this section.
Existing Supply Lines
The water and electrical source must be shut off before disconnecting or cutting the
water or electric lines.
Disconnect any electrical cord that is connected to the existing sink. Disconnect the
cold and hot water lines at the ttings on the existing sink.
Existing Sink Removal
Detach any fasteners holding the existing sink in place and remove the existing sink
along with any shelves that may interfere with the installation of the Power Prep
Advanced. Discard all unwanted materials in an appropriate container or disposal area.
Wall Preparation
Clean the wall(s) where the new Power Prep Advanced will be installed. Fill all existing
holes with an appropriate ller material. Be sure that any outlet that will be covered
by the sink has been disconnected and a water tight cover has been installed over the
opening.
IMPORTANT
: IT IS RECOMMENDED THAT NEW ½” OR LARGER MINIMUM I.D. BALL-TYPE
SHUT OFF VALVES BE INSTALLED. USE A MINIMUM NUMBER OF ELBOWS
IN THE COLD WATER SUPPLY IN ORDER TO PROVIDE THE LEAST AMOUNT
OF RESTRICTION IN THE LINE.
IMPORTANT
: WASTE PLUMBING MUST CONFORM TO LOCAL BUILDING CODES.
PRE-PLUMBING
Supply and Waste Lines
The supply and waste lines must meet the following requirements:
• Hot and cold water supply must be ½” diameter or larger and able to sustain 50 PSI
minimum pressure under full ow.
• Centerlines of the hot and cold water supply must be 10” or less above the oor to
access the shutoff valves when the machine is installed.
• Waste drain must be 1-1/2” minimum diameter.
• Centerline of the waste drain must be 11” or less above the oor to allow the sink
to drain properly.
Install new shutoff valves on the hot and cold water supply lines.
Grease Trap
It may be necessary to relocate and/or replace the existing grease trap. Be sure that the
grease trap meets or exceeds the local plumbing codes.
POST-UNCRATING INSTRUCTIONS
UNCRATING
Remove From Crate
Remove the Power Prep Advanced from the shipping crate. Sharp staples and nails
are used to crate the machine, and care must be taken in handling boards and other
packing materials to keep from creating a puncture wound or other injury to people or
damage to the equipment. Discard the crating materials in an appropriate disposal area
or container.
Inspect the unit and packages shipped in the sink to be certain there was no damage
created by the shipping company. If there are signs of shipping damage, contact the
shipping company before proceeding.
Remove the packages from the wash sink and locate the box labeled “OPEN FIRST”.
This box will contain the fasteners and sealant that will be required for assembly of the
Power Prep Advanced.
Bekijk gratis de handleiding van Power Soak PS-50, stel vragen en lees de antwoorden op veelvoorkomende problemen, of gebruik onze assistent om sneller informatie in de handleiding te vinden of uitleg te krijgen over specifieke functies.
Productinformatie
| Merk | Power Soak |
| Model | PS-50 |
| Categorie | Niet gecategoriseerd |
| Taal | Nederlands |
| Grootte | 8966 MB |


