Nord Stage 4 handleiding
Handleiding
Je bekijkt pagina 17 van 76
3. GETTING STARTED | 17
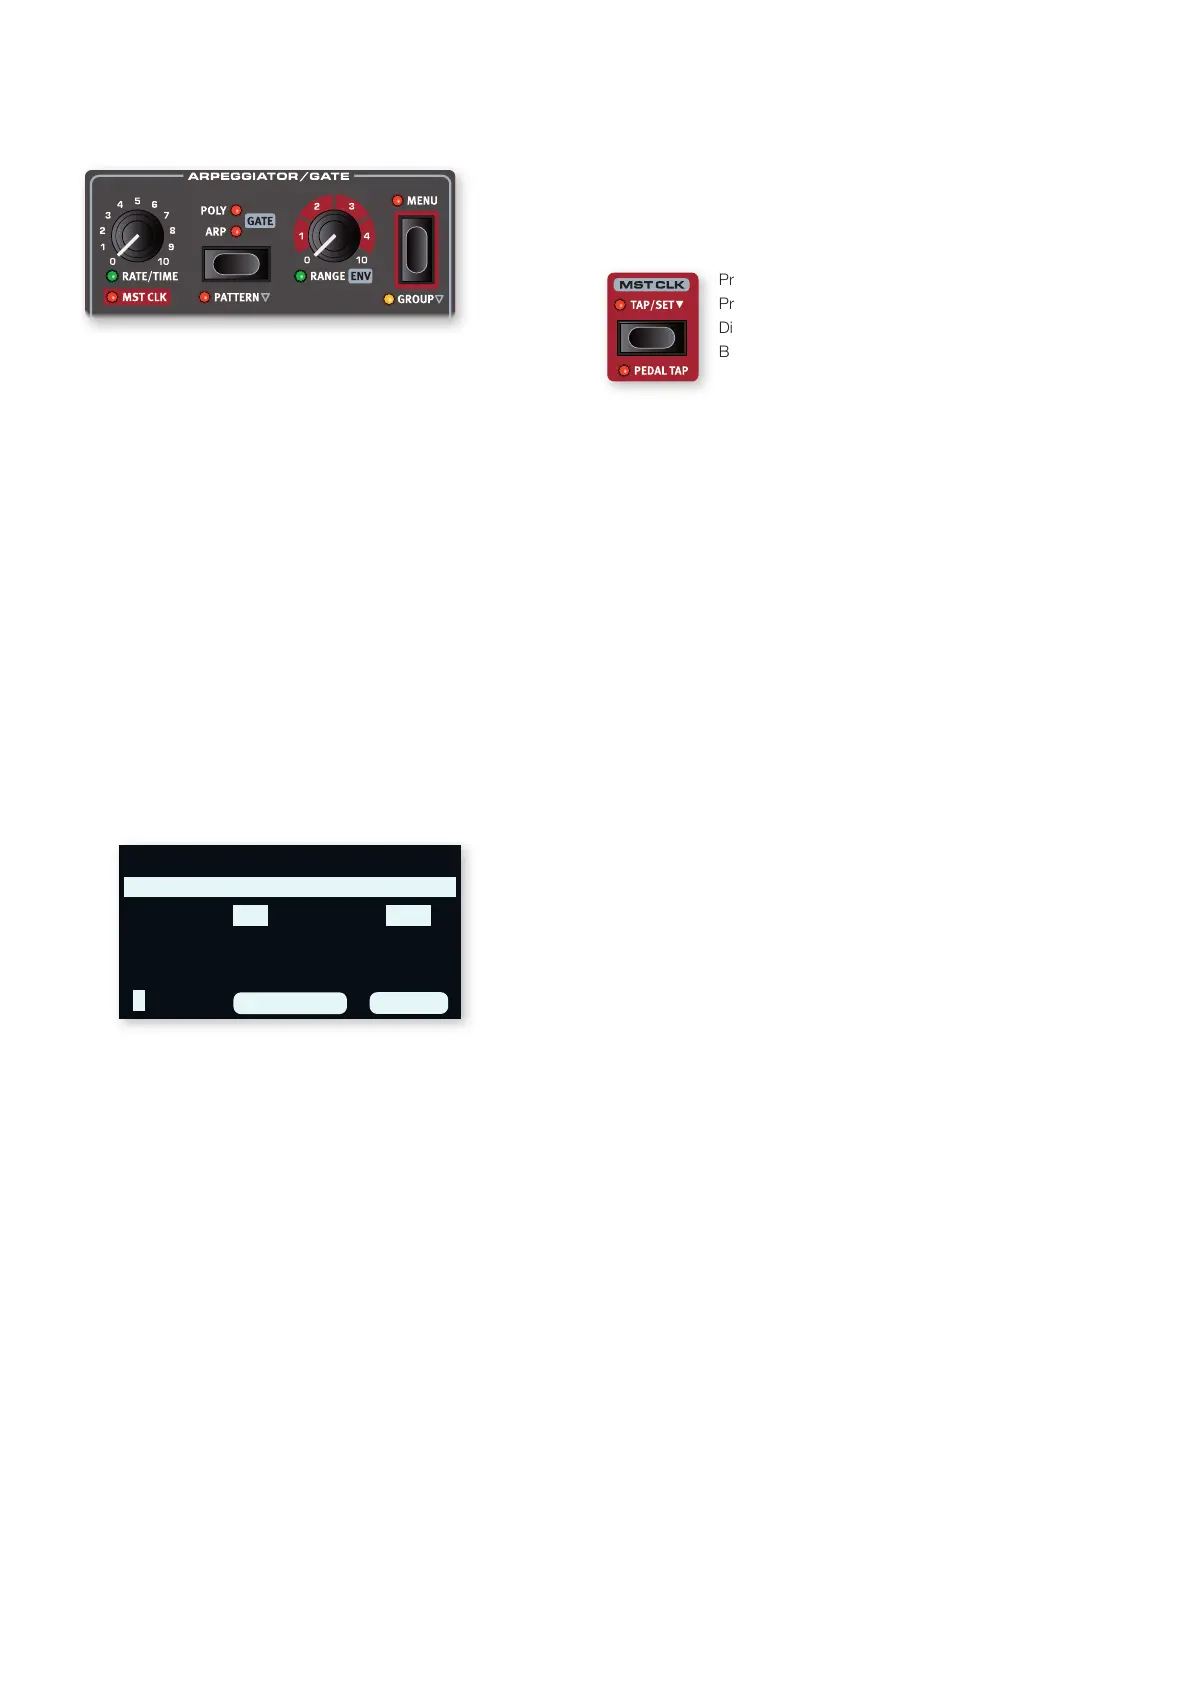
THE ARPEGGIATOR/GATE
As a final exercise, let’s create a sound using the Synth section and its
ARPEGGIATOR/GATE.
1 Make sure that only the Synth Section is turned on and perform a
SOUND INIT (Shift+Waveform). Set the Amp Envelope ATTACK time
to 0, the DECAY to around 500 ms, select a sawtooth waveform
and open up the filter a little bit. This will produce a percussive
sound.
2 Press ARP RUN, play a chord on the keyboard and turn the
Arpeggiator Rate knob. This will play the notes that are held down,
one after the other in a repeating fashion.
3 Press the Arpeggiator/Gate MENU button in order to make some
additional settings:
Turn the DIRECTION dial and try out the different settings. With
the default UP setting notes are played from the lowest key and up
to the highest and then it starts over again. The other directions are
DOWN (down), UP/DOWN and RANDOM.
With ZIG ZAG (the second dial) activated, played notes will jump by
two steps and then back one, in a given direction.
i Pages 2-5 of the Arpeggiator/Gate menu concern the Pattern
mode, their settings only having effect when Pattern (Shift+Arp/
Gate Mode) is enabled.
l The top row of the Arpeggiator/Gate menu indicates the current
Waveform or Sample selection (“Multi Saw x 2” in the example).
4 Now let’s alter the range of the played arpeggio by turning the
RANGE/ENV knob. The range can be adjusted up to 4 octaves in
steps of 1/3 of an octave.
5 Press the KB HOLD button to keep the arpeggio going without the
need for pressing the keys.
l Feel free to also try out the POLY (Polyphonic) and GATE modes
while the arpeggiator is going. In Polyphonic mode, inversions of
the held chord are played back repeatedly, while the Gate mode
turns the sound off and on in a rhythmic fashion. Note that in Gate
mode you will want to set the Amp and Filter Envelope Decay to
longer values, since played notes are not repeated as in the Arp
and Poly modes.
MASTER CLOCK
Now that we have an arpeggio going, let’s try the Master Clock feature
to synchronize the arpeggio and to bring in an effect as well.
1 Hold SHIFT and turn the Arpeggiator RATE knob to lock the
arpeggio to the Master Clock, the MST CLK LED lights up.
Press down on the Mst Clk TAP/SET button in the
Program area to dial in a tempo with the PROGRAM
Dial. The display will indicate the BPM. Set this to 130
BPM for this exercise. Press SHIFT/EXIT to exit.
l Alternatively, tap a minimum of four times on the Mst Clk button to
set the tempo on the fly. You could also use a foot switch pedal,
or the left or middle pedal of a Nord Triple Pedal to tap the tempo.
See page 59 for details on how to set this up.
2 Turn the Arpeggio RATE knob to select the meter subdivision (or
note values) that the arpeggio should play. The setting is shown
in the Program area display as the knob is being turned. Notice
how 1/4 is half the “speed “ of 1/8. A “T” after a numerical value
indicates triplets. Set the subdivision to 1/8.
3 Turn on the DELAY effect for the active Synth Layer. If you carefully
adjust the delay TEMPO, you could match it to fit the rhythm of the
arpeggio, but there is another way. Let’s synchronize the delay to
the same clock as the arpeggio:
4 Hold SHIFT and turn the Delay TEMPO knob to activate Master
Clock for the Delay. The MST CLK LED lights up.
5 Turn the Delay TEMPO knob and again refer to the Program area
display to monitor the setting.
6 Try 1/16, which will be half the note value or twice the “speed” of
the arpeggio. Turn up the DRY WET knob up to but not beyond 12
o’clock to hear the delay taps together with the arpeggiated notes.
The Arpeggio, the LFO on the synth, the Delay and the Mod 1 rate can
be synchronized to the Master Clock in this fashion.
What’s more, the Master Clock operates on all Layers simultaneously so
you can control arpeggios and LFOs on all Synth Layers, and Effects for
the Organ and Piano Sections as well.
Some of the Mst Clk equipped functions have division settings that are
larger than 1/1 that allows for sweeps that are longer than one bar. And
you can of course synchronize some functions, while leaving others
free-running if you like.
23
4
5
RANDOM
UP/DOWN
DOWN
DIRECTION
ZIGZAG
Multi Saw x2
ARPEGGIATOR
UP
ON
OFF
1
Bekijk gratis de handleiding van Nord Stage 4, stel vragen en lees de antwoorden op veelvoorkomende problemen, of gebruik onze assistent om sneller informatie in de handleiding te vinden of uitleg te krijgen over specifieke functies.
Productinformatie
| Merk | Nord |
| Model | Stage 4 |
| Categorie | Niet gecategoriseerd |
| Taal | Nederlands |
| Grootte | 10906 MB |


