Handleiding
Je bekijkt pagina 18 van 161
Earthing is mandatory.
Models 90-081; 90-082:
When complete “start-up” above, the left display window shows “--”,
the right display window shows ambient temperature value.
Push the power switch to “on” position.
The default temperature setting is 20℃, be showed on the left
display window.
If the ambient temperature is lower than default temperature, the
electrodes start sparking, after 7 seconds, the heater starts.
If the ambient temperature is higher than default temperature, turn
thermostat control knob to desired temperature, the electrodes start
sparking, after 7 seconds, the heater starts.
COLD START-UP: at low temperature keep the air vent hole closed by
a finger during ignition to make start-up easier.
ABNORMAL OPERATION: in case of malfunction (flame failure,
reduced air flow, bad combustion, etc.) the heater stops and the
indicator light starts FLASHING (THE LOCK-OUT MODE code will be
showed on the display window).
Manual reset/restart
If the heater is in lock-out mode, check and remove the cause of
lock-out before restarting the heater. To reset, turn the ON/OFF
switch to 0 and then again to I. In case of repeated malfunction, call
technical service. Turning the thermostat control knob will NOT reset
the heater.
Shut-down
Move switch to "OFF" (O) position. Unplug the unit when not used
for a long time.
•Never disconnect the heater from mains to stop it while in
operation. Always allow the cooling sequence to be completed
(BGO-55A), otherwise the residual heat could damage internal
components.
•Do not cover the heater. Do not block the air inlet and outlet.
•The heater outlet is very hot during operation and after use. Do not
touch! Use personal protecting equipment if needed.
•Children should be supervised to ensure that they do not play with
the appliance.
•The appliance is not intended for use by persons (including
children) with reduced physical, sensory or mental capabilities, or
lack of experience and knowledge.
•Unplug the heater before moving it. Never pull the cable to unplug
or move the unit.
•Do not leave the heater unattended when in use.
•Never use the appliance with wet hands or when either the heater
or the power cable is wet.
•If the supply cable is damaged, it must be replaced by the
manufacturer, by a service agent or a similar qualified person.
Cleaning, Maintenance and Storage
Regularly wipe the enclosure using a soft sponge or cloth. For very
dirty parts, use a sponge wetted with lukewarm water and a mild
detergent, then dry using a clean cloth.
Keep air inlet and fan free from dust and dirt. To clean inner parts,
gently blow compressed air through air inlet.
Regularly inspect the power cable: if worn, cracked or damaged have
it replaced by technical service.
Before storing the heater, make sure it is perfectly cool and dry.
Cover the unit with a plastic bag, put it in its packing box and store it
in a dry, ventilated place.
•Before starting any maintenance task, shut down, unplug and let
the heater cool down for at least 15 minutes.
•Do not attempt any electrical repair yourself. If the heater needs
service or repair, contact a qualified technician.
•Do not use a faulty unit unless a qualified technician has inspected
and repaired it.
•When cleaning, make sure that water does not enter the unit.
•Do not open the enclosure to clean the inner parts. Do not spray
water into the heater.
•Never use solvents, gasoline, toluene and similar aggressive
chemicals to clean the heater.
The following checks BY QUALIFIED PERSONNEL ONLY are
recommended before every seasonal use:
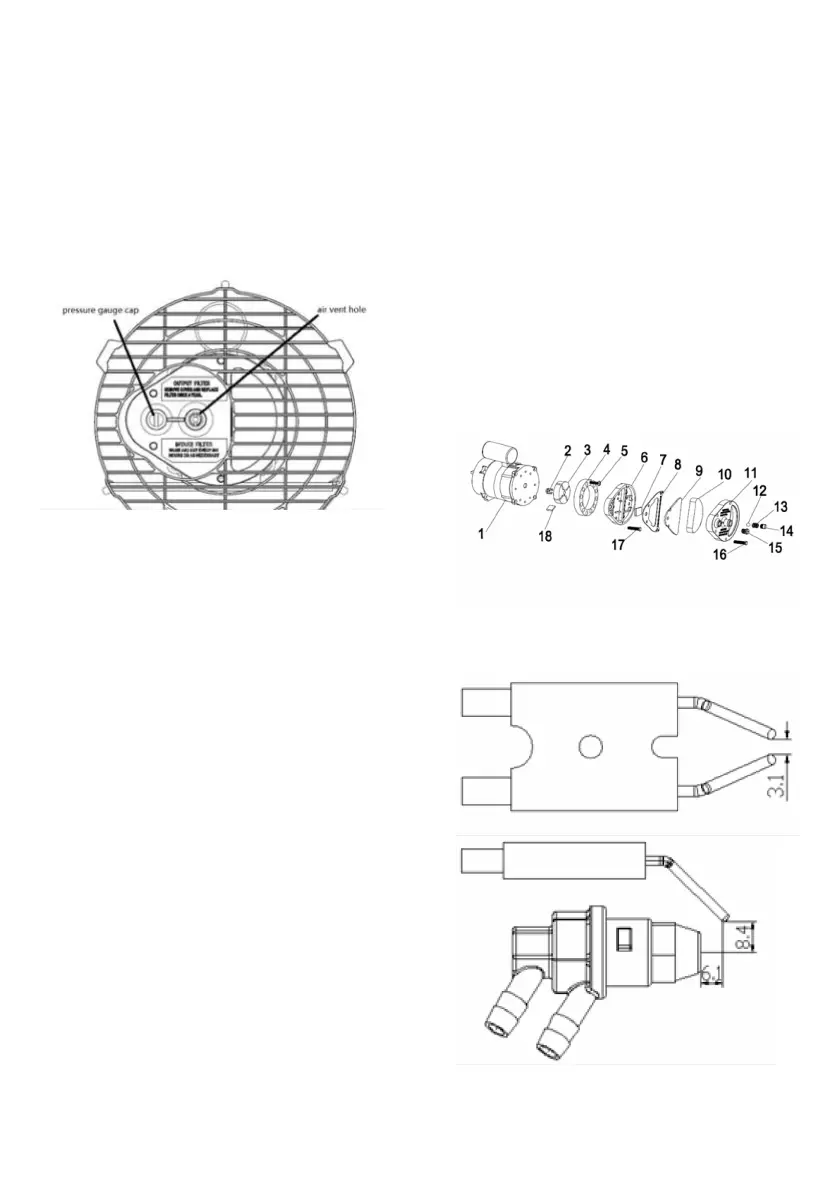
Nozzle
Carefully unscrew nozzle from nozzle fitting. Blow compressed air
through nozzle orifice to free it from dirt. Replace nozzle if necessary.
Air Filters
Clean air filters. Remove filter end cover (11), wash air intake filter
(10) using a light detergent and dry it thoroughly before re-installing.
Replace air delivery filter (9) once a year.
Ignition Electrodes
Clean, adjust and if necessary replace ignition electrode. For
electrode gaps see below (dimensions in mm).
Compressor Pressure Adjustment
The compressor pressure is factory set and must be checked and
adjusted by qualified technicians only. Tampering with the unit
may be dangerous.
Bekijk gratis de handleiding van NEO Tools 90-080, stel vragen en lees de antwoorden op veelvoorkomende problemen, of gebruik onze assistent om sneller informatie in de handleiding te vinden of uitleg te krijgen over specifieke functies.
Productinformatie
| Merk | NEO Tools |
| Model | 90-080 |
| Categorie | Heater |
| Taal | Nederlands |
| Grootte | 39104 MB |


