NEO Tools 11-604 handleiding
Handleiding
Je bekijkt pagina 5 van 21
5
NOTE!
Read the operating instructions carefully, follow the warnings and safety
conditions contained therein. The appliance has been designed for safe
operation. Nevertheless: installation, maintenance and operation of the
appliance can be dangerous. Following the following procedures will
reduce the risk of injury and shorten the installation time of the unit
SAFETY RULES
• Care should be taken when using the stool.
• Do not stand on the trolley, as the transport wheels easily turn without
providing stability without additional support points.
• Do not overload the trolley, bearing in mind the maximum permissible
load.
• The seat and the shelf should be cleaned regularly of dirt (grease, grime
etc.).
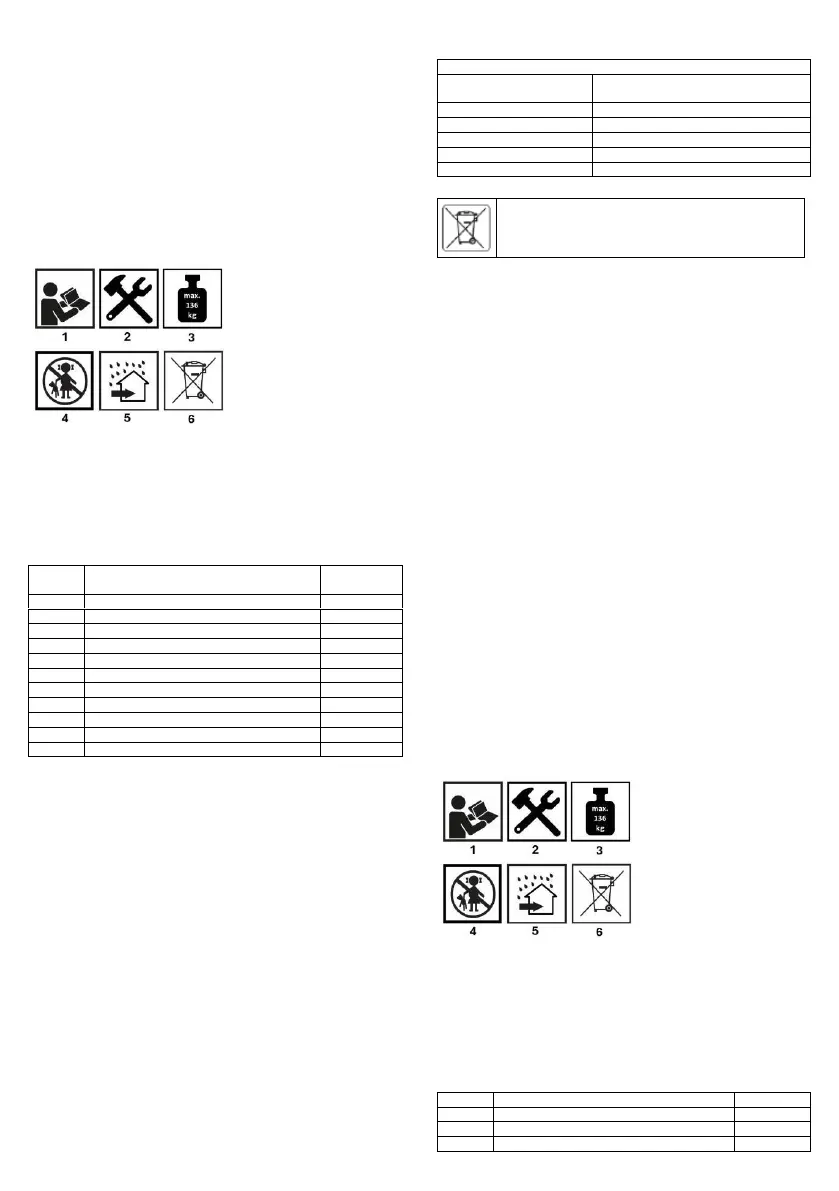
Pictograms and warnings
1.Read the instructions
2.Requires assembly
3.Maximum load
4.Keep out of reach of children
5.For indoor use
6.Do not dispose of with household waste
Description of graphic elements
The numbering below refers to the components of the device
shown on the graphic pages of this manual.
NR
DESCRIPTION
QUANTITY
1.
SEAT
1 SEPT.
2.
PLATE
2 SEPT.
3.
TOP STEEL FRAME
2 SEPT.
4.
SEAT BOLT
4 SEPT.
5.
SADDLE NUT
4 SEPT.
6.
WHEEL NUT
4 SEPT.
7.
PAD
4 SEPT.
8.
COVER
1 SEPT.
9.
BOTTOM STEEL FRAME
1 SEPT.
10.
SHELF FIXING SCREW
4 SEPT.
11.
RUNNING WHEELS
4 SEPT.
* There may be differences between the graphic and the actual
product
METHOD OF INSTALLATION
Figure A schematically shows the steps for assembling the stool.
Start assembling the stool by checking that all required components are
included and checking for damage.
The following tools will be required for assembly:
• Phillips screwdriver PH2 1 pc.
• Open-end or socket spanner 131 pcs.
• Open-end or socket spanner 141 pcs.
MONTAGE
Find an even flat and clean surface for installation.
• Lay the seat Figure A1 with the reverse side in place
• Then place two flat bars (fig. A2) on the seat, on them place the steel
frames (fig. A3) and fix with screws (fig. A4).
• To the steel frames fig. A3 place the shelf fig. A8 and the bottom steel
frame fig. A9. Screw the whole together using bolts fig. A10 and nuts
fig. A6. Use a spanner 14 to lock the bolts fig. A10, and a spanner or
socket 13 for the nuts fig. A5.
• The last step is to attach the castors fig. A11. The bolts of the castors
fig. A11 must go through the respective holes in the shelf fig. A8 and in
the lower steel frame fig. A9. Place washers fig. A7 under the nuts fig.
A6 and tighten with spanner 13.
ATTENTION! When screwing together the individual components of the
structure, make sure that all parts are tightened firmly and correctly.
• Once all the components have been screwed together, the stool is
turned over and placed on its castors. The structure is ready for use.
Rated data 11-604
Dimensions of the stool
L. 36.5 cm, width 35.5 cm, height 37.5
cm
Seat dimensions
37 cm x 20.5 cm
Mass
4.5 kg
Maximum load
136 kg
Seat
Made of flame-retardant material
Year of production
2024
ENVIRONMENTAL PROTECTION
The product should not be thrown away with household waste, but
should be disposed of at suitable facilities. A non-recycled product is a
potential danger to the environment and human health.
"Grupa Topex Spółka z ograniczoną odpowiedzialnością" Spółka komandytowa with its
registered office in Warsaw, ul. Pograniczna 2/4 (hereinafter: "Grupa Topex") informs that
all copyrights to the content of this manual (hereinafter: "Manual"), including, among
others. Its text, photographs, diagrams, drawings, as well as its composition, belong
exclusively to Grupa Topex and are subject to legal protection under the Act of 4 February
1994 on Copyright and Related Rights (ie Journal of Laws 2006 No. 90 Poz. 631, as
amended). Copying, processing, publishing, modifying for commercial purposes the entire
Manual and its individual elements, without the consent of Grupa Topex expressed in
writing, is strictly prohibited and may result in civil and criminal liability.
DE
ÜBERSETZUNG (BENUTZERHANDBUCH)
Werkstatthocker auf Rädern mit Werkzeugablage: 11-604
HINWEIS: BEVOR SIE DAS GERÄT BENUTZEN, LESEN SIE BITTE
DIESE ANLEITUNG SORGFÄLTIG DURCH UND BEWAHREN SIE SIE
ZUM NACHSCHLAGEN AUF. PERSONEN, DIE DIE ANLEITUNG
NICHT GELESEN HABEN, DÜRFEN DAS GERÄT NICHT
ZUSAMMENBAUEN, EINSTELLEN ODER BEDIENEN.
BESONDERE SICHERHEITSBESTIMMUNGEN
HINWEIS!
Lesen Sie die Bedienungsanleitung sorgfältig durch, beachten Sie die
darin enthaltenen Warnhinweise und Sicherheitsvorschriften. Das Gerät
wurde für einen sicheren Betrieb konzipiert. Dennoch: Installation,
Wartung und Betrieb des Geräts können gefährlich sein. Wenn Sie die
folgenden Verfahren befolgen, verringern Sie das Verletzungsrisiko und
verkürzen die Installationszeit des Geräts
SICHERHEITSVORSCHRIFTEN
• Bei der Verwendung des Hockers ist Vorsicht geboten.
• Stellen Sie sich nicht auf den Wagen, da sich die Transporträder leicht
drehen und ohne zusätzliche Stützpunkte keinen Halt bieten.
• Überlasten Sie den Wagen nicht, sondern beachten Sie die zulässige
Höchstlast.
• Der Sitz und die Ablage sollten regelmäßig von Schmutz (Fett, Dreck
usw.) befreit werden.
Piktogramme und Warnhinweise
1. lesen Sie die Anleitung
2. erfordert die Montage
3. maximale Belastung
4. außerhalb der Reichweite von Kindern aufbewahren
5. für die Verwendung in Innenräumen
6. nicht über den Hausmüll entsorgen
Beschreibung der grafischen Elemente
Die folgende Nummerierung bezieht sich auf die Komponenten des
Geräts
die auf den grafischen Seiten dieses Handbuchs dargestellt sind.
NR
BESCHREIBUNG
MENGE
1.
SEAT
1 SEPT.
2.
PLATE
2 SEPT.
3.
OBERER STAHLRAHMEN
2 SEPT.
Bekijk gratis de handleiding van NEO Tools 11-604, stel vragen en lees de antwoorden op veelvoorkomende problemen, of gebruik onze assistent om sneller informatie in de handleiding te vinden of uitleg te krijgen over specifieke functies.
Productinformatie
| Merk | NEO Tools |
| Model | 11-604 |
| Categorie | Niet gecategoriseerd |
| Taal | Nederlands |
| Grootte | 5787 MB |


