Metra 99-5842T handleiding
Handleiding
Je bekijkt pagina 8 van 16
386.257.1187
|
MetraOnline.com
8
CONNECTIONS (CONT.)
I N STAL L ATIO N
3.5mm jack steering wheel control retention:
• The 3.5mm jack is to be used to retain audio controls on the steering wheel.
• For the radios listed below, connect the included
female 3.5mm connector with stripped leads,
to the male 3.5mm SWC jack from the Interface. Any remaining wires tape off and disregard.
•
Eclipse: Connect the steering wheel control wire, normally Brown, to the Brown/White
wire of the connector. Then connect the remaining steering wheel control wire, normally
Brown/White, to the Brown wire of the connector
.
•
Metra OE:
Connect the steering wheel control Key 1 wire
(Gray)
to the
Brown
wire.
•
Kenwood or select JVC with a steering wheel control wire:
Connect the
Blue/Yellow
wire
to the
Brown
wire.
Note:
If your Kenwood radio auto detects as a JVC, manually set the radio type to Kenwood.
See the instructions under changing radio type.
•
XITE:
Connect the steering wheel control SWC-2 wire from the radio to the
Brown
wire.
•
Parrot Asteroid Smart or Tablet:
Connect the 3.5mm jack into the AX-SWC-PARROT (sold
separately), and then connect the 4-pin connector from the AX-SWC-PARROT into the radio
.
Note:
The radio must be updated to rev. 2.1.4 or higher software.
•
Universal “2 or 3 wire” radio:
Connect the steering wheel control wire, referred to as Key-A
or SWC-1, to the
Brown
wire of the connector. Then connect the remaining steering wheel
control wire, referred to as Key-B or SWC-2, to the
Brown/White
wire of the connector. If the
radio comes with a third wire for ground, disregard this wire
.
Note:
After the interface has been programmed to the vehicle, refer to the manual provided
with the radio for assigning the SWC buttons. Contact the radio manufacturer for more
information.
• For all other radios: Connect the 3.5mm jack from the Interface into the jack on the aftermarket
radio designated for an external steering wheel control interface. Please refer to the aftermarket
radios manual if in doubt as to where the 3.5mm jack goes to.
It is highly advisable to read the following steps beforehand, to ensure a clear understanding of
what is to be expected. The following steps must be done in the order that they are numbered.
With the vehicle completely off:
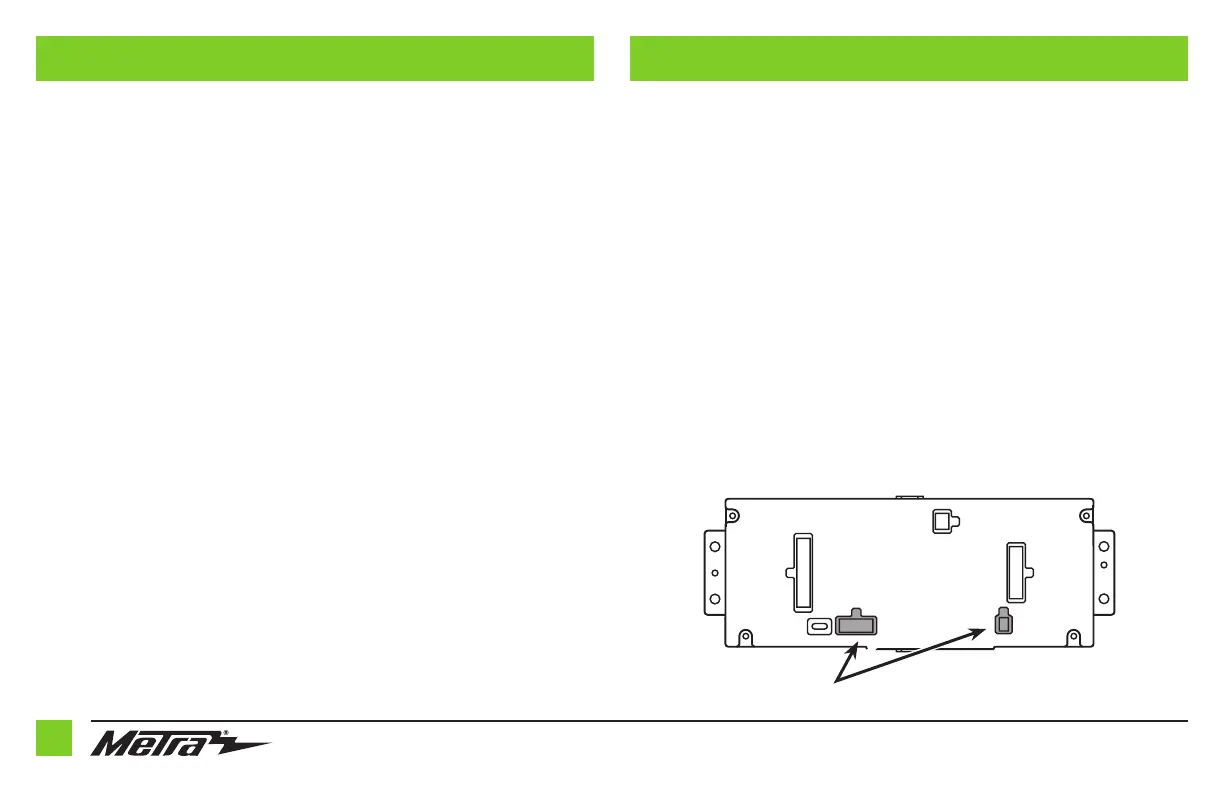
Touchscreen display
1. Connect the
16-pin harness with stripped leads
into port “B” in the touchscreen display.
2.
Connect the
5842 harness
to the wiring harnesses in the vehicle. These harnesses are the ones
removed
in dash disassembly. Then insert the
5842 harness
into port “A” in the touchscreen display
.
But do not install this harness until exactly before step 1 of “Programming”. This is a timed process
.
3. Connect the
4-pin harness with yellow RCA jacks
into port “C” in the touchscreen display.
4. Disregard ports “D” and “E”, they will not be used in this application.
5. Port “F” is an update port for future firmware upgrades.
6. Locate the factory antenna connector in the dash and complete all necessary connections to
the radio. Use the
antenna adapter
provided to adapt the factory antenna connector to the
aftermarket radio.
A
B
C
E
F
D
Note: DO NOT CONNECT!
Bekijk gratis de handleiding van Metra 99-5842T, stel vragen en lees de antwoorden op veelvoorkomende problemen, of gebruik onze assistent om sneller informatie in de handleiding te vinden of uitleg te krijgen over specifieke functies.
Productinformatie
| Merk | Metra |
| Model | 99-5842T |
| Categorie | Niet gecategoriseerd |
| Taal | Nederlands |
| Grootte | 2032 MB |


