Marantz Rack Mix 12 handleiding
Handleiding
Je bekijkt pagina 4 van 24
4
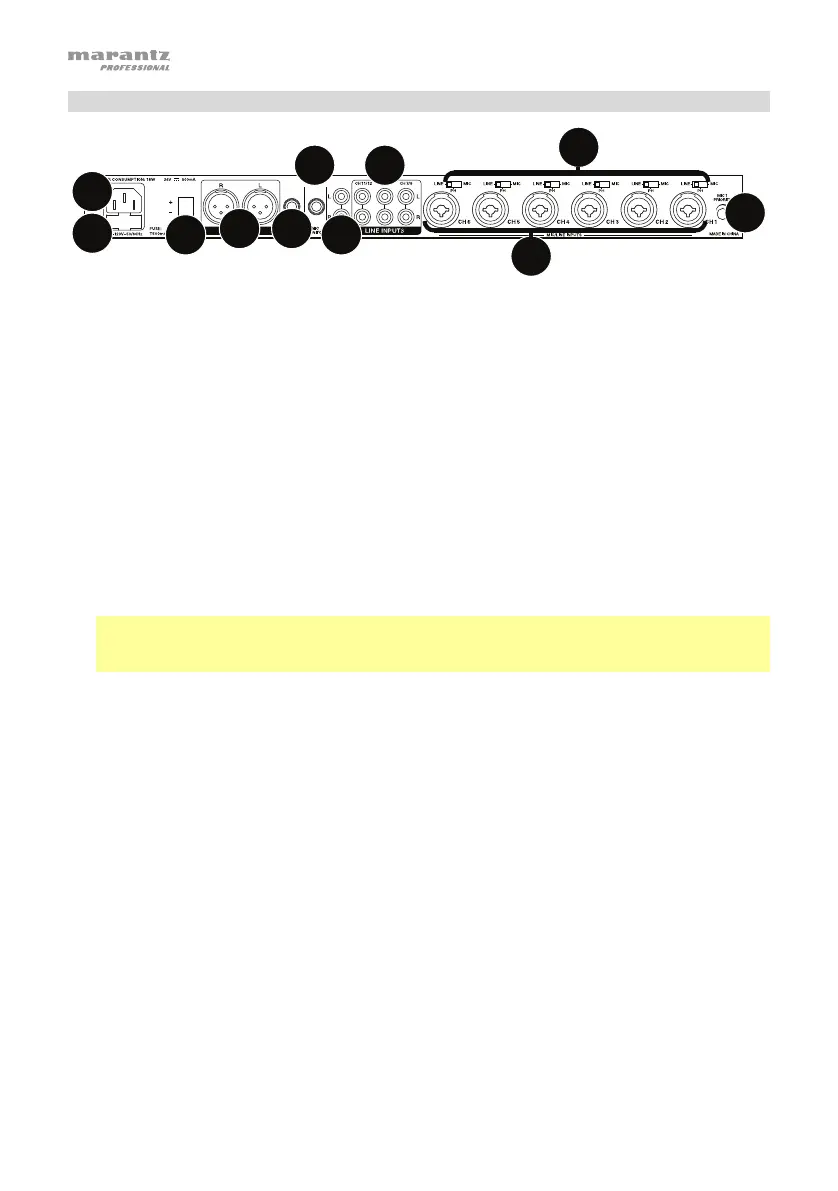
Rear Panel
1
2
3
7
8
9
10
11
5
6
4
1. AC Power Input: Use the included power cable to connect this input to a power outlet.
Alternatively, use the DC power input, described below. (If both power inputs are connected
to power outlets, Rack Mix 12 will draw its power from the AC power input.)
2. Fuse Cover: If the fuse is broken, use a screwdriver or other tool to lift this tab, and replace
the fuse with a fuse with the same rating. Using a fuse with an incorrect rating can damage
the unit and/or fuse.
3. DC Power Input: Use a separate DC power supply to connect this input to a power outlet.
Alternatively, use the AC power input, described above. (If both power inputs are connected
to power outlets, Rack Mix 12 will draw its power from the AC power input.)
4. Mic/Line Inputs (Channels 1–6): Connect microphones or line-level devices to these inputs
with XLR or 1/4” (6.35 mm) cables.
5. Input Selector (Channels 1–6): Use these switches to set what type of audio source is
connected to each mic/line input: a microphone without phantom power (Mic), a
microphone with +18–21V of phantom power (Ph), or a line-level device (Line).
Note: Most dynamic microphones do not require phantom power, while most condenser
microphones do. Consult your microphone’s documentation to find out whether it needs
phantom power.
6. Mic 1 Priority: Turn this knob to set how loud the volume level of all other inputs will be
when the Channel 1 mic/line input receives an incoming signal. At its lowest setting, a signal
received by the Channel 1 mic/line input will mute all other input signals entirely. At its
highest setting, a signal received by the Channel 1 mic/line input will not affect the other
input signals at all.
7. Line Inputs (Channels 7/8–11/12): Connect line-level devices to these inputs with standard
stereo RCA cables.
8. Line Out: Use standard XLR cables to connect these outputs to your loudspeakers or
amplifier system. Use the Master Level knob to control the level of these outputs.
9. Mono Out: Use a standard 1/4” (6.35 mm) TS cable to connect this output to a remote
recording device, remote v
10. Mic Monitor: Use a standard 1/4” (6.35 mm) cable to connect this output to a powered
monitor, remote mixer, etc. When the Mic On/Off button is depressed (in the down position),
the signal from the mic/line inputs (Channels 1–6) will be sent to this output, and the Line
Outs will be disabled. When the Mic On/Off button is raised (in the up position), this output
will be disabled, and all channels will be sent to the Line Outs.
11. Rec Out: Use standard stereo RCA cables to connect these outputs to a remote recording
device, remote mixer, etc. Use the Master Level knob to control the level of these outputs.
Bekijk gratis de handleiding van Marantz Rack Mix 12, stel vragen en lees de antwoorden op veelvoorkomende problemen, of gebruik onze assistent om sneller informatie in de handleiding te vinden of uitleg te krijgen over specifieke functies.
Productinformatie
| Merk | Marantz |
| Model | Rack Mix 12 |
| Categorie | Niet gecategoriseerd |
| Taal | Nederlands |
| Grootte | 2290 MB |


