Lofrans Kobra handleiding
Handleiding
Je bekijkt pagina 11 van 42
Verricello Salpa Ancora mod. Dorado / Kobra / Razza
10
3 INSTALLAZIONE 3 INSTALLATION 3 INSTALLATION 3 INSTALLATION 3 MONTAJE
3.6 Installazione in coperta
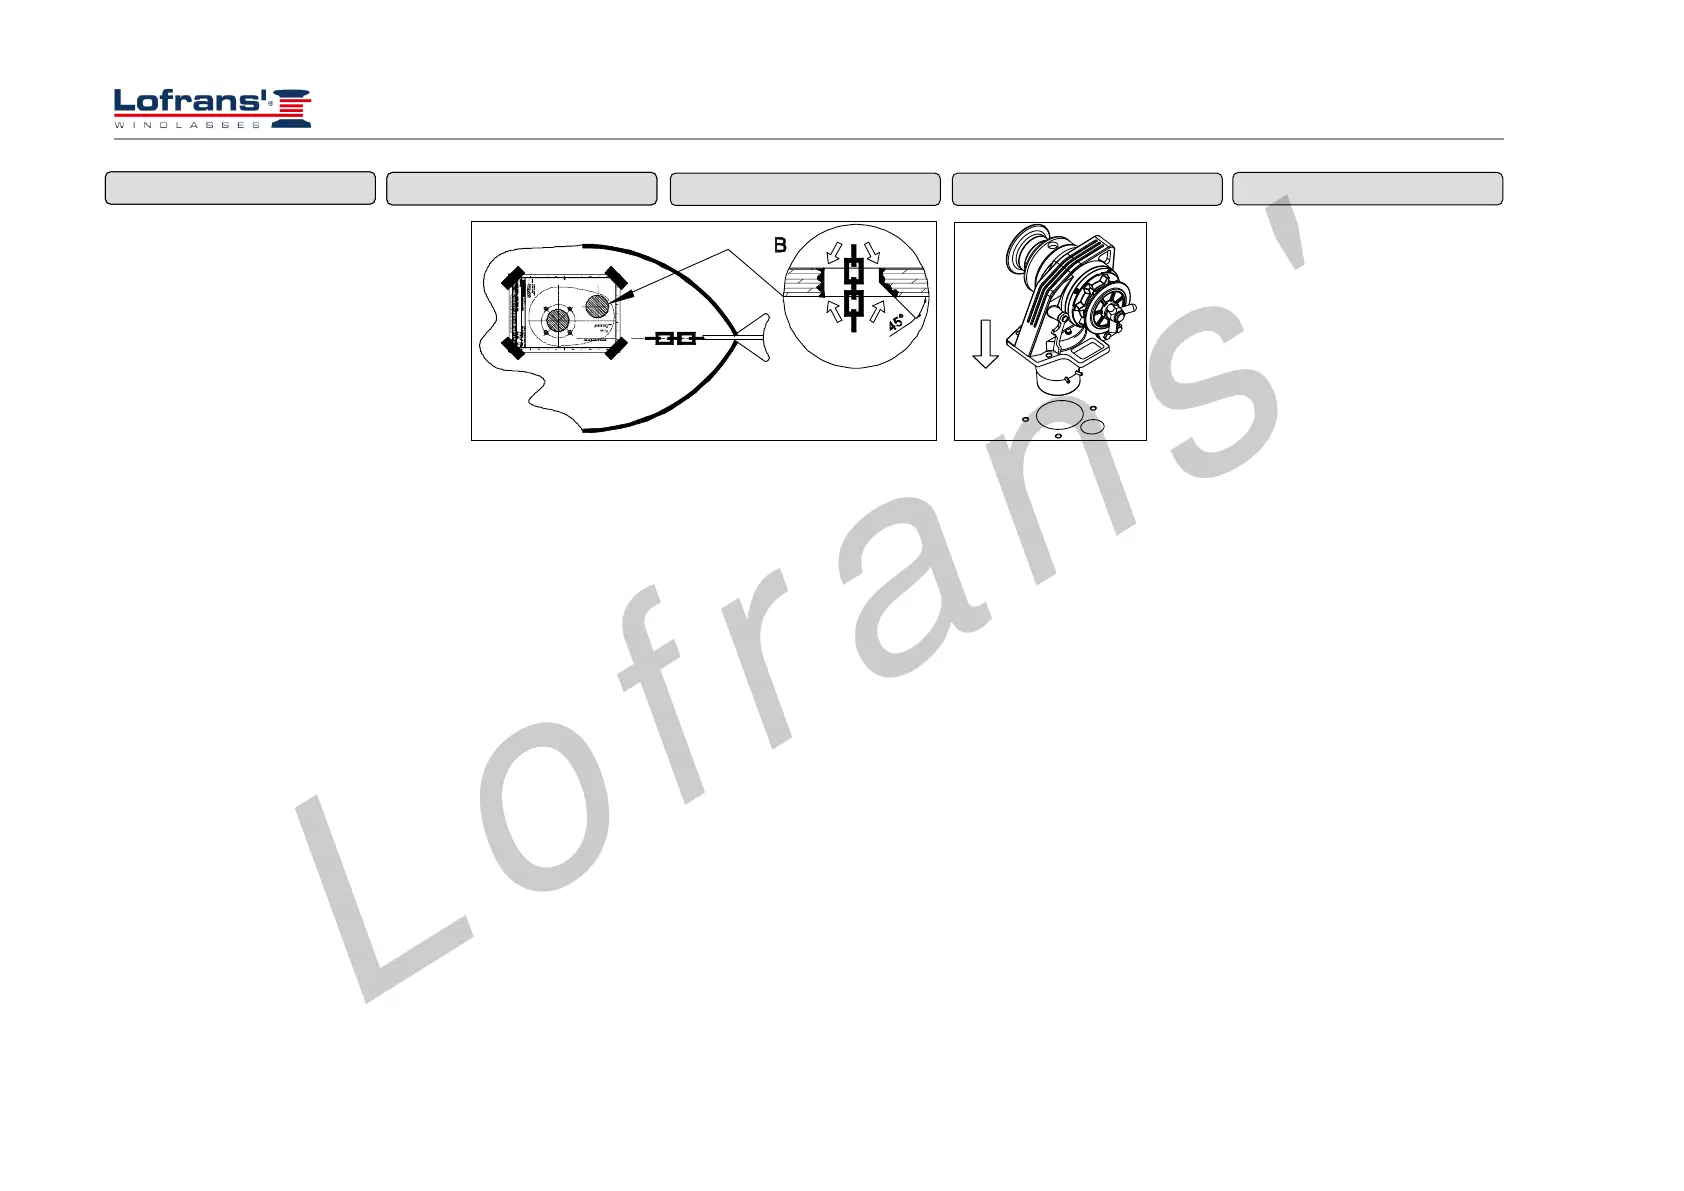
1 - Posizionare con cura la dima di
foratura sul ponte, assicurandosi del
corretto allineamento con la prua.
2 - Marchiare e forare come indicato in
figura. Lasciare vivi gli spigoli dei fori,
mentre la parte del bordo del foro
catena in direzione della prua deve
essere lisciato per un angolo di 45°.
3 - Posizionare con cura la parte
superiore del salpa ancora sulla coperta.
4 – Collegare i cavi provenienti dalla
batteria al motore elettrico.
Nota:
E’ consigliato sigillare la base del salpa
ancora alla coperta tramite colla
siliconica.
3.6 Deck installation
1 –Place carefully the drilling template
on the deck, by ensuring the correct
alignment with the bow.
2 - Mark and drill as indicated in the
figure. Let the edges of the holes sharp,
while the edge side of the holes of the
chain towards the bow must be
smoothed for an angle of 45° degree.
3 - Place carefully the upper part of the
anchor windlass on the deck.
4
- Connect the wires from the battery
to the electrical engine.
Note:
It is recommended to seal the base of
the anchor windlass to the deck by
means of silicone glue.
3.6 Installation sur le pont
1 - Positionner soigneusement le gabarit
de perçage sur le pont, en s’assurant
qu’il est bien dans l’axe de la proue.
2 – Marquer puis percer comme indiqué
sur la figure. Laisser des arêtes vives
dans les trous mais lisser la partie du
bord de la chaîne, en direction de la
proue, sur un angle de 45 °.
3 – Positionner soigneusement la partie
supérieure du guindeau sur le plancher.
4 – Brancher les câbles de la batterie sur
le moteur électrique.
Remarque:
Il est conseillé de sceller la base du
guindeau sur le plancher avec du
silicone.
3.6 Auf Deck Installation
1- Die Bohrschablone sorgfältig auf
dem Deck positionieren. Sicherstellen,
dass sie richtig auf den Bug
ausgerichtet ist.
2- Wie in der Abbildung gezeigt
markieren und bohren. Die Kanten der
Bohrungen scharf lassen. Die Kante des
Kettenlochs in Richtung Bug muss
hingegen im 45°-Winkel geglättet
werden.
3 - Das Oberteil der Ankerwinde
sorgfältig auf dem Deck positionieren.
4 – Die von der Batterie kommenden
Kabel an Elektromotor anschließen.
Anmerkung:
Der Sockel der Ankerwinde sollte auf
dem Deck mit Silikonkleber abgedichtet
werden.
3. Montaje en cubierta
1 - Coloque con cuidado la plantilla de
perforación en el puente, asegurándose
de la alineación correcta con la roda de
proa.
2 - Marque y perfore como indicado en
la figura. Deje vivas las aristas de los
orificios, mientras que la parte del borde
del orificio de la cadena en dirección de
la proa debe ser lijada con un ángulo de
45°.
3 - Coloque con cuidado la parte
superior del molinete en la cubierta.
4 – Conectar los cables provenientes de
la batería al motor eléctrico.
Nota:
Se aconseja sellar la base del molinete a
la cubierta con cola silicónica.
1
2
3
Lofrans'
Bekijk gratis de handleiding van Lofrans Kobra, stel vragen en lees de antwoorden op veelvoorkomende problemen, of gebruik onze assistent om sneller informatie in de handleiding te vinden of uitleg te krijgen over specifieke functies.
Productinformatie
| Merk | Lofrans |
| Model | Kobra |
| Categorie | Niet gecategoriseerd |
| Taal | Nederlands |
| Grootte | 9652 MB |


