Liberty Pumps ALM-PK handleiding
Handleiding
Je bekijkt pagina 3 van 6
2138000H Copyright © Liberty Pumps, Inc. 2023
All rights reserved. 3 | EN
Installation
Do not install this alarm system outdoors. The system is rated
for indoor use only.
Enclosure Installation
1. Select an indoor mounting location for the alarm unit. Liberty
Pumps recommends a location between 48 in (1.2 m) and
66 in (1.7 m) above floor level.
2. Using the supplied template on the rear cover of this manual,
mark screw locations on the mounting surface.
3. If the screw locations are not directly over a wall stud, or the
alarm will be mounted to a masonry wall, the use of the
supplied anchors is recommended. A 3/16” (5 mm) hole must
be drilled before inserting the anchor into the wall.
4. Mount the alarm enclosure to the wall using the supplied
anchors and screws as applicable.
Alarm Float Adapter
Alarm float adapters cannot be used with puddle sensors.
Do not cut the connector off a puddle sensor and wire it to the
float adapter. The sensor uses three wires for communication
and the float adapter has only two terminal blocks.
If your system already has an alarm
float installed, and you do not want
to replace it with the float included
with your Liberty Pumps ALM-Series
product, you can use the included terminal block adapter.
1. Turn both screws in the float adapter counterclockwise, until
the conductor receptacles are fully open.
2. Insert the float conductors into the float adapter, one
conductor per receptacle. Polarity does not matter.
3. Tighten the screws in the float adapter until they bottom out.
4. Insert the float adapter into the connector on your Liberty
Pumps ALM-Series alarm.
Sensor Installation
Sewage Pump Sensor
1. Place the float switch cord
into the clamp as shown.
2. Locate the clamp at the
desired activation level and
secure the clamp to the
pump discharge pipe.
Note: Do not install cord under hose clamp.
3. Tighten the hose clamp using a screwdriver. Over-tightening
may result in damage to the plastic clamp. Make sure the float
cable is not allowed to touch the excess hose clamp band
during operation.
Note: All hose clamp components are made of 18-8 stainless
steel. See your Liberty Pumps distributor for replacements.
4. Route the sensor cable out of the sewage pit and connect it to
the bottom of the alarm enclosure ensuring it does not
interfere with the operation of the primary pump’s float.
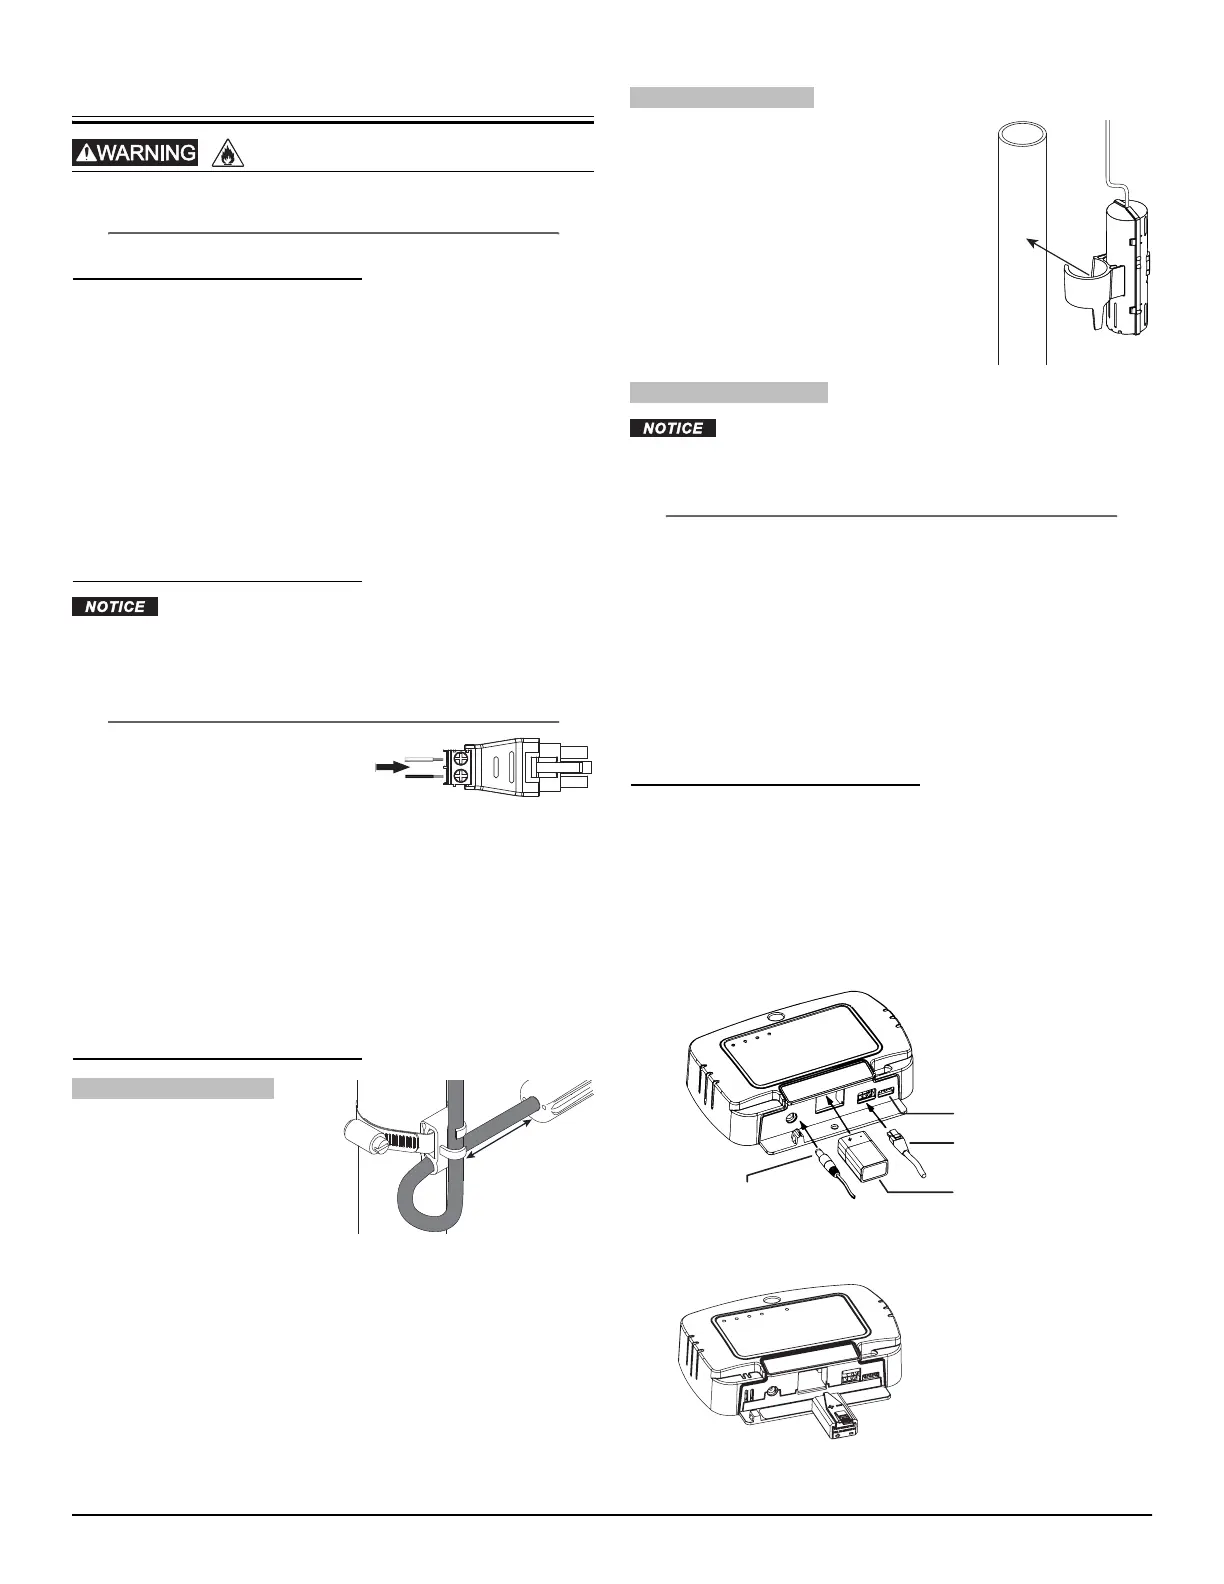
Sump Pump Sensor
1. Remove sump pump sensor from
packaging.
2. Apply a small amount of glue to the
inside of the snap feature of the sensor.
Note: Over-gluing the sensor will make
future removal very difficult.
3. Snap sensor over the discharge pipe of
your sump pump as shown.
4. Route the sensor cable out of the sump
pit and connect it to the bottom of the
alarm enclosure as shown in Figure 1.
Water Puddle Sensor
Do not cut the connector off a puddle sensor and wire it to the
float adapter. The sensor uses three wires for communication
and the float adapter has only two terminal blocks.
1. Remove the puddle sensor from its packaging.
2. Place sensor in the location susceptible to water intrusion or
buildup (example: under hot water heater, near laundry sink,
near problematic foundation wall, etc.).
3. Route water puck cable such that it will not pose a tripping
hazard.
4. Plug water puck cable into the ALM sensor connector.
5. Test water puck for operation by setting it in a small puddle or
by holding a damp towel on its bottom surface.
Connect Power
1. Connect the supplied power adapter to the alarm unit as
shown. Plug the power adapter into the wall receptacle and
verify that the green “power” indicator illuminates.
2. Install the 9V battery as shown. Paying attention to polarity,
the battery should gently push into place and latch on the
ledge at the bottom of the battery chamber.
Note: A 9V battery must be installed in the device at all times
to ensure proper operation.
Figure 1. Connection Locations on Bottom of Alarm Unit
Figure 2. 9V Battery Installation with Tray
RISK OF ELECTRIC SHOCK
3.5 inch (9 cm)
tether length
Auxiliary contacts
Sensor connector
9V batter
y
slotPower connector
Mid-December 2020
manufacture date
and newer
Bekijk gratis de handleiding van Liberty Pumps ALM-PK, stel vragen en lees de antwoorden op veelvoorkomende problemen, of gebruik onze assistent om sneller informatie in de handleiding te vinden of uitleg te krijgen over specifieke functies.
Productinformatie
| Merk | Liberty Pumps |
| Model | ALM-PK |
| Categorie | Niet gecategoriseerd |
| Taal | Nederlands |
| Grootte | 990 MB |


