Levenhuk Halo NVR50 handleiding
Handleiding
Je bekijkt pagina 5 van 47
5
Getting started
Install batteries
Open the battery compartment cover and insert the rechargeable batteries
according to the correct polarity symbols. Close the cover.
Rechargeable battery charging
• Connect the USB cable to the device and the DC adapter via a USB plug and
connect it to the AC power supply to charge the device; or
• Insert it into the battery charger according to the correct polarity symbols.
Connect the battery charger to the AC power supply, using the power cable
and power adapter. Prior to using the rechargeable battery for the first time,
charge it for at least 4 hours.
Button panel and device settings
Power button
Button functions: 1) turns the device on/off; 2) сonfirms the selection;
3) starts and stops video recording in the Video mode; 4) starts or stops the video
playback in the Playback mode.
Press and hold the power button for 3 seconds to turn the device on or off.
!
As the device has no exit pupil distance (eye relief), keep your eyes at
a distance of 3in (8cm) from the screen.
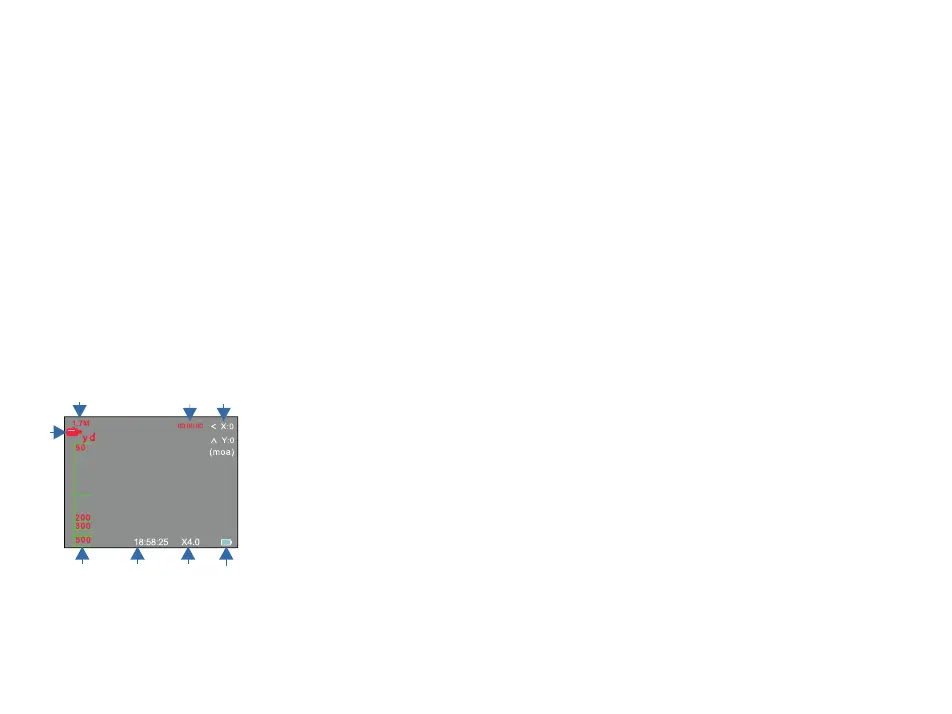
1. Video recording status
2. Distance range (yards)
3. Time
4. Digital magnication
5. Battery status
6. Coordinates of the center of the
reticle
7. Video recording time
Recording a video
Press the power button to start recording a video, and then press again to stop
the video recording. Select the Video segment time (Video duration) option in the
menu, then you can set the video length, select the audio recording option (on or
off), select the date stamp option (on or off).
Color mode
The default color mode is the color mode. If you use the device at night, take o
the objective lens cover with the IR lter and switch on the IR torch, the deafualt
night color mode is black-and-white; you can switch the night color mode to
black-and-brown (sepia) or black-and-green color mode in the menu.
!
IR illumination (infrared radiation) can be detected by photo and video
cameras as well as other similar electronic devices during operation.
Right button
Button functions: 1) enters and exits the menu; 2) scrolls the menu down;
3) adjusts the zoom; 4) plays the video forward in the playback mode.
Select the Playback option in the menu; press and hold the Right button to enter
the menu.
Menu options:
1. Reticle type (Reticle type)
2. Playback (Playback)
3. Color (Color mode)
4. Unit switch (Unit of measurement: MIL/MOA)
5. Ranging (Target ranging)
6. Video split time (Video length)
7. Video audio (Audio recording option)
8. Date stamp (Date stamp)
9. Auto power (Auto-off)
10. Language settings (Language settings)
11. 1Screen brightness (Screen backlight)
12. 1Date/time (Date/time)
13. 1Format (Memory formatting)
14. 1Default setting (Default setting)
15. 1Firmware (Software version)
Playback
Select the Playback option in the menu. Press and hold the Right button to
view the files. Select a file to playback. Press and hold the Left button to enter
the playback submenu, you can delete and protect the files or switch on the
slideshow.
Le button
Button functions: 1) enters the Ballistic Data Computer / Crosshair adjustment
mode; 2) scrolls the menu up; 3) rewinds the video in the playback mode.
1
2 3 4
7
8
5
6
Bekijk gratis de handleiding van Levenhuk Halo NVR50, stel vragen en lees de antwoorden op veelvoorkomende problemen, of gebruik onze assistent om sneller informatie in de handleiding te vinden of uitleg te krijgen over specifieke functies.
Productinformatie
| Merk | Levenhuk |
| Model | Halo NVR50 |
| Categorie | Niet gecategoriseerd |
| Taal | Nederlands |
| Grootte | 4945 MB |


