Kichler Spyn Lite handleiding
Handleiding
Je bekijkt pagina 9 van 57
952" Spyn Lite
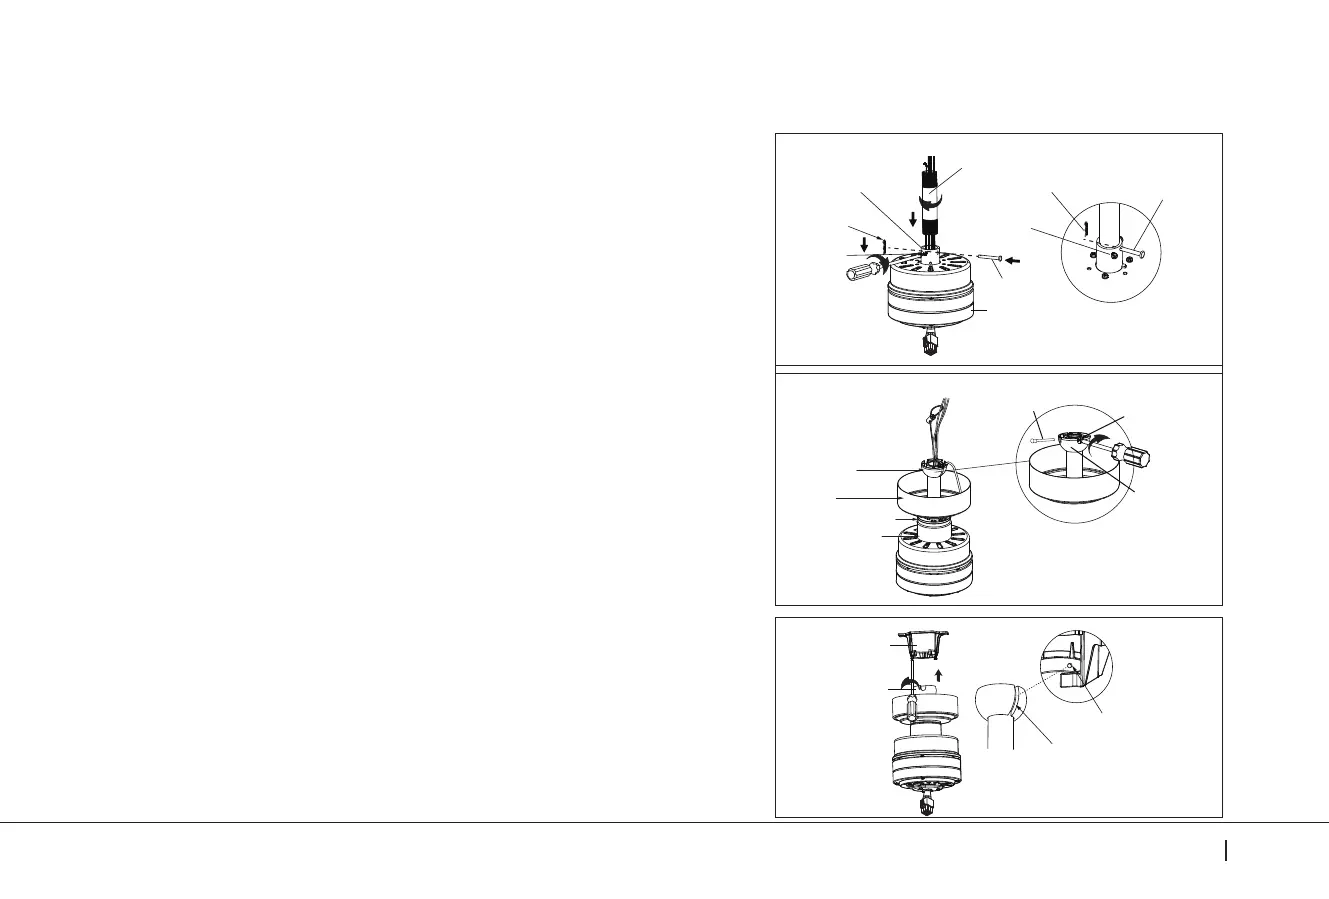
HANGING THE FAN (CONTINUED)
Step 4. Carefully feed fan wires and safety cable up through the
downrod. Thread the downrod into the motor coupling until the
hitch pin holes are aligned. Next, replace the hitch pin and
retaining clip.
NOTE: Be careful not to jam the hitch pin against the
wiring inside of the downrod.Tighten both set screws.
(Fig. 8)
Step 5. Slip the coupling cover, canopy trim ring (smooth finished
side facing motor body) and canopy onto the downrod. Carefully
reinstall the hanger ball onto the downrod. Carefully reinstall the
cross pin through the hanger ball and downrod.
NOTE: Be careful not to jam the cross pin against the
wiring inside of the downrod.
Make sure the cross pin is in the correct position. Tighten the cross
pin. Tighten the set screw on the hanger ball. Make sure the wires
are not twisted. (Fig. 9)
Step 6. Lift the motor body into position and place the hanger ball
into the mounting bracket. Rotate the entire assembly until the “
Check Tab” has dropped into the “Registration Slot” and seats
firmly. (Fig. 10)
The entire motor body should not rotate if this is done correctly.
WARNING: Failure to reattach the cross pin and seat the “Check Tab” can
cause the fan to fall from the ceiling during operation. Take special care to
make sure this pin is reattached.
Fig. 9
Fig. 8
Fig. 10
Hanger Ball
Check Tab
Registration Slot
Mounting Bracket
Set Screw
Set Screw
Hitch Pin
Motor Body
Hitch Pin
Retaining Clip
Retaining Clip
Downrod
Hanger Ball
Canopy
Canopy Trim Ring
Coupling Cover
Hanger Ball
Set Screw
Cross Pin
Motor Coupling
Bekijk gratis de handleiding van Kichler Spyn Lite, stel vragen en lees de antwoorden op veelvoorkomende problemen, of gebruik onze assistent om sneller informatie in de handleiding te vinden of uitleg te krijgen over specifieke functies.
Productinformatie
| Merk | Kichler |
| Model | Spyn Lite |
| Categorie | Ventilator |
| Taal | Nederlands |
| Grootte | 4203 MB |


