Kichler Spyn Lite handleiding
Handleiding
Je bekijkt pagina 12 van 57
KICHLER.COM12
FINISHING THE INSTALLATION
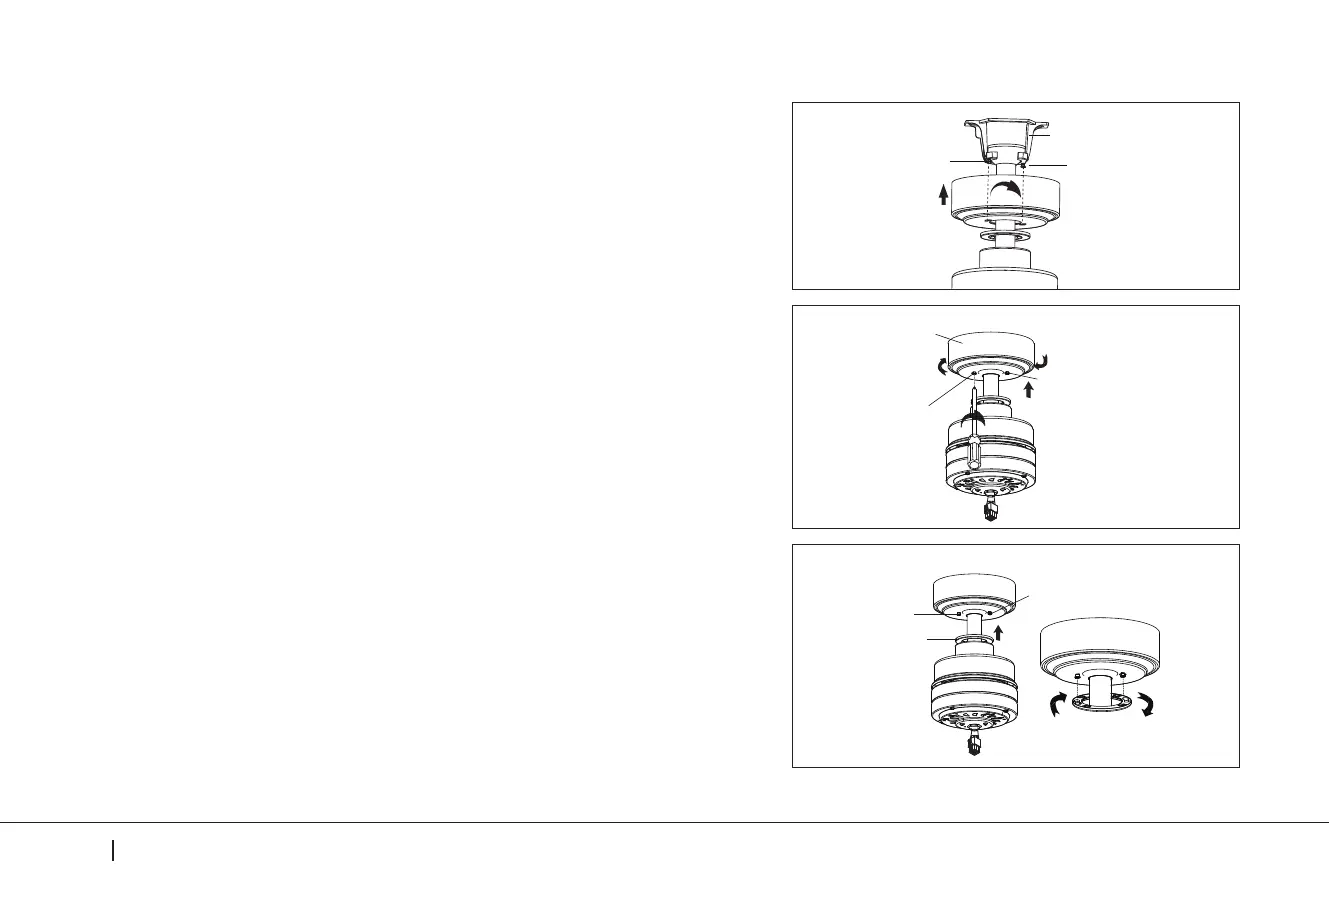
Fig. 14
Fig. 15
Fig. 16
Mounting Bracket
Shoulder Screw
Shoulder Screw
CAUTION: Before continuing installation, confirm that the
power is still turned o at the main circuit breaker or by
removing the circuit fuse. Turning the power o using a
wall switch is not sucient to prevent electrical shock.
NOTE: Adjust the shoulder screws as necessary until the canopy and
canopy trim ring are snug.
(Fig. 16)
Step 1. Loosen the two shoulder screws at the bottom of the
mounting bracket.(do not remove). (Fig. 14)
Step 3. Raise the canopy trim ring to the canopy. Place the key hole slots
in the canopy trim ring over the heads of the shoulder screws. Rotate the
canopy trim ring (clockwise) until it locks in place against the shoulder
screws (at the narrow ends of the key hole slots). (Fig. 16)
Step 2. Raise the canopy to the mounting bracket. Place the key hole
slots in the canopy over the shoulder screws in the mounting bracket.
Rotate the canopy (clockwise) until the canopy locks in place against
the shoulder screws (at the narrow ends of the key hole slots).
Tighten the two shoulder screws to secure the canopy in place. (Fig. 15)
WARNING: Make sure the "Check Tab" at the bottom of the ceiling mounting
bracket is properly seated in the "Registration Slot" on the side of the hanger ball
before attaching the canopy to the ceiling mounting bracket.
Canopy
Shoulder Screw
Shoulder Screw
Shoulder Screw
Canopy Trim Ring
Shoulder Screw
Bekijk gratis de handleiding van Kichler Spyn Lite, stel vragen en lees de antwoorden op veelvoorkomende problemen, of gebruik onze assistent om sneller informatie in de handleiding te vinden of uitleg te krijgen over specifieke functies.
Productinformatie
| Merk | Kichler |
| Model | Spyn Lite |
| Categorie | Ventilator |
| Taal | Nederlands |
| Grootte | 4203 MB |


