Juki MF-3580 handleiding
Handleiding
Je bekijkt pagina 96 van 440
! 24 !
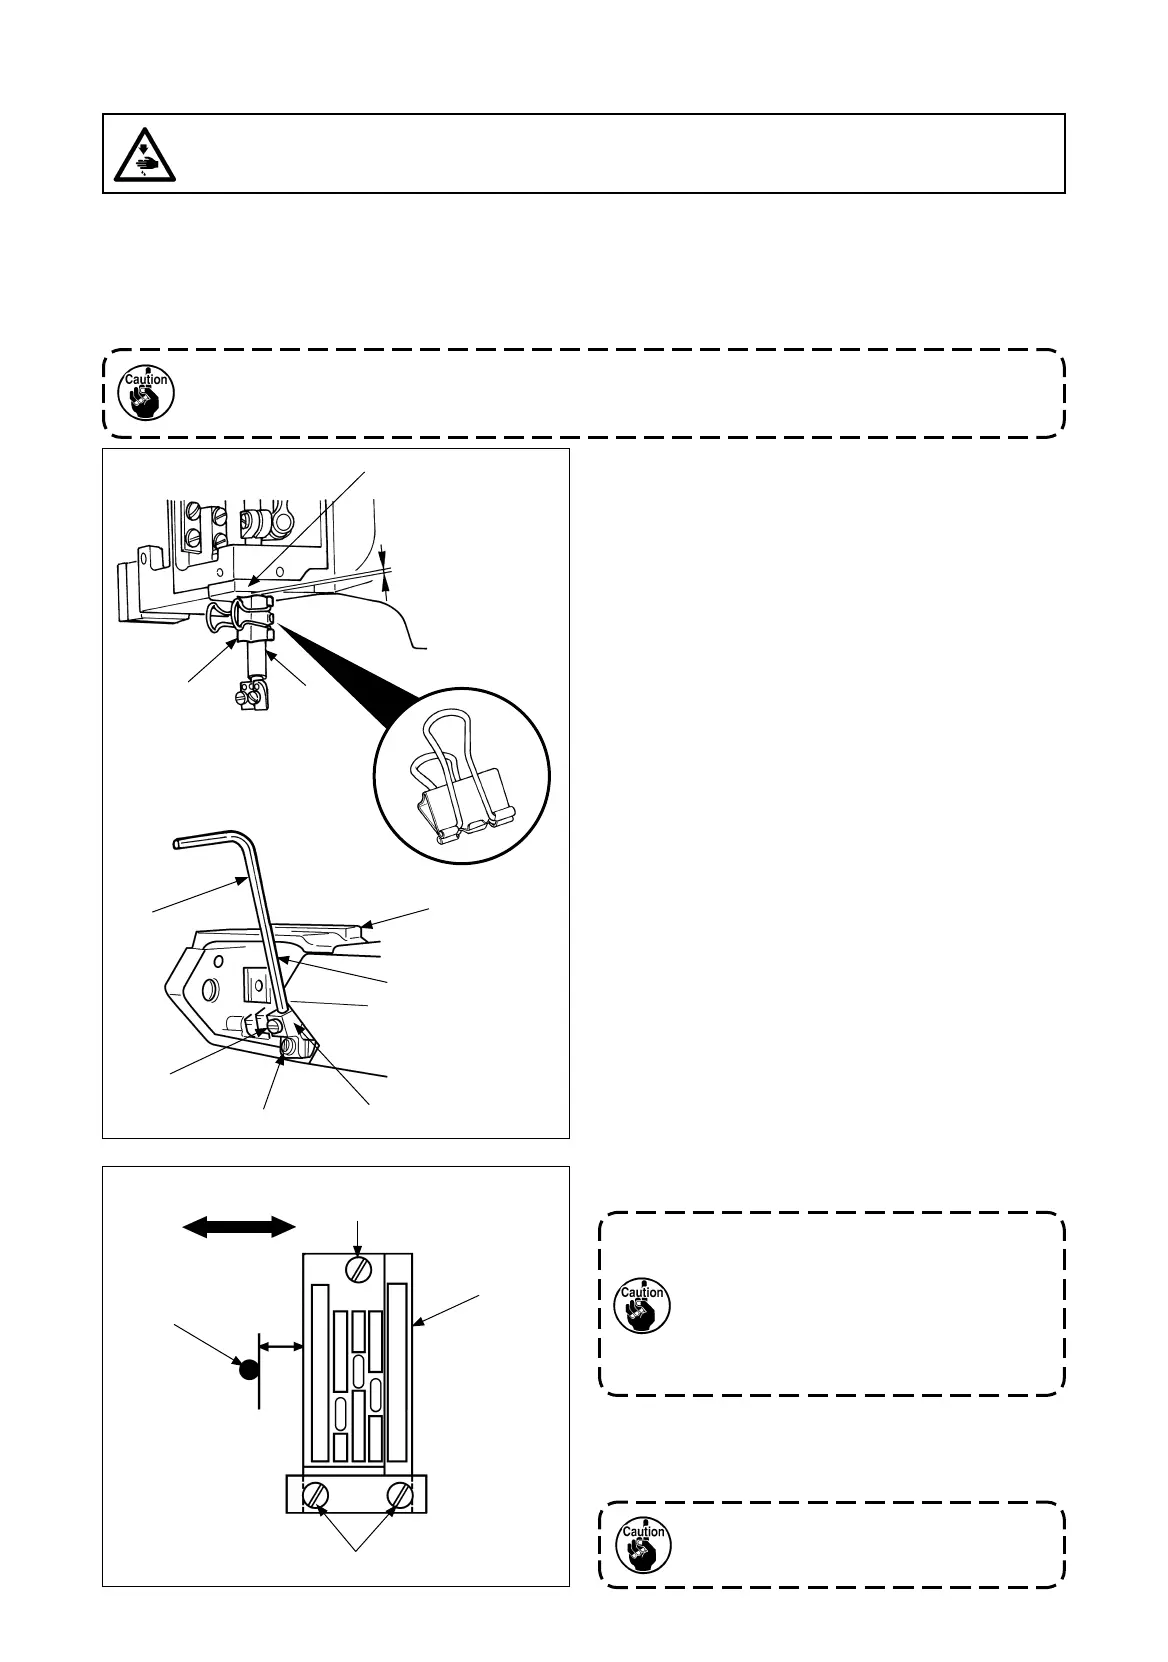
2. Timing between the looper and needle bar
(1) Timing between the looper and needle bar (synchronization)
Gauge components are mounted to perform synchronization adjustment.
The standard position is that there is no clearance between the bottom surface of lower needle bar bushing
3
and the
top surface of clip
4
when hexagonal wrench key (3 mm)
1
touches throat plate
2
by rotating the handwheel in the
normal and reverse directions, (Be sure to rotate the handwheel in both directions to check the clearance.) The allowable
clearance range is from 0 to 0.1 mm.
The allowable clearance between the hexagonal wrench key (3 mm)
1
and the throat plate
2
ranges
from 0 to 0.1mm when the bottom surface of the lower needle bar bushing
3
touches the top surface
of the timing gauge
4
ahead of the other touch by rotating the pulley in both directions.
(2) Installing and adjustment procedure of the
hexagonal wrench key and clip
1) Insert hexagonal wrench key (3 mm)
1
into front
looper base
5
and tighten setscrew
6
.
2) Slightly loosen setscrew
7
. Move looper base
5
into
which the hexagon wrench key (3 mm)
1
has been
inserted until its leftmost point is reached.
3) Install throat plate
2
and tighten setscrew
8
.
4) Turn the pulley to bring hexagonal wrench key (3
mm)
1
to the leftmost point. Adjust the clearance
measured from the right side face of the pulley to
the left side face of throat plate
2
to 9 mm. Then,
temporarily tighten setscrew
7
in looper base
5
.
Further adjust the base to the correct position and
securely tighten the setscrew.
5) Rotate the handwheel counterclockwise and stop it at
the position where hexagonal wrench key (3 mm)
1
touches the left surface of throat plate
2
.
6) Attach clip
4
to needle bar
9
.
*
Attach a commercially-available alligator clip (small)
with its upper face aligned with the mark-off line.
Attach clip
4
so that the top surface of clip
4
touches
the bottom surface of lower needle bar bushing
3
.
7) When the handwheel is rotated clockwise, hexagonal
wrench key (3 mm)
1
moves to the right and left.
Touch the hexagonal wrench key with the left surface
of throat plate
2
again.
At this moment, make sure that the clearance
between the bottom surface of lower needle bar
bushing
3
and the top surface of clip
4
is within the
allowable range.
The bottom surface of lower needle bar
bushing
3
may touch the top surface of
clip
4
ahead of the other touch, in such
a case, make sure that the clearance of
the touching position between hexagonal
wrench key (3 mm)
1
and throat plate
2
is
within the allowable range.
Clearance at
rotation in both
directions :
0 to 0.1mm
Position where
hexagonal wrench
key (3 mm)
1
touches throat
plate
2
WARNING :
Perform the work after turning OFF the power to prevent accidents caused by the abrupt start of the
sewing machine.
8) If the timing between the looper (hexagonal wrench
key (3 mm)
1
) and needle bar
9
is inappropriate,
follow the procedure below.
Right-left direction
9mm
Improper synchronization position
adjustment may cause stitch skipping or
thread breakage.
1
8
2
8
4
9
3
1
6
7
2
5
Bekijk gratis de handleiding van Juki MF-3580, stel vragen en lees de antwoorden op veelvoorkomende problemen, of gebruik onze assistent om sneller informatie in de handleiding te vinden of uitleg te krijgen over specifieke functies.
Productinformatie
| Merk | Juki |
| Model | MF-3580 |
| Categorie | Naaimachine |
| Taal | Nederlands |
| Grootte | 79694 MB |


